
[fusion_builder_container hundred_percent=”no” equal_height_columns=”no” menu_anchor=”” hide_on_mobile=”small-visibility,medium-visibility,large-visibility” class=”” id=”” background_color=”” background_image=”” background_position=”center center” background_repeat=”no-repeat” fade=”no” background_parallax=”none” parallax_speed=”0.3″ video_mp4=”” video_webm=”” video_ogv=”” video_url=”” video_aspect_ratio=”16:9″ video_loop=”yes” video_mute=”yes” overlay_color=”” video_preview_image=”” border_size=”” border_color=”” border_style=”solid” padding_top=”” padding_bottom=”” padding_left=”” padding_right=””][fusion_builder_row][fusion_builder_column type=”1_1″ layout=”1_1″ background_position=”left top” background_color=”” border_size=”” border_color=”” border_style=”solid” border_position=”all” spacing=”yes” background_image=”” background_repeat=”no-repeat” padding_top=”” padding_right=”” padding_bottom=”” padding_left=”” margin_top=”0px” margin_bottom=”0px” class=”” id=”” animation_type=”” animation_speed=”0.3″ animation_direction=”left” hide_on_mobile=”small-visibility,medium-visibility,large-visibility” center_content=”no” last=”no” min_height=”” hover_type=”none” link=””][fusion_text columns=”” column_min_width=”” column_spacing=”” rule_style=”default” rule_size=”” rule_color=”” class=”blog-14″ id=””]Looking to boost your rankings and increase traffic?! Then Google Search Console (GSC) is a must-have addition to your SEO arsenal.
GSC is a free, yet pretty powerful tool – You can analyze search traffic data, fix errors, improve performance and so much more…
Despite this, it’s still a great unknown for a lot of SEO beginners and even some pros.
Fret not, in this article I’ll show you 12 ways to harness the full power of GSC and supercharge your SEO.
Table of Contents
How to set up Google Search Console
First thing’s first, you need to verify your website in Google Search Console.
Log into your Google Search Console account, navigate to “Search Property” (1) and click on the “Add A Property” button (2).
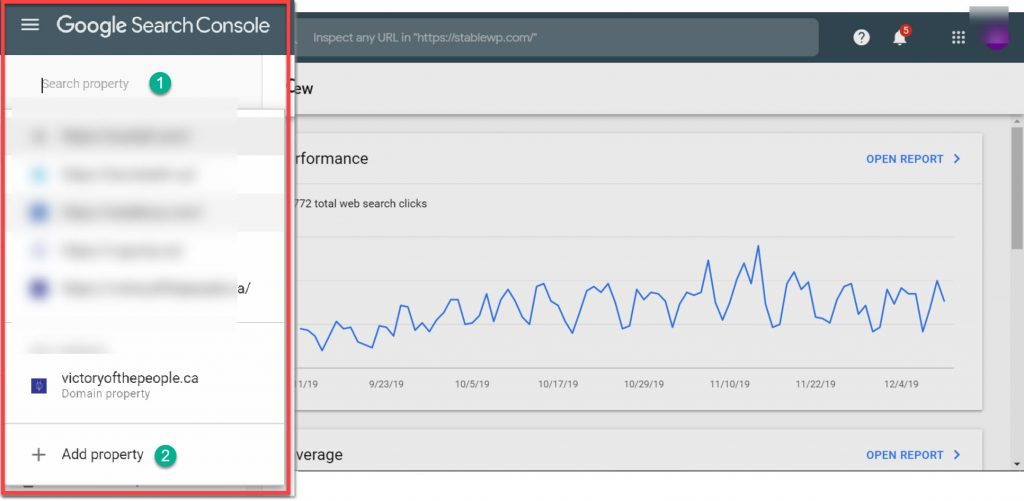
Notice how Google uses the term “property” and not website. It’s because you can use the Search Console not only for your site but also for your mobile app. You can find the same term used in Google Analytics.
GSC now allows you to verify your entire domain (including all versions like http, https, www, non-www, etc.) or verify only a single version of your site.
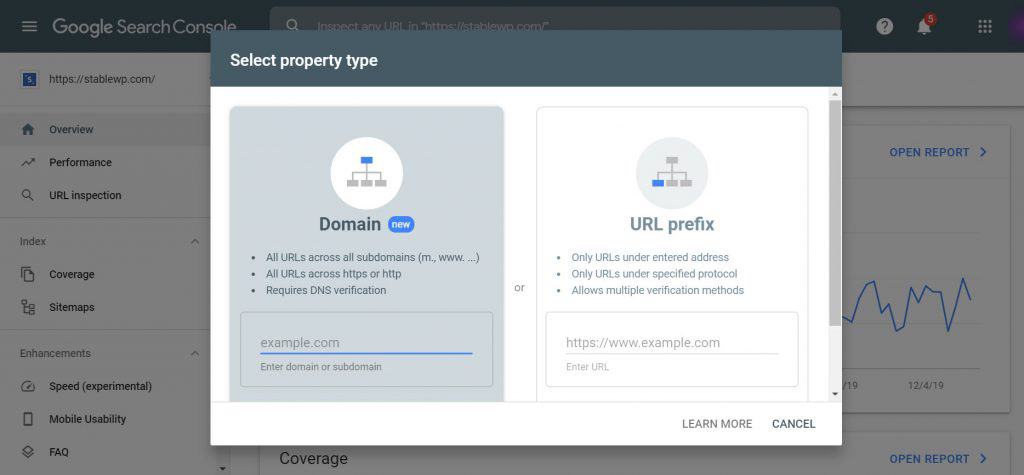
I’d recommend using the “Domain” option as this will allow you to track SEO performance and issues across your entire property. Makes your SEO life that much easier.
Enter your entire domain name without any protocols (https://) or paths (/). Once complete, click on the “Continue” button and proceed to verification.
This method will require access to your site’s DNS record.
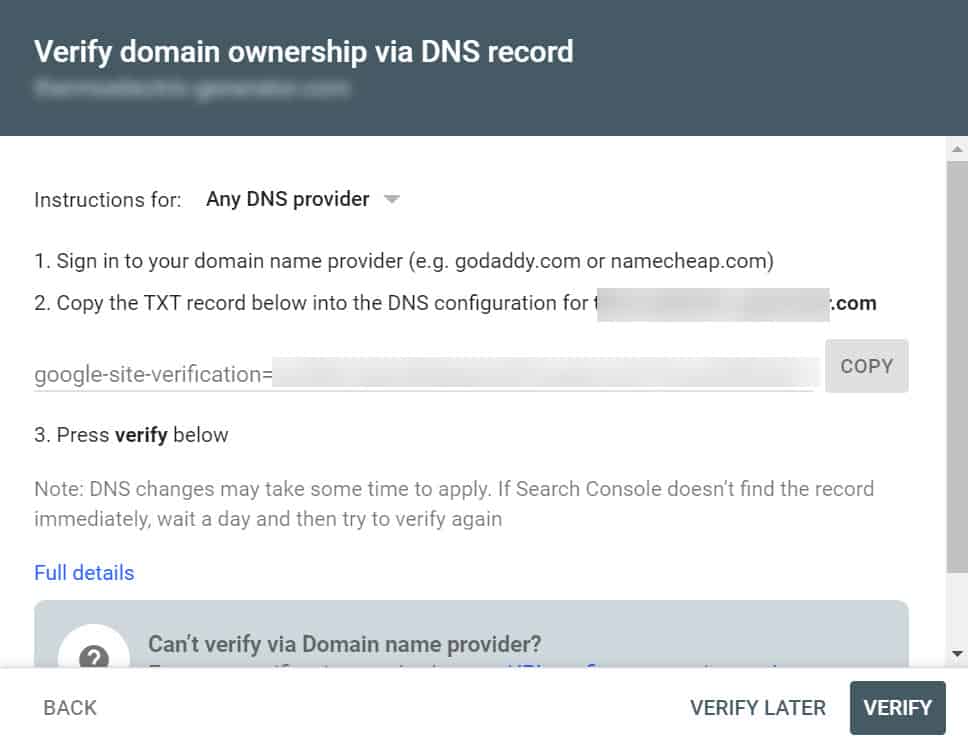
Sign in to your domain name provider (e.g. GoDaddy, Namecheap, etc.) and copy/paste the TXT record into the DNS configuration.
Finally, hit the “Verify” button and you’re done.
If you don’t have access to your DNS config or if this is too complicated, you can go with the other option – verify a URL prefix.
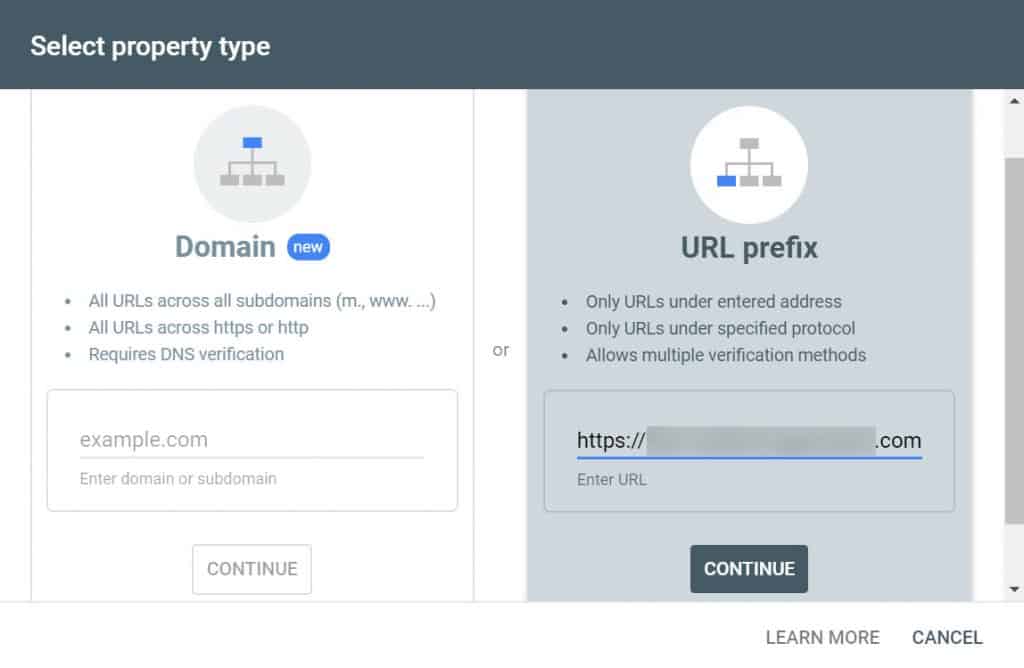
In this case, make sure to enter the domain along with the correct version of your site (e.g. https://) that you want to track.
Once you’re done, click on the “Continue” button and you’ll be greeted by several verification options.
Google’s recommended method of verification is using the HTML file upload. You need to download the HTML verification file and then upload it to your root domain, which requires access to your server through FTP or cPanel File Manager.
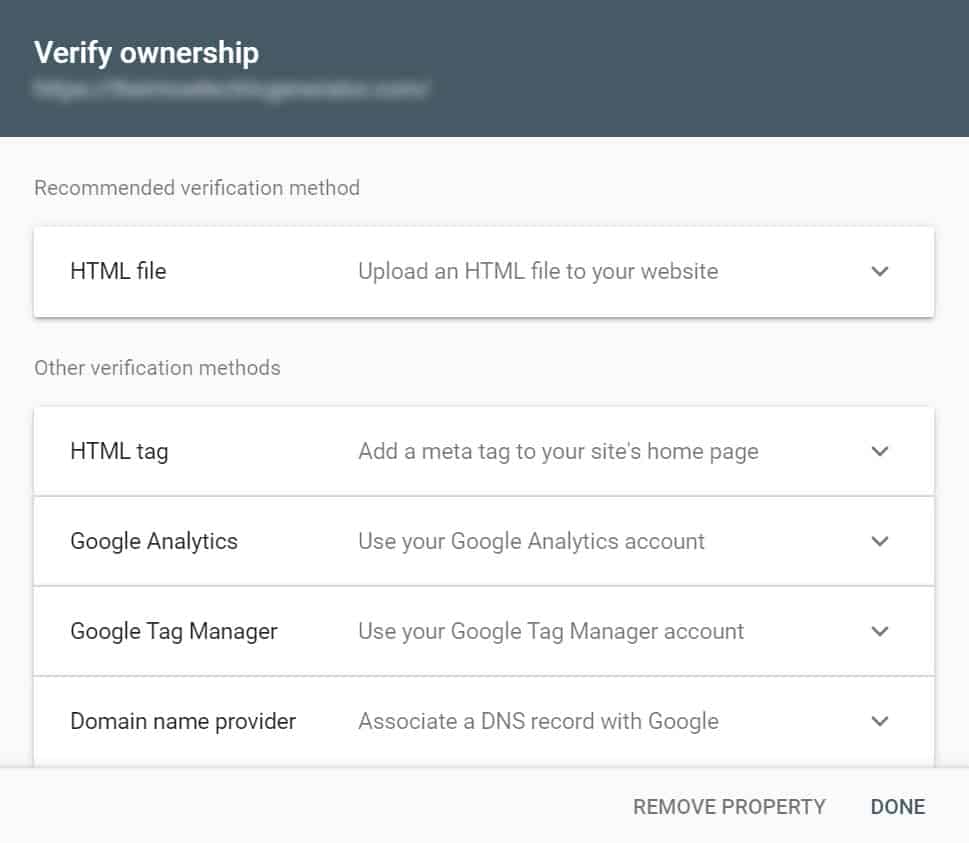
If you’re not comfortable uploading files directly to your server and messing with your root domain, there are simpler alternate methods available.
You can:
- Insert an HTML meta tag to your site’s home page
- Add DNS text record
- Connect with your Google Analytics account
- Use Google Tag Manager to verify your GSC property
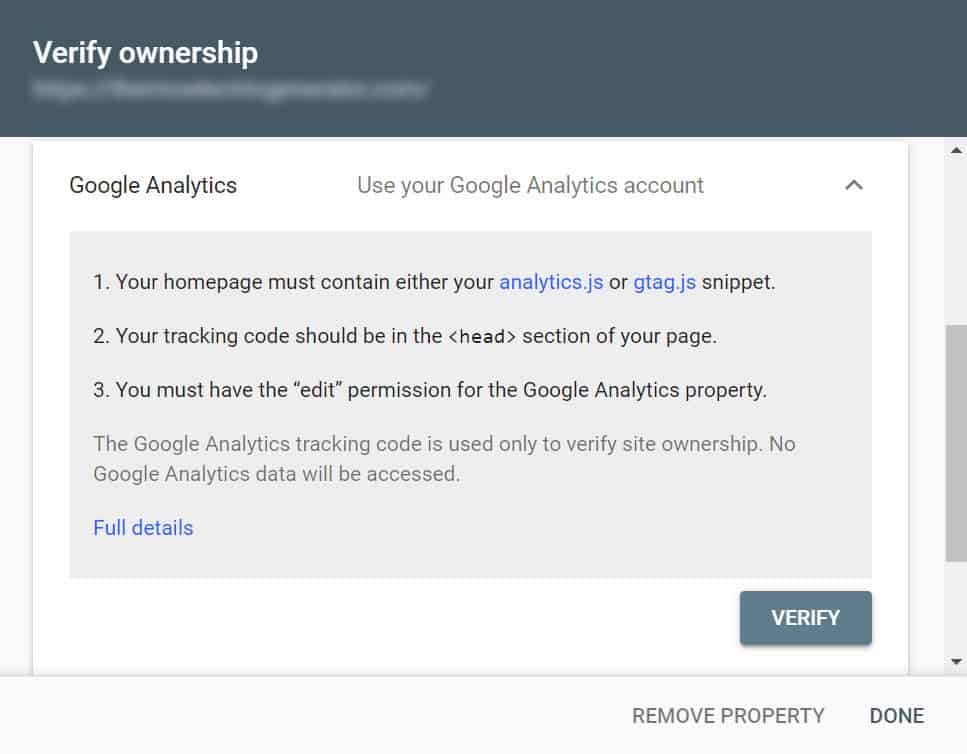
By far the simplest method is using Google Analytics if you have already installed it on your website. If not, you can check out this free guide on how to set up and use Google Analytics.
Select Google Analytics and click on verify. GSC will guide you through the next few steps, so follow their instructions and you’ll be done in no time.
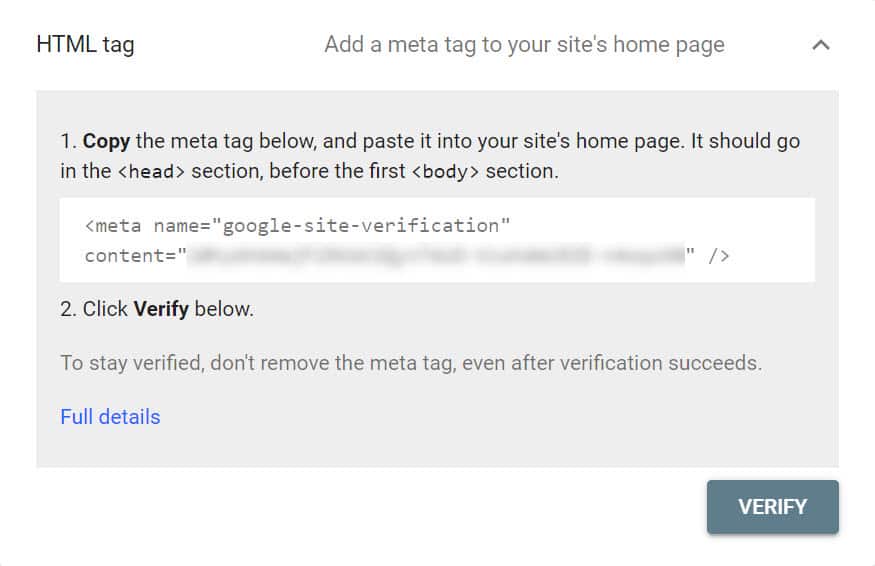
If you’re using a WordPress website, I’d recommend the HTML tag method because you can verify your Google Search Console using a WP plugin.
Select the HTML tag option, then copy the meta tag from the box below.
There are many plugins you can use to verify your Search Console, like Yoast SEO and All-in-One SEO Pack. You can also add the verification code to your headers using Insert Headers and Footers plugin.
If you’re using the Yoast SEO plugin, simply paste this code into your Yoast settings. Navigate to Webmasters Tools within General settings, then paste the code in the Google verification code box.
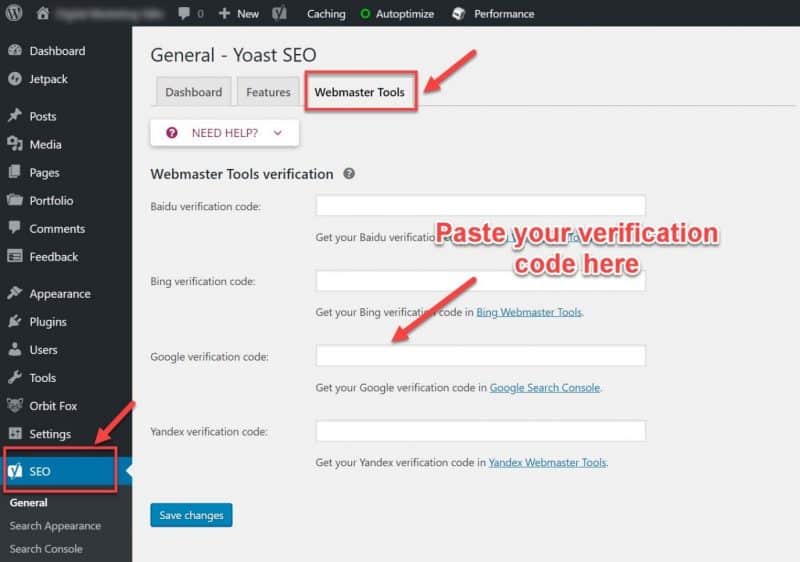
You can paste the entire meta tag in the box, and Yoast SEO will automatically strip it down leaving just the necessary code.
Once you’re done, you can access your Google Search Console dashboard, with all its reports and tools.
Google Search Console only collects data from the moment you set it up, so the earlier you implement this, the better. Of course, the ideal time would be as soon as you launch your website!
Now, that we got that out of the way, let me show you why you need GSC and how it can bolster your SEO.
12 ways to supercharge your SEO using Google Search Console
As I mentioned earlier, Google Search Console is a must-have tool for anyone taking SEO seriously. It’s especially useful when running a full SEO audit.
Still, many webmasters don’t know how to take full advantage of this powerful tool. Most people think it’s only used for tracking errors and fixing issues with your site.
Actually, GSC is much more than this. Besides monitoring performance, it’s a great tool to help you optimize your site and find new opportunities to grow your traffic.
With that said, here are the 12 ways you can use GSC to supercharge your SEO and jack up your traffic.
1. Set international targeting for your site
If you have a local business or service only some countries, you can use GSC to set which country or language should be prioritized for your search results.
This kind of geotargeting helps Google determine how and when it displays your site in search results. It also improves results related to geographic queries and gives you better chances of ranking for relevant searches.
As of (Dec) 2019, this feature is only available in the legacy GSC interface. To access it navigate to the “Legacy Tools and Reports” section on the left-hand side menu and select “International Targeting.”
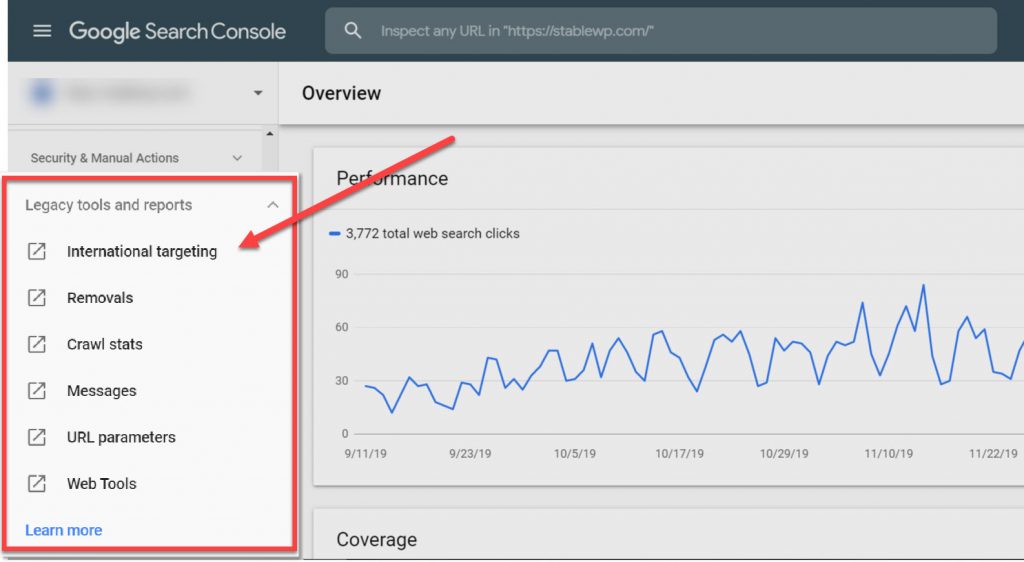
This will open the legacy GSC tool where you can set your geo-targeting.
You may want to set your targeting if you’re servicing a specific geographical area. This is especially important if you’re using geography-neutral domain extensions such as .com, .net or .org.
For example: If you run a business that only sells or service customers in Canada, and you have a domain name that ends with a .com, you should set international targeting to Canada.

The languages tab shows a report of errors if you have multiple language versions of your site for each country you’re targeting.
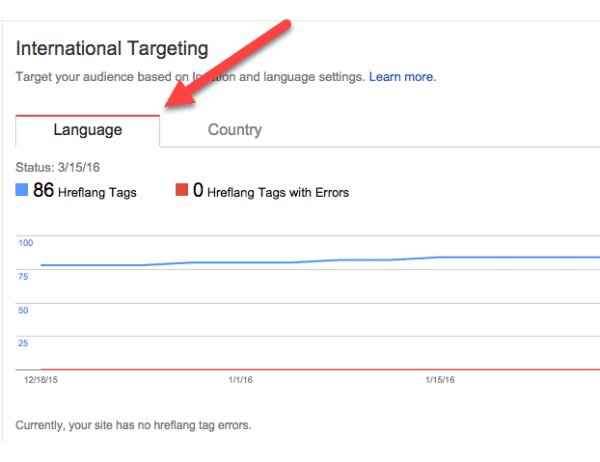
For instance, a website in Canada might want to create a translated version for French-speaking customers.
To target specific languages with your site you need to add hrefslang tag that tells Google which version of the site should be served based on visitor’s location.
Check for errors and fix them, so your site is displayed properly for each geographic location.
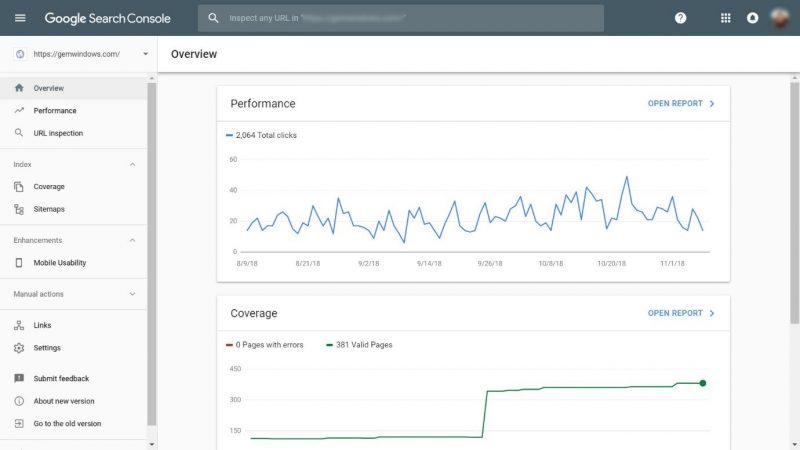
2. Get more organic traffic with performance reports
A major reason why you need Google Search Console is that it’s the only tool that can give you accurate search performance data.
What is search performance?
Search performance allows you to monitor pages and keywords that your website ranks for in Google. You can track the number of clicks, impressions, average click-through rates (CTR) and average position of your site in search results.
There’s even more, you can check the countries you rank in the most, devices (which we’ll get to later) as well as search appearance.
Performance reports are available on the left-hand side menu of the Google Search Console.
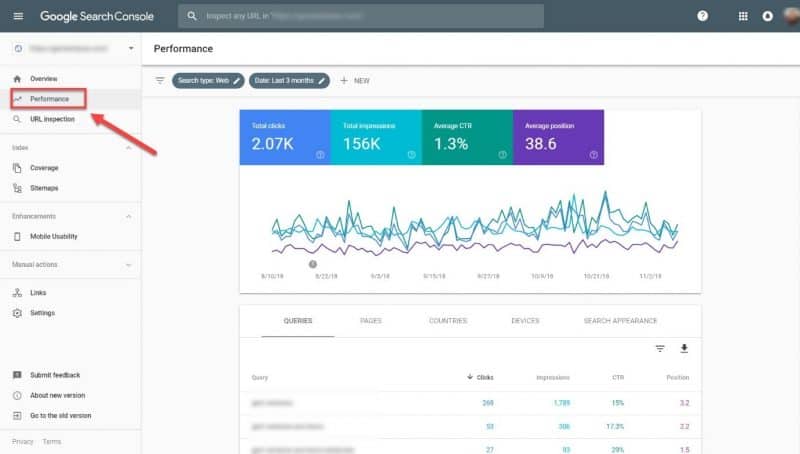
Visual elements with different colours and better design make it easy to pick exactly what data you want to monitor.
Also, the new version allows you to track data for the last 16 months, compared to the old GSC where you could see data as far as only 90 days.
And take it from an SEO expert – more data allows for better optimization!
That’s why l strongly recommend using the new version to track performance.
Now, you may be thinking: “How do I get more traffic based on past search performance?!”
There are a couple of ways in which you can boost traffic with Google Search Console performance report.
a) Increase CTR to boost traffic with performance reports
CTR has a massive impact on both your ranking and your traffic.
Google uses ‘click-through rate’ (CTR) as a key ranking signal for high value, engaging content.
The higher your CTR, the higher the perceived value of your content is, in the eyes of Google. Your website will be pushed upwards in the search results, meaning greater visibility for your site and increased traffic.
More directly, larger click numbers mean you get more traffic. Which is the end goal of SEO, isn’t it!?
Now let me show you how to boost your CTR with GSC performance reports.
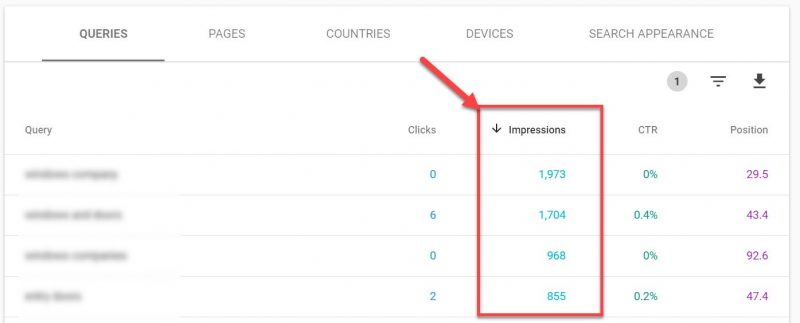
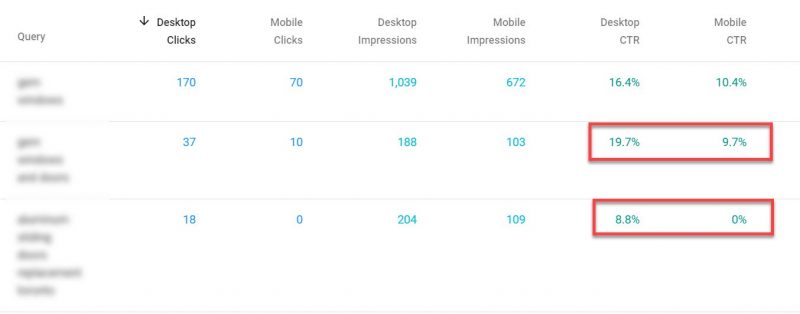
You want to identify search terms you rank for, but aren’t getting enough clicks.
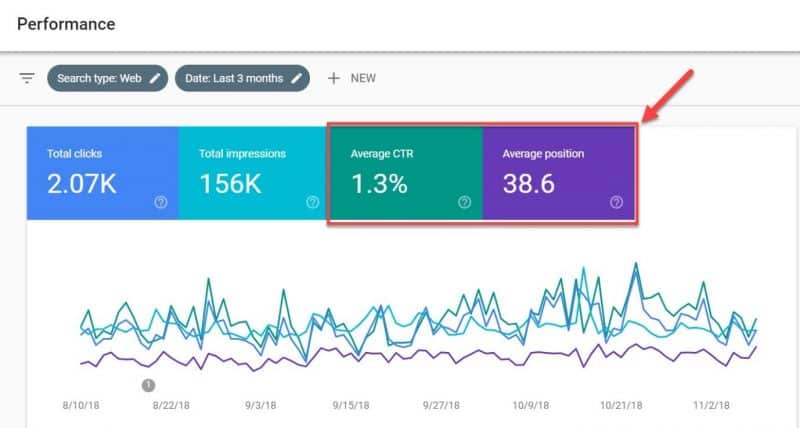
To do so, highlight the “Average CTR” and “Average Position” in the performance report.
You can use the Advanced Web Rankings tool to figure out the average CTR for each position in the search rankings.
For example, #5 position gets on average a 4.04 CTR on desktop and 4.22 on mobile.
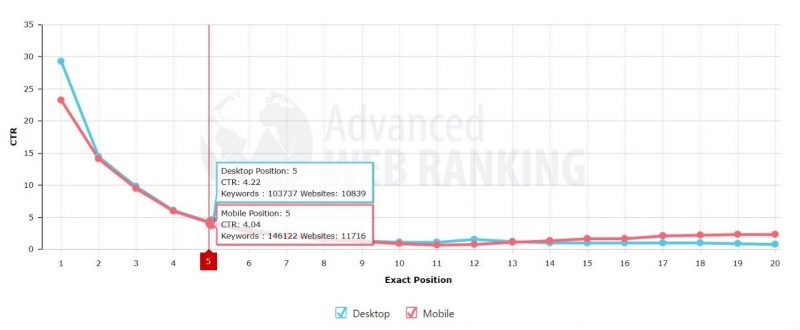
Pages that are ranking on spots between 5-10 are a great opportunity, you just need to bump up your CTRs, and you’ll get higher rankings and more traffic.
Now you need to filter out all the pages you’re ranking on 1-4 position. Add a position filter and set it to display position that is greater 4.9 (5 and above).
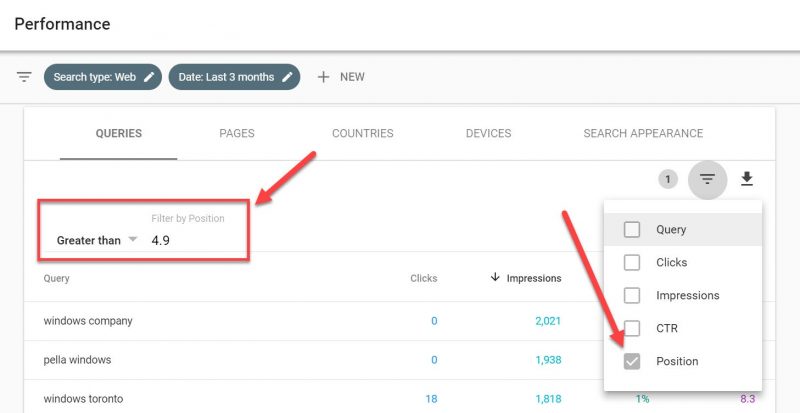
Then apply another filter to surface only pages that have a CTR lower than the average (4.04) for that position.
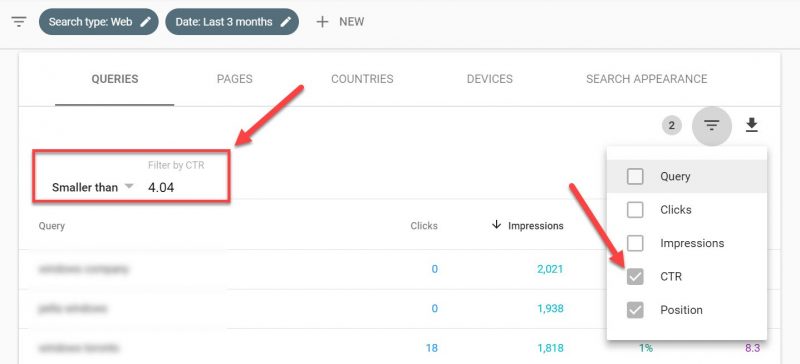
You will get a list of keywords you rank for but aren’t getting enough clicks. These are prime targets for you to improve their CTRs and get more traffic.
![]()
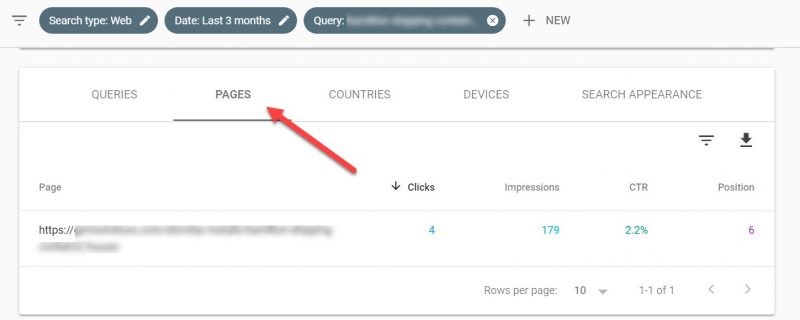
To find underperforming pages (those with low CTR), click on the keyword and switch to the “Pages” tab.
Once you’ve identified the page, you can start optimizing it for more clicks. You can boost your CTRs by:
- Crafting better Title Tags – Write headlines that are attractive, make readers curious, include numbers, parenthesis and other elements that garner more views.
- Optimizing your Meta Descriptions – When writing Meta tags, ask yourself “Why should someone click on my page and not some other in the SERP”.
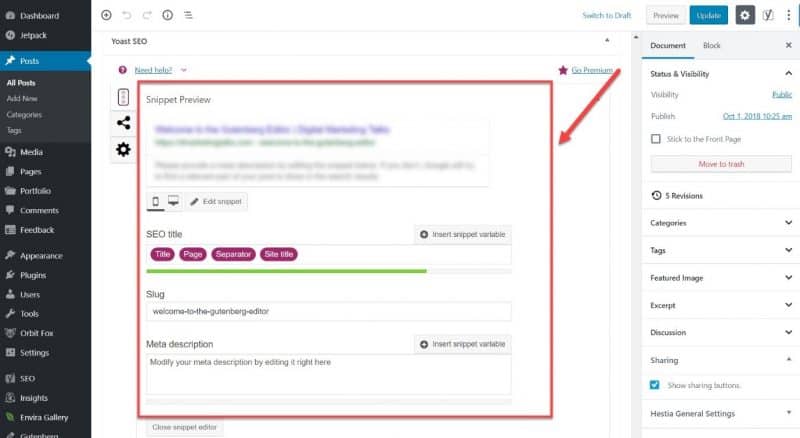
You can easily edit your Title Tags and Meta Descriptions with Yoast SEO plugin. Just navigate to the Meta Box at the end of each page and modify tags and descriptions in your snipped editor.
Learn more about this plugin and how to use it in our comprehensive Yoast SEO guide.
After you’re done optimizing, come back in two weeks and check on your performance.
b) Surface opportunity keywords to rank for
Don’t neglect other keywords, even those you don’t rank high for. I’m talking about queries that you stand between 10-20 positions in Google search results.
These are great opportunity keywords because you’re already ranking for them and Google already considers your site as a good source of information on that topic.
Just create awesome, detailed content, and you’ll soar to the top page of SERP in no time.
Again, set a position filter, only this time set it to greater than 9.9, so it displays positions from 10 and lower.
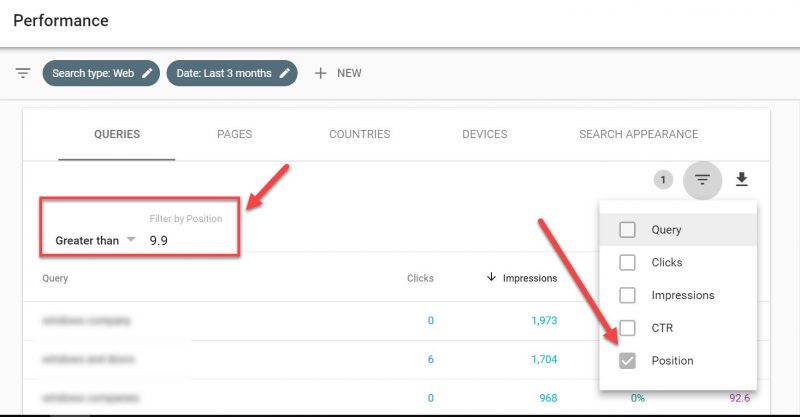
Sort your results by impressions, to see keywords with high visibility. It means these are popular search queries on Google.
To make this tactic even more effective, you can research your competition and see what it takes to outrank them.
Climb the rankings with insane, detailed articles that cover the topic from end to end. You can also consider interlinking with your other, more successful content to spread out those link juices.
You’ll see a climb in rankings and a surge in traffic from these keywords within weeks.
3. Submit your XML sitemaps – a key part of technical SEO
Everyone that knows a thing or two about technical SEO understands that sitemaps are a critical step towards the indexation of each page on a website.
XML sitemaps inform Google about URLs on your site that are available and ready for crawling.
In most cases, Google crawl spiders are able to find and index your site on their own, even without sitemaps. However, you want to do everything you can to make sure this process is done correctly, and all your pages get indexed.
Submitting a sitemap will also help Google index your site much faster.
It’s a common misconception that only large websites, like e-commerce stores, need sitemaps because they can have hundreds if not thousands of pages.
However, new websites that don’t have many backlinks can also benefit from sitemaps, because Google might not be able to discover your pages if no one links back to them.
Don’t worry if you’re not a developer and don’t know how to create XML sitemaps, Yoast SEO plugin comes to the rescue again.
Find the XML sitemaps feature in your Yoast plugin, General Settings and toggle this feature to “On”.
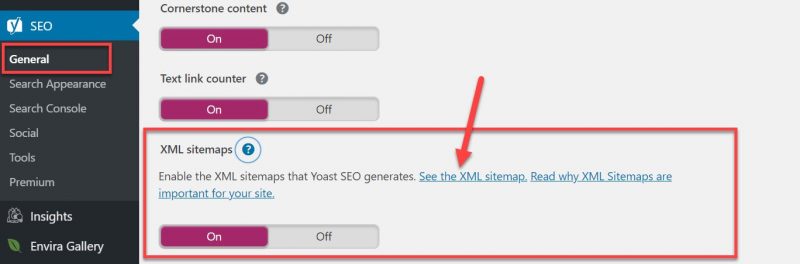
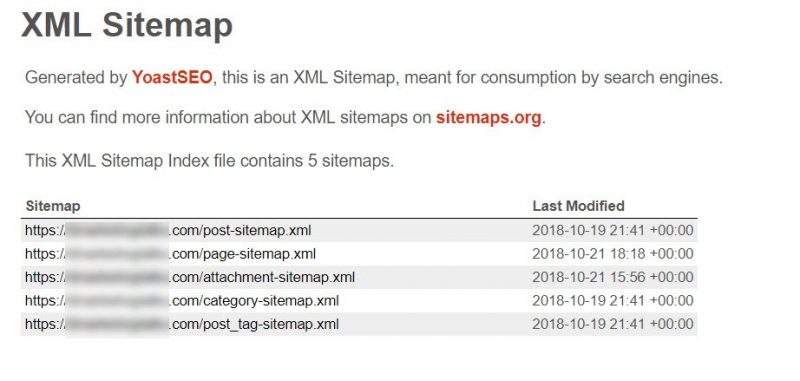
Yoast will automatically create sitemaps for you. All you have to do is just click on the “See the XML sitemap” link and copy the URL of your sitemap.
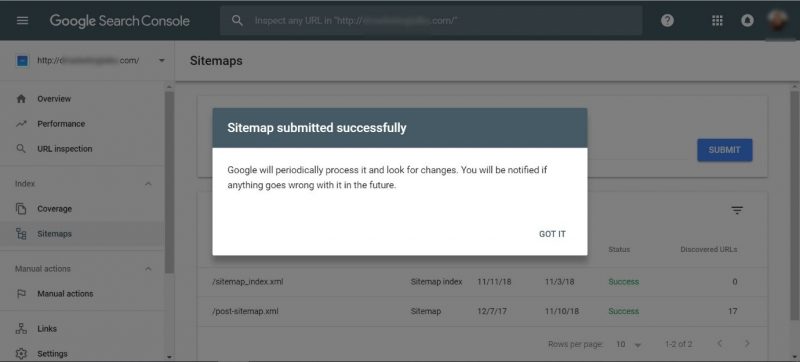
Go back to your Google Search Console and find the “Sitemaps” option in the left-hand side menu.
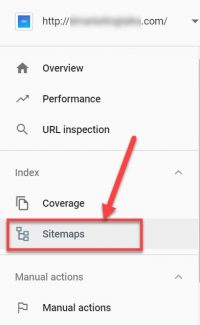
Paste your sitemap URL and click “Submit”.

Your site is ready, and Google will check your sitemaps from time to time to ensure all changes are indexed.
And you’re done as far as sitemaps go.
4. Boost rankings with structured data (rich snippets)
Rich snippets and cards are gradually taking over the top pages of Google search results.
There are various types of rich snippets ranging from instant answers, through sponsored ads, down to local packs and media features.
These are the top 5 reasons why you should care about rich snippets:
- They instantly grab attention, they’re more visual and get straight to the point.
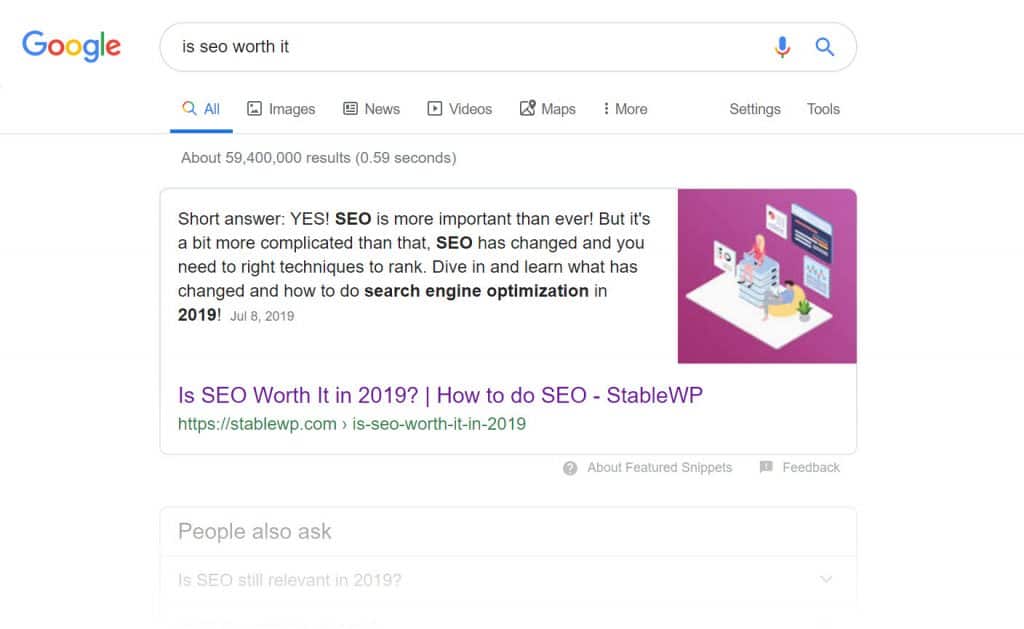
- Rich snippets provide instant answers to users’ queries.
- Reviews can boost CTR by up to 35%.
- You have a chance to appear twice in the search results (once organically and once within a rich snippet) if you do your SEO right.
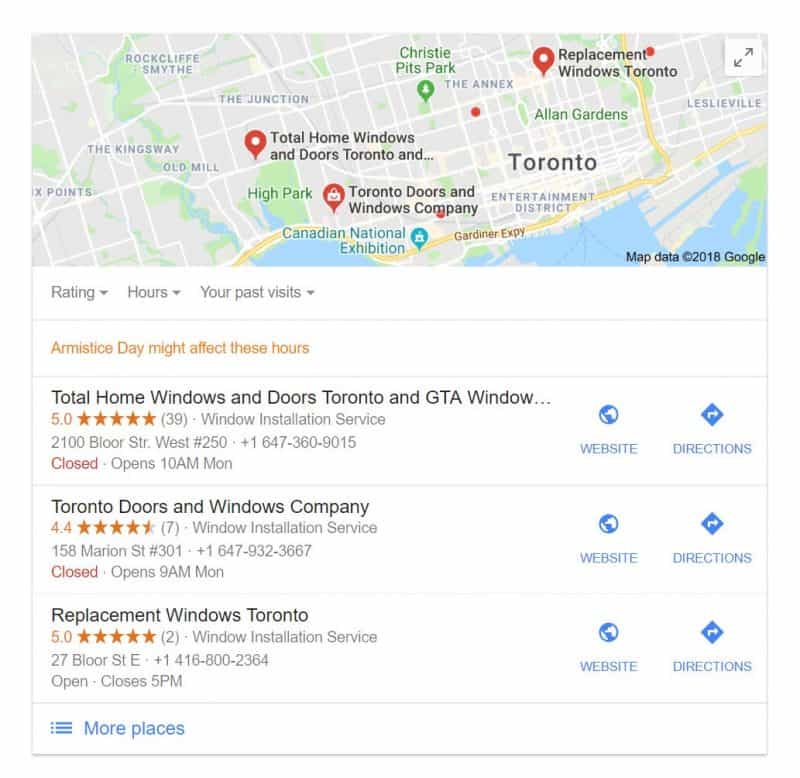
- Local businesses especially benefit from snippets called the Local 3 Pack.
Having this in mind you want to write structured data which helps search engines understand the structure of your content and increase the chances of appearing in rich snippets.
To help Google parse your content and enhance your search appearance with rich snippets I’d definitely recommend adding Schema markup to your site
Schema can be quite cumbersome and technical, so if you’re not a developer (like me) you can use Structured Data Markup Helper to generate the right code, and Google Tag Manager to add it to your site.
But it doesn’t end there!
Once schema is added to your site, you can track the status of your structured data using Google Search Console.
Head over to the “Enhancements” report and check for items with errors within your structured data.
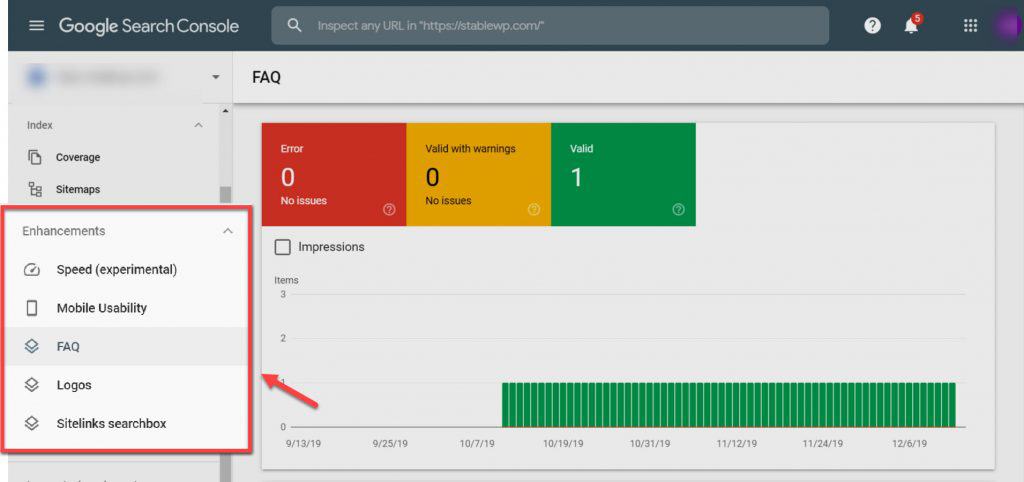
The “Enhancements” reports can contain multiple items depending on the site type, for example:
- Page speed
- Mobile usability
- FAQ structured data
- Logos
- Sitelinks searchbox
Learn which rich results Google could or could not read from your site, and troubleshoot rich result errors.
Check each item by clicking on the item in the report.
Inspect the URL of the page and the reason for the error. To fix structured data errors, you need to analyze each one individually using the Structured Data Testing Tool provided by Google.
5. Track indexation status of your pages
Keep an eye on the indexation status of your pages in GSC. It’s very important to keep track of all crawled and indexed pages on your site to ensure Google knows of their existence.
Only pages that are indexed by Google can appear in search results and drive organic traffic to your site.
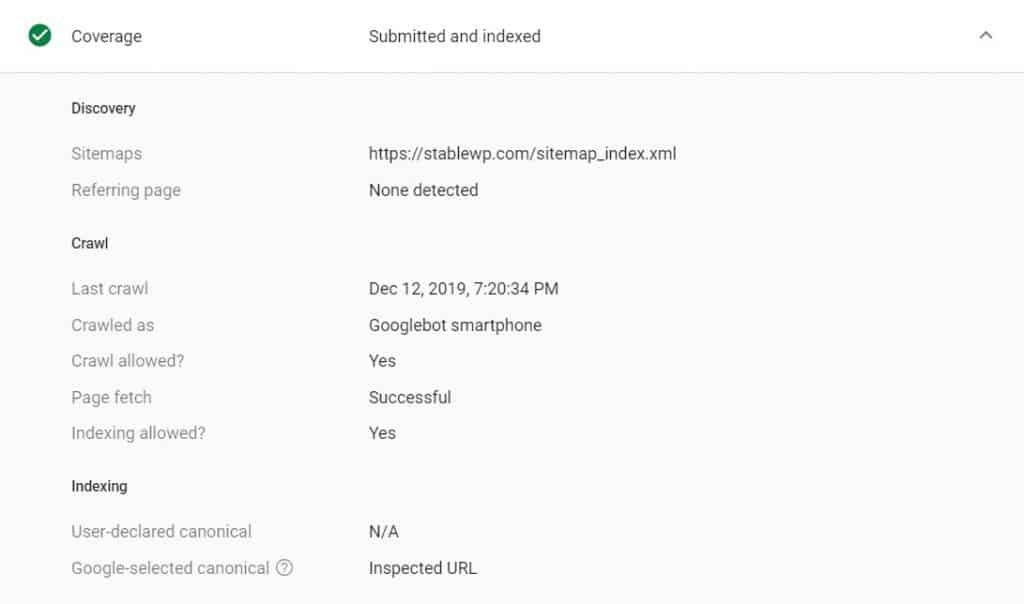
Search Console provides in-depth data regarding your indexation. To find this report navigate to the “Coverage” report in the “Index” section.
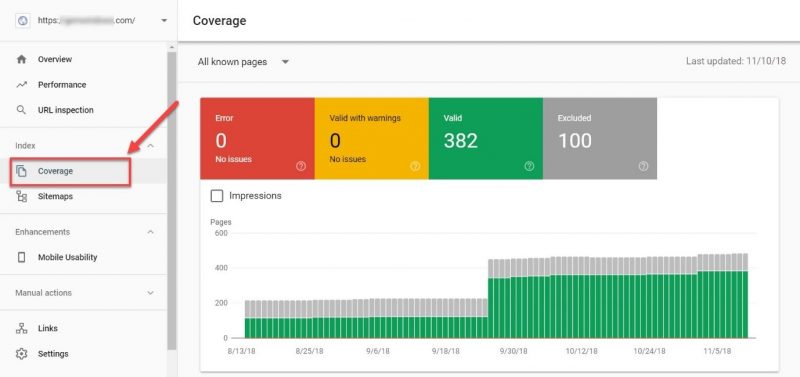
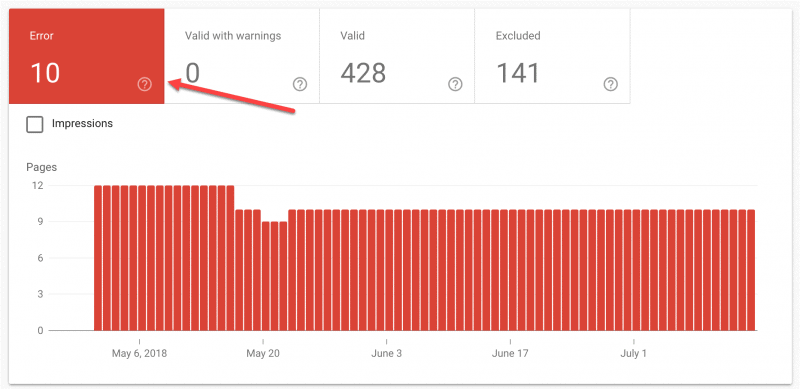
The Coverage report allows you to know which pages on your site are indexed by Google. You can see the pages excluded from the index, as well as errors that prevent certain pages from being indexed.
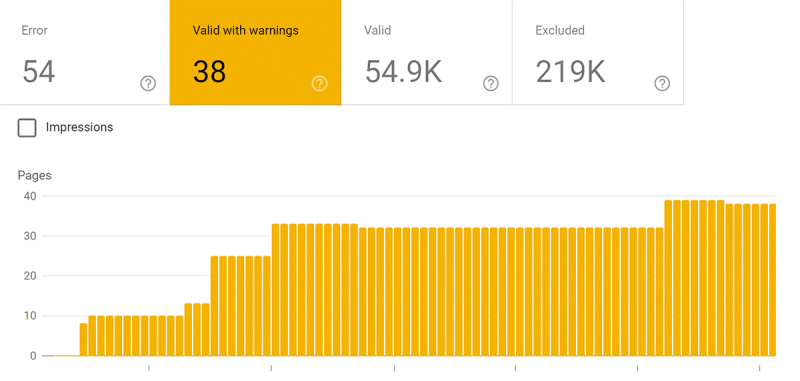
The “Valid” tab tells you how many pages are indexed by Google.
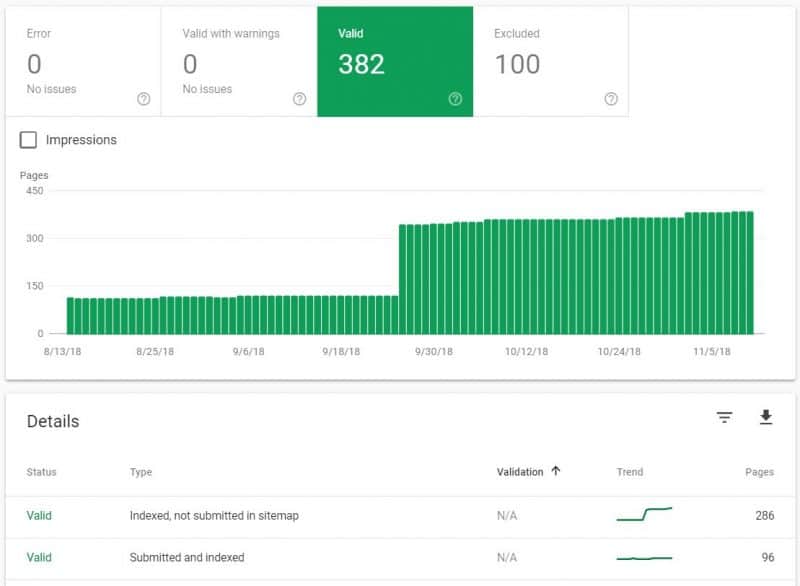
a) Check for issues in your indexed pages
There are two issues you should look out for in the valid pages report:
- A sudden drop in the number of indexed pages
- Index bloat
If you notice an unforeseen drop in the number of indexed pages, it may be a signal that something is wrong.
It could be that some pages are blocking Googlebot or you mistakenly added a noindex tag to these pages, and that’s why the numbers have dropped.
Same goes if your numbers suddenly increase for unknown reasons also known as index bloat. You should definitely inspect what’s going on.
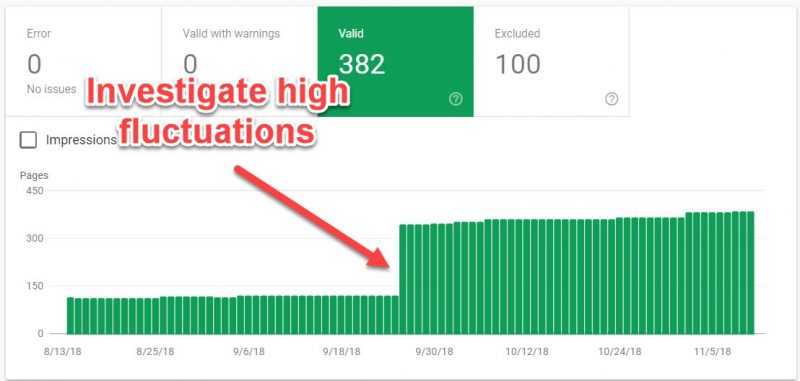
Index bloat may occur for any number of reasons:
- Pagination issues
- Having both HTTPS and HTTP versions of your site indexed under the same property
- Allowing WordPress categories, tags and archives to be indexed
- E-commerce sites may have an issue with filter widgets, etc.
Either way, index bloat may hurt your SEO because Google may struggle to figure out the most relevant pages to serve in search results.
It can also cause duplicate content which may get you penalized by Google’s algorithms (Panda update).
Huge spikes and drops can be a sign of an issue, and you should definitely investigate further.
b) Examine excluded pages
Not all pages on your site should be indexed. There are many reasons why you want to exclude certain pages from appearing on Google.
For example, your login page, thank you page, checkout confirmation page, shouldn’t be indexed because they serve no purpose for Google.
Other pages like archives, tags, and categories, may even hurt your rankings if indexed because they can cause duplicated content (mentioned earlier).
So, highlight “Excluded” pages in your GSC Coverage report and have a look at their numbers…
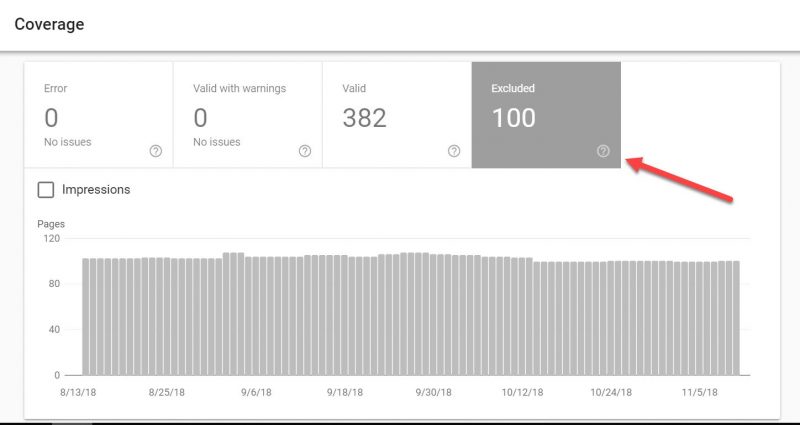
…as well as reasons for being excluded.
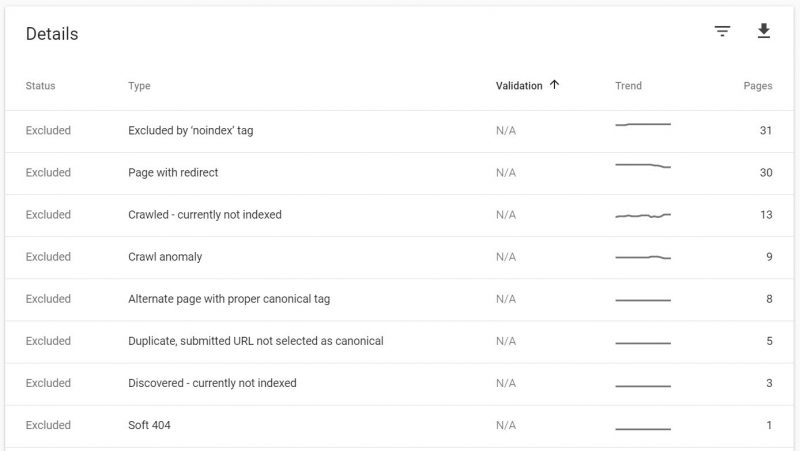
Make sure that pages excluded from indexation should actually be excluded intentionally, and that none of them is removed accidentally.
Exclusion details worth checking are:
- Crawl anomaly
- Crawled – currently not indexed
- Submitted URL not selected as Canonical
- Blocked by robots.txt (should be fine, but worth double-checking)
- Duplicate page without canonical tag
You can use the Search Console URL Removal tool to remove pages from Google’s index temporarily.
Right now, this feature only exists in the legacy version of GSC. You’ll have to navigate to the “Legacy Tools and Reports” and click on the “Removals” link.
This will open up Google’s URL removal tool
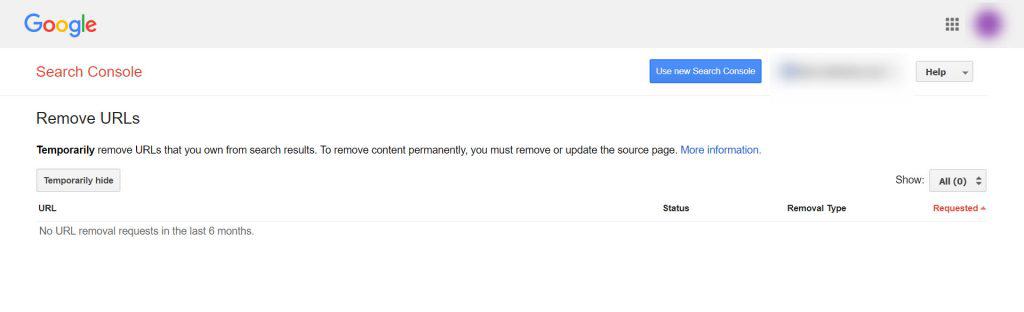
The removal only lasts for 90 days, and if you want to permanently remove the page from Google’s index, you can block it within the robots.txt file.
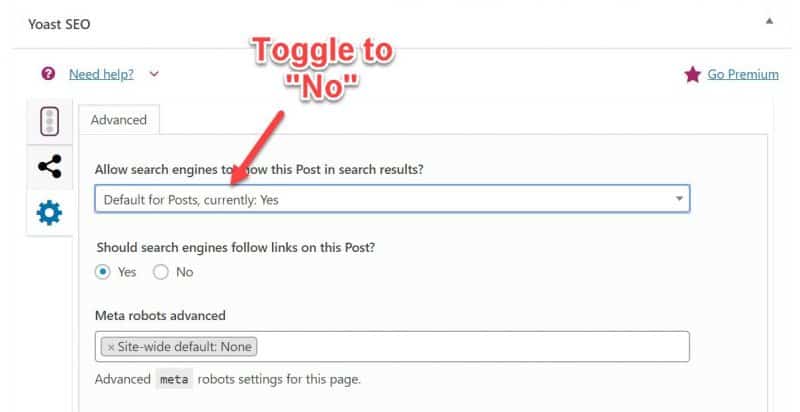
Alternately, you can block the page with the Yoast SEO plugin. Just navigate to the Yoast meta box at the end of your page and access the advanced options via the gear icon.
Then toggle to disallow search engines from showing this post in their results.
Lastly, you can see a list of blocked resources for individual URLs using the URL Inspection Tool.

If Googlebot can’t access important resources on your page, they might be indexed incorrectly.
Remove these resources from the disallow section of your robots.txt file, then run a test in Google Search Console. Go to the “Crawl” section and select the Robots Testing Tool.
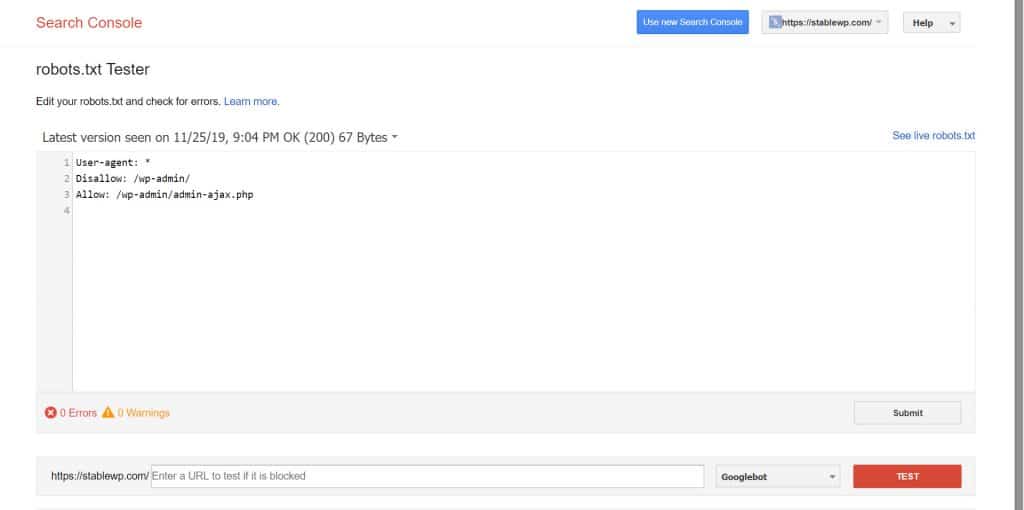
Finally, inspect your URL again to make sure the page is rendered correctly.
6. Fix errors that may hinder your SEO
Another major reason you need Google Search Console is it’s the only tool that can accurately show you errors that can impact your crawling and indexation, both of which can affect your SEO.
Errors can come in all shapes and sizes, but let’s start by addressing the indexation errors you can find in the Index Coverage report.
a) Fix Index Coverage Errors
You’ll also see a list of errors showing along with the reason why they occurred.
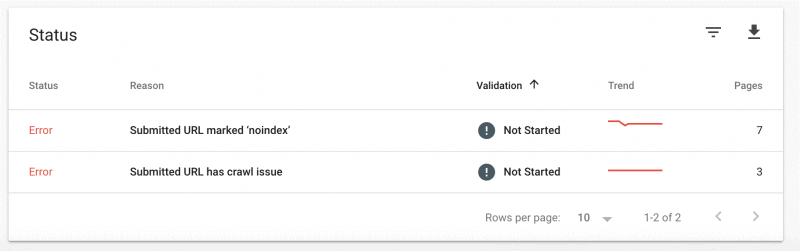
Here’s a list of all possible index errors that may appear in the Coverage report:
- Server Error
- Redirect Error
- Submitted URL blocked by robots.txt
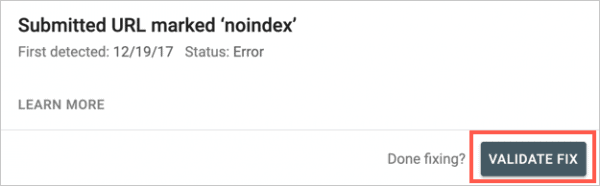
- Submitted URL marked ‘noindex’
- Submitted URL seems to be a Soft 404
- Submitted URL returns unauthorized request (401)
- Submitted URL not found (404)
- Submitted URL has crawl issue
Click on each error to get more details.
How to fix index coverage errors:
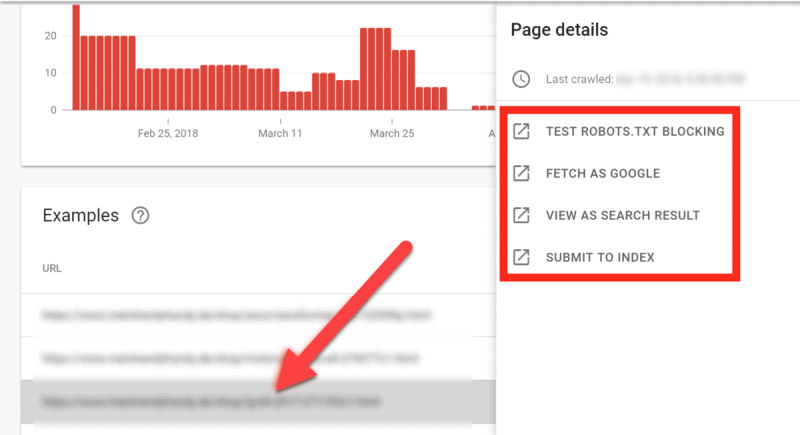
- Test robots.txt blocking – Use this when you see robots.txt blocked error. Google will show the live robots.txt file on your site. Click on the “Test” button to check whether the URL is allowed in the robots.txt file. If you mistakenly blocked the URL in the robots.txt file then fix the robots.txt entries.
- Test Live URL – Fetch as Google to check how Google views your page when crawling. If you see any error in fetching, fix that error.
- View as a search result – Click on this option to view the search result of your page. This won’t work for the error pages as Google didn’t index those error pages.
- Submit to Index – Search Console will sometimes allow you to submit the URL for indexing directly.
- Validate Fix – Once you’re done fixing the issue, go back to Index Coverage report and click on the ‘Validate Fix’ button. Google will start validating your fix, and after the process is finished, you’ll see a “Validation Passed” checkmark if it was successful.
Don’t forget to check the “Valid with Warnings” tab within the Index Coverage report, as well.
It shows pages that are indexed, however, they have issues you should be aware of.

For example, you may get a warning “Indexed, though blocked by robots.txt”.
This message occurs when your page gets indexed, despite being blocked by robots.txt. A blocked page can still be indexed if it’s linked to another place on the internet.
You see this warning because Google is unsure if you actually intended to block this page or if you did it accidentally.
If you do want to index this page, simply remove the block from your robots.txt file.
On the other hand, if you want to keep it from appearing in search engines, you need to add the “noindex, follow” tag to this page. You can do this with the Yoast SEO plugin, the same way as described earlier in the article.
b) Fix Crawl Errors
Crawl errors indicate broken pages on your site.
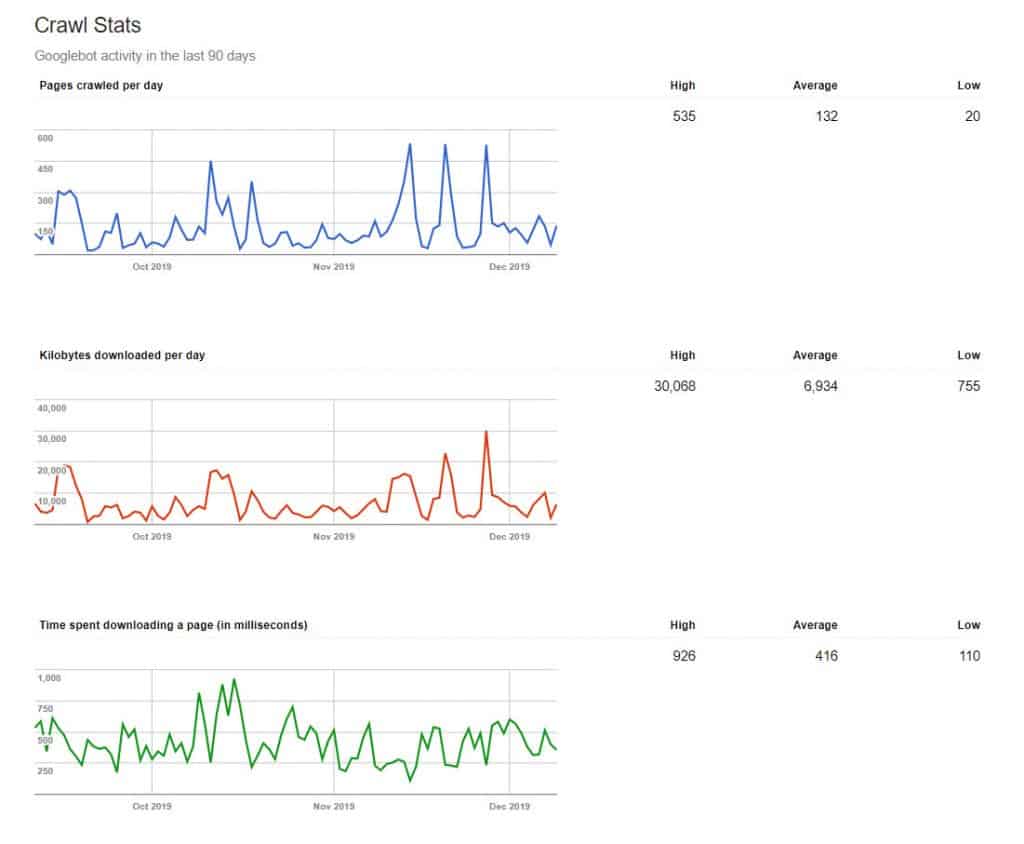
Crawl errors are shown at the site level in the new Index Coverage report, and at the individual URL level in the new URL Inspection tool (mentioned earlier).
You can also check crawl stats or Googlebot’s activity in the last 90 days. This report is currently only available in the legacy version of GSC, by going into the “Crawl Stats” section.
Most of the URL crawl errors can be fixed with a 301 redirect, while site errors will require a bit more effort to handle.
You can check out Google’s documentation on Crawl errors and how to address them.
7. Check for backlinks and internal links to boost your pages
Links play a huge role in SEO.
Backlinks, or links coming from external sources, tell search engines that your content is high quality and your site is worth looking into(otherwise no one would link back to you).
Internal links give structure to your website content, they connect each piece of content together to signify Google what your site is all about.
Moreover, by interlinking your content, you can create topic clusters. This creates a group of interlinked pages built around one broad topic which gives them more authority and trustworthiness, and with that higher rankings and more traffic.
Google Search Console gives you a unique look at all the pages with internal and external links.
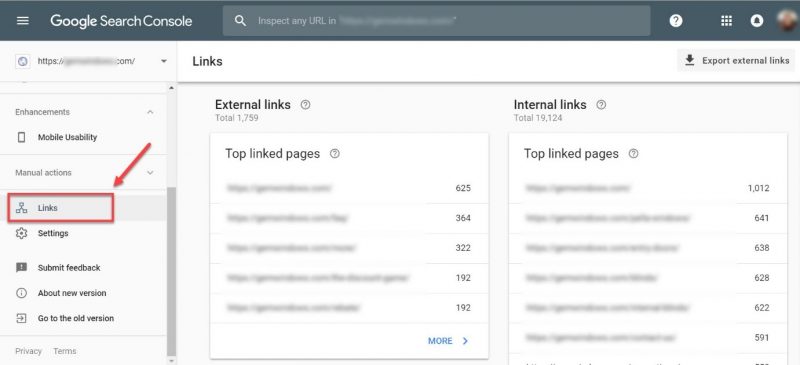
You can see the top pages regarding external and internal links. Click on the Top internally linked pages and sort them by the least number of links to find pages with few internal links.
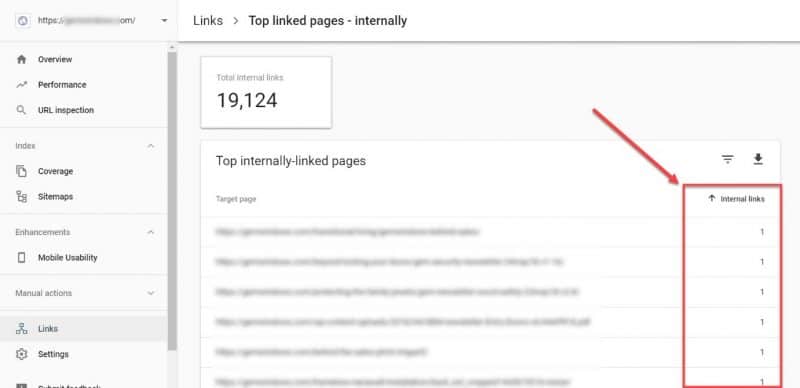
Now click on each page with few links to identify it and then just edit the page to add more internal links wherever it makes sense.
To take this tactic to the next level, look for pages that have an abundance of external links.
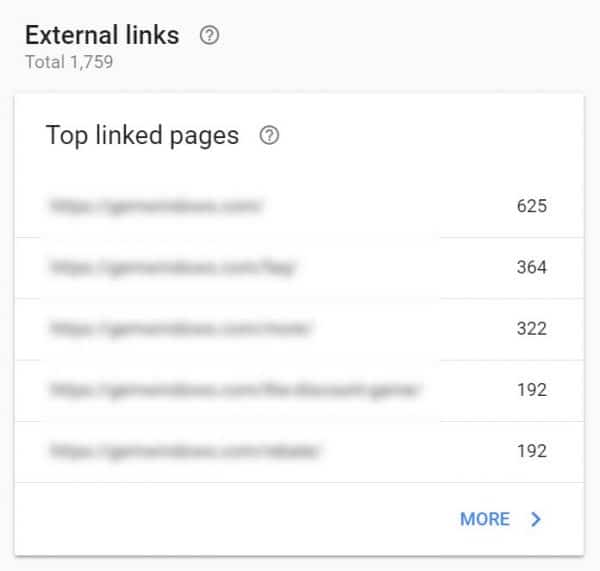
These are pages with the highest authority on your site.
All you have to do is interlink them with other pages you want to boost, to spread some link juice and increase the value of these pages.
Take note that in some cases GSC might not display all the backlinks on your site. Which is why it’s worth investing in some premium SEO tools like Ahrefs, SEM Rush or Moz.
8. Get new content indexed faster
Once you publish a new post, it can take days before Google decides to crawl your site and index this page.
With Google Search Console, you can use a simple trick to reduce this time and get your content indexed instantly.
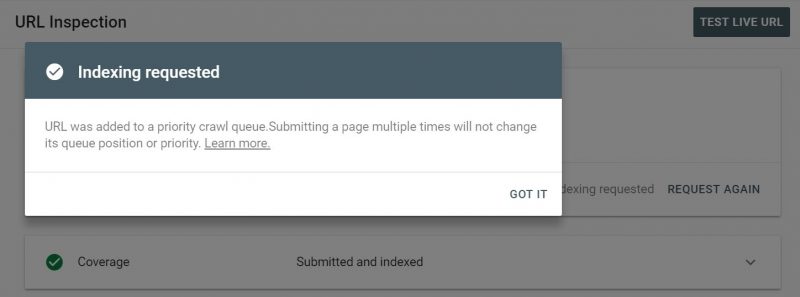
Go into the “URL Inspection” tool and pop in the URL of your new page.
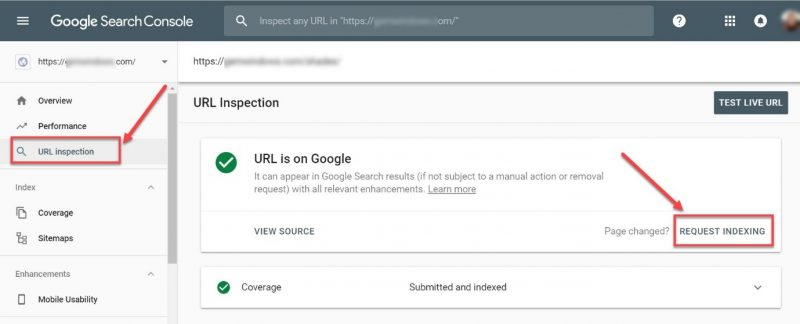
Then just click on the “Request Indexing” button, and Google will immediately add this page to the priority cue and have it indexed.
Besides doing this for your new pages, you can do the same thing to speed up indexing of your existing pages whenever you make some changes (updates) to them.
9. Confirm your site is optimized for mobile
As you might’ve noticed, mobile search Has grown over the past few years and it’s getting bigger.
In 2018 mobile search amounted to 52.2% of all internet traffic. And these numbers are growing!
Google also bets on mobile traffic, which is why they instated a mobile-first index that ranks websites based on their mobile versions, even if for desktop searches.
This gives you enough reason to care about your mobile user experience.
Google Search Console can help you check the usability of your pages on mobile devices.
Check the “Mobile Usability” report and have a look at which pages are optimized for mobile devices and which need more work.
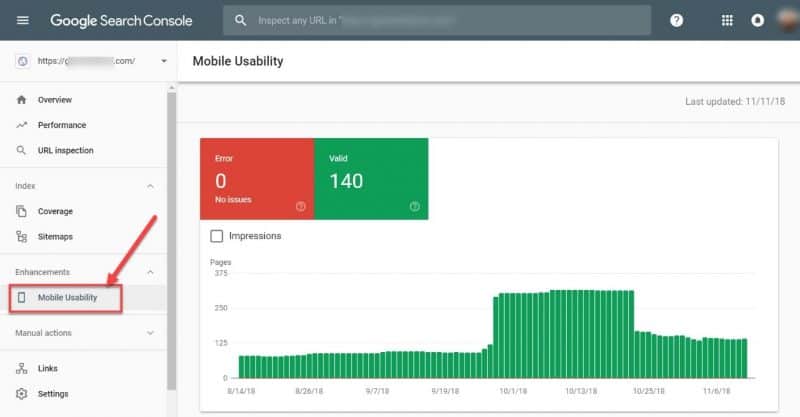
If you find errors, make sure to investigate what’s causing them and fix the issues to get these pages indexed properly.

Use Google’s recommendation as a guideline to fix potential errors.
10. Compare performance across devices
The new Google Search Console allows you to easily compare performance between desktop and mobile devices to identify issues and opportunities.
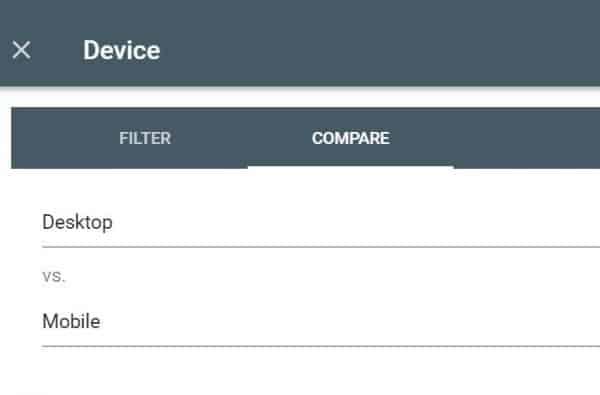
Go into your Performance report and add a “Device” filter.
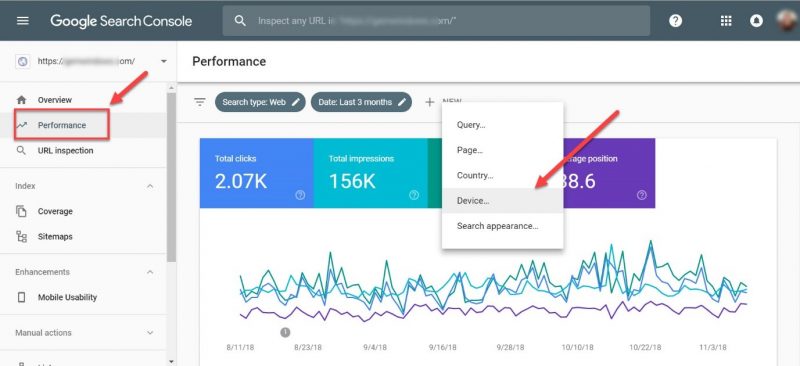
Then set the devices you want to compare.
You can now compare performance across different devices.
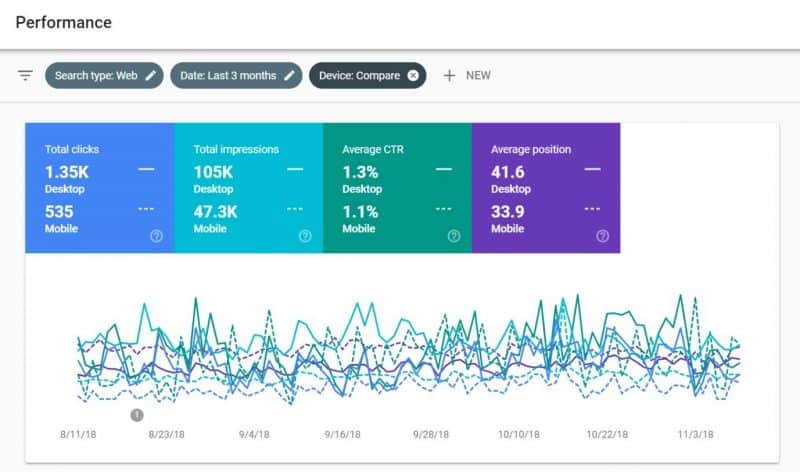
Scroll down and look for any big discrepancies in terms of CTRs.
For instance, if you find that some keywords have high CTRs on the desktop and much lower on mobile, it means you’re missing out on a lot of potential traffic.
You have to optimize your title tags and meta descriptions to better appeal to mobile users.
Make the necessary adjustments and enjoy all the additional traffic resulting from high CTR.
11. Enhance Google Analytics by integrating it with GSC
Google Analytics is another powerful tool for your SEO toolbox. But you can enhance it even further by integrating with Google Search Console.
Head over to your Google Analytics account, and click on the “Admin” section in the lower left corner, and select “Property Settings”.
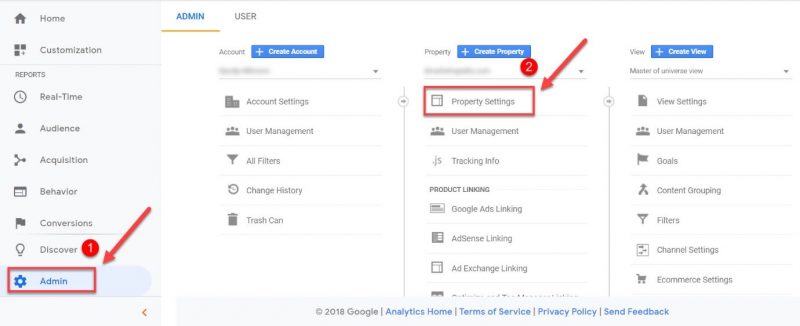
Then click on the “Adjust Search Console” button.
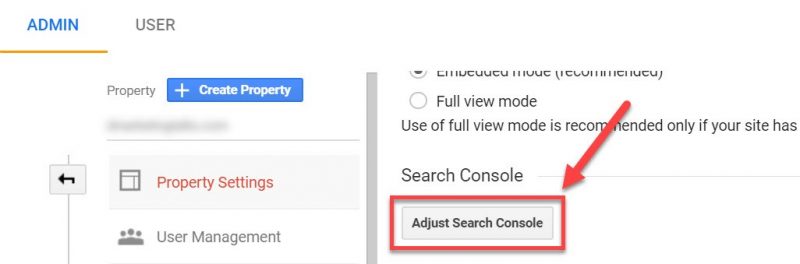
Press the “Add” button and enter your site URL.
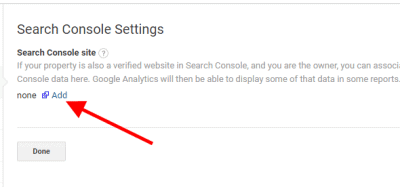
And you’re done.
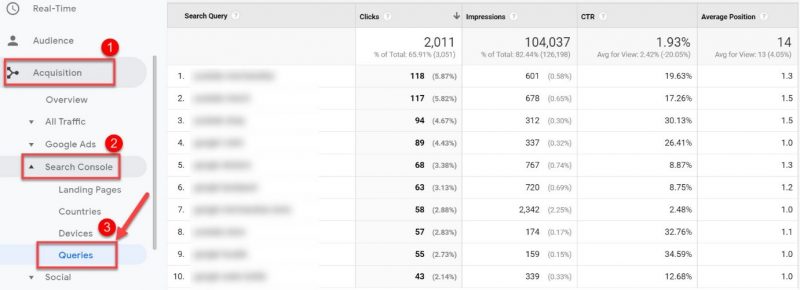
Now if you go Acquisition report > Search Console, you can see detailed keyword data with a number of clicks, impressions, CTR and average position, in your Google Analytics.
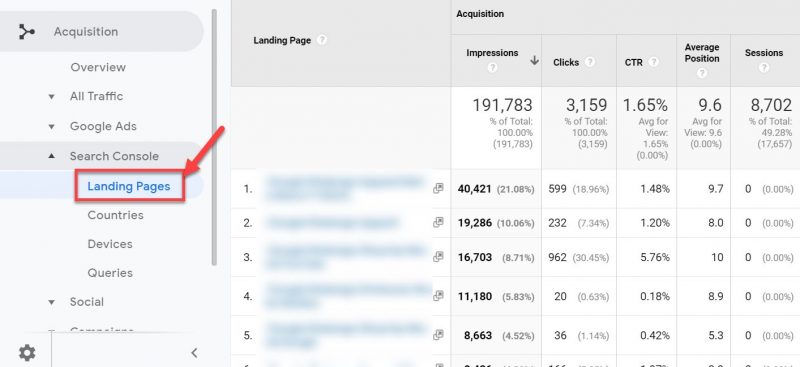
You can also monitor your Landing page performance…
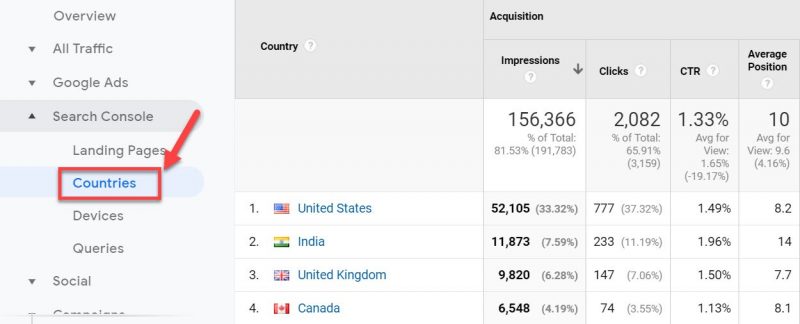
As well as impressions, clicks, CTR and position data by country.
Integrating your GSC with Google Analytics gives you deeper insight into your search performance all in one place.
12. Check for security issues
Finally, use the Security Issues report to check for harmful pages on your site.
Most of the time your Security Issues report will look like this, there won’t be any security problems:
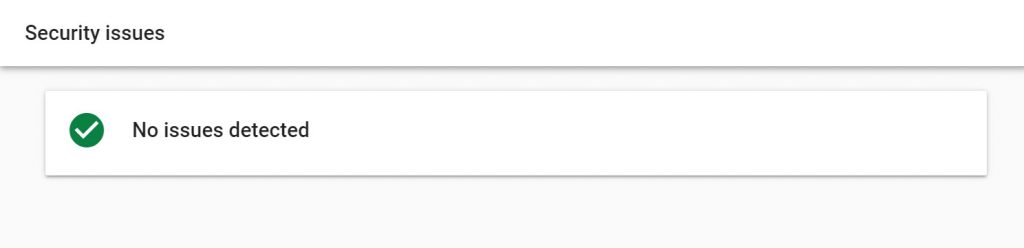
But it’s definitely worth checking once in a while, as security issues can seriously damage your website, reputation as well as your SEO.
GSC will check for malware, deceptive pages, harmful downloads, and uncommon downloads, and if anything is detected, you’ll get a warning message.

It’s better to be safe than sorry, so keep this report in check.
Takeaway
Google Search Console indispensable for your SEO!
There are so many ways in which it can improve your site, boost your rankings and increase traffic. In this article, I’ve shown you the top 12 ways to use GSC.
These tactics take minutes to implement, and you can reap the rewards for years to come.
And it’s why you should set it up today, to start collecting all the data.
So take action and supercharge your SEO with Google Search Console.
And let us know down in the comments: Which of these 12 tactics do you plan on trying out first?
[do_widget id=custom_html-25][/fusion_text][/fusion_builder_column][/fusion_builder_row][/fusion_builder_container]
