SEO Audit is the process of assessing the search engine readiness of your website. In other words, it means inspecting how optimized is your site for Google (and other search engines).
An SEO audit is a super-important detective task which can help you twofold:
- Identify weak spots that are undermining your SEO and hurting your results,
- Discover new SEO opportunities for better rankings and more organic traffic.
Even if you’ve done an excellent job optimizing your site in the past, you need to run an SEO audit from time to time to keep your website up-to-date with the latest developments in search marketing and be ahead of your competitors.
Follow this step-by-step SEO audit checklist to cover all your (SEO) bases and turbocharge your search traffic.
Let’s get it on!
Table of Contents
Step #1: Check for critical issues that may be holding you back
Every SEO audit needs to start by addressing critical issues that might be hindering your entire success. These include anything from ranking for your own brand name to indexation issues and Google penalties.
Start your SEO audit by checking the following six areas first:
1. Ensure that you’re ranking for your website name
The number one thing to do in your SEO audit is to check whether your website is ranking for your branded search term.

This is very important for your branding and reputation.
People use Google to research everything from products and services to brands. You want to make sure that when someone types in your brand (website) name in Google, your website is the first result.
If you have a brand new website/domain and it doesn’t come up as the first organic result, don’t be alarmed.
It might take some time (a few weeks if you do your SEO right) for Google to index your site.
On the other hand, if you had your website for a while and you’re still not coming up as the top result for your branded search term, you need to fix the issue by:
- Optimizing your homepage (title tags and meta descriptions, H1 tag, logo, image SEO…)
- Claiming your Google My Business (GMB) profile
- Building some (branded) links to your website
- Getting citations in local directories
If your site doesn’t appear in Google SERP at all, this may be a sign of deeper problems (Google penalties) which we’ll talk about in the later section.
But it’s not just about appearing on the top in Google; it’s also about how your results look…
2. Inspect your (branded) search appearance
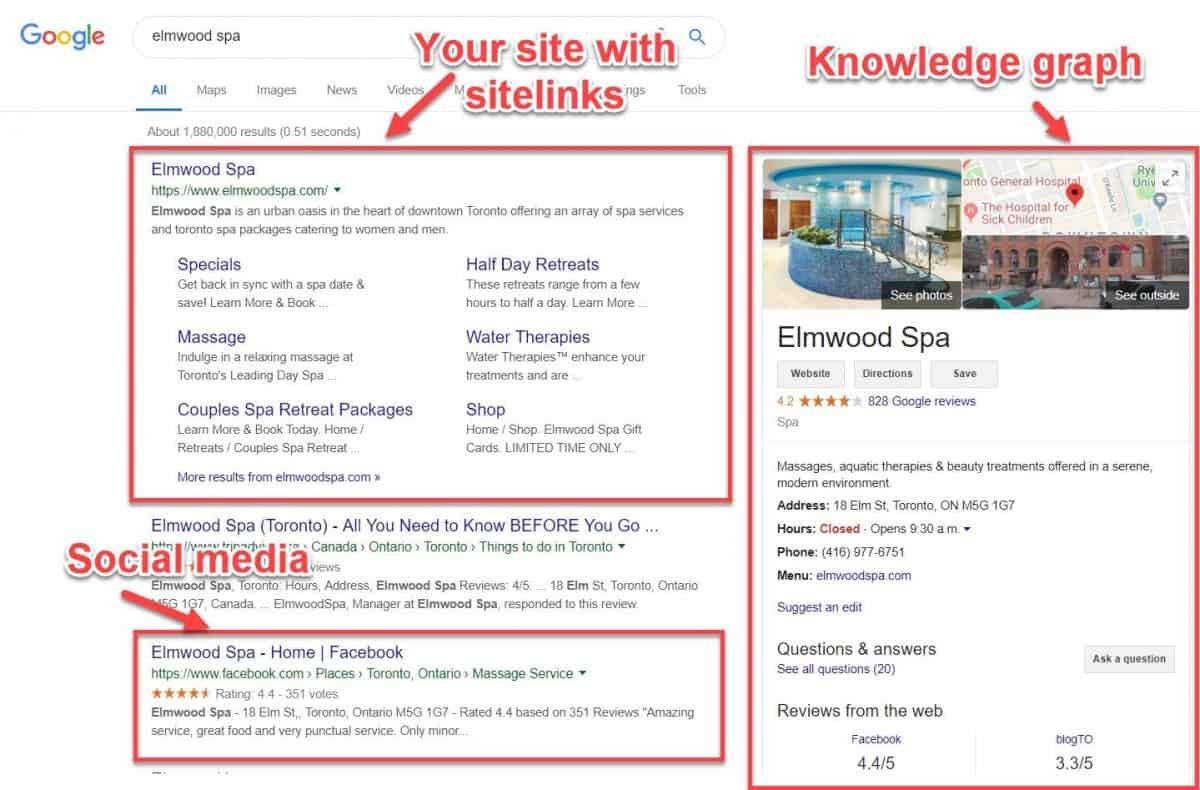
Treat Google results page for your branded term as your business card and make sure you own the entire page.
People trust Google so much that you want to take special care of how your brand is presented in the search results page.
Audit your Google results page and check the following:
- Does your website appear first
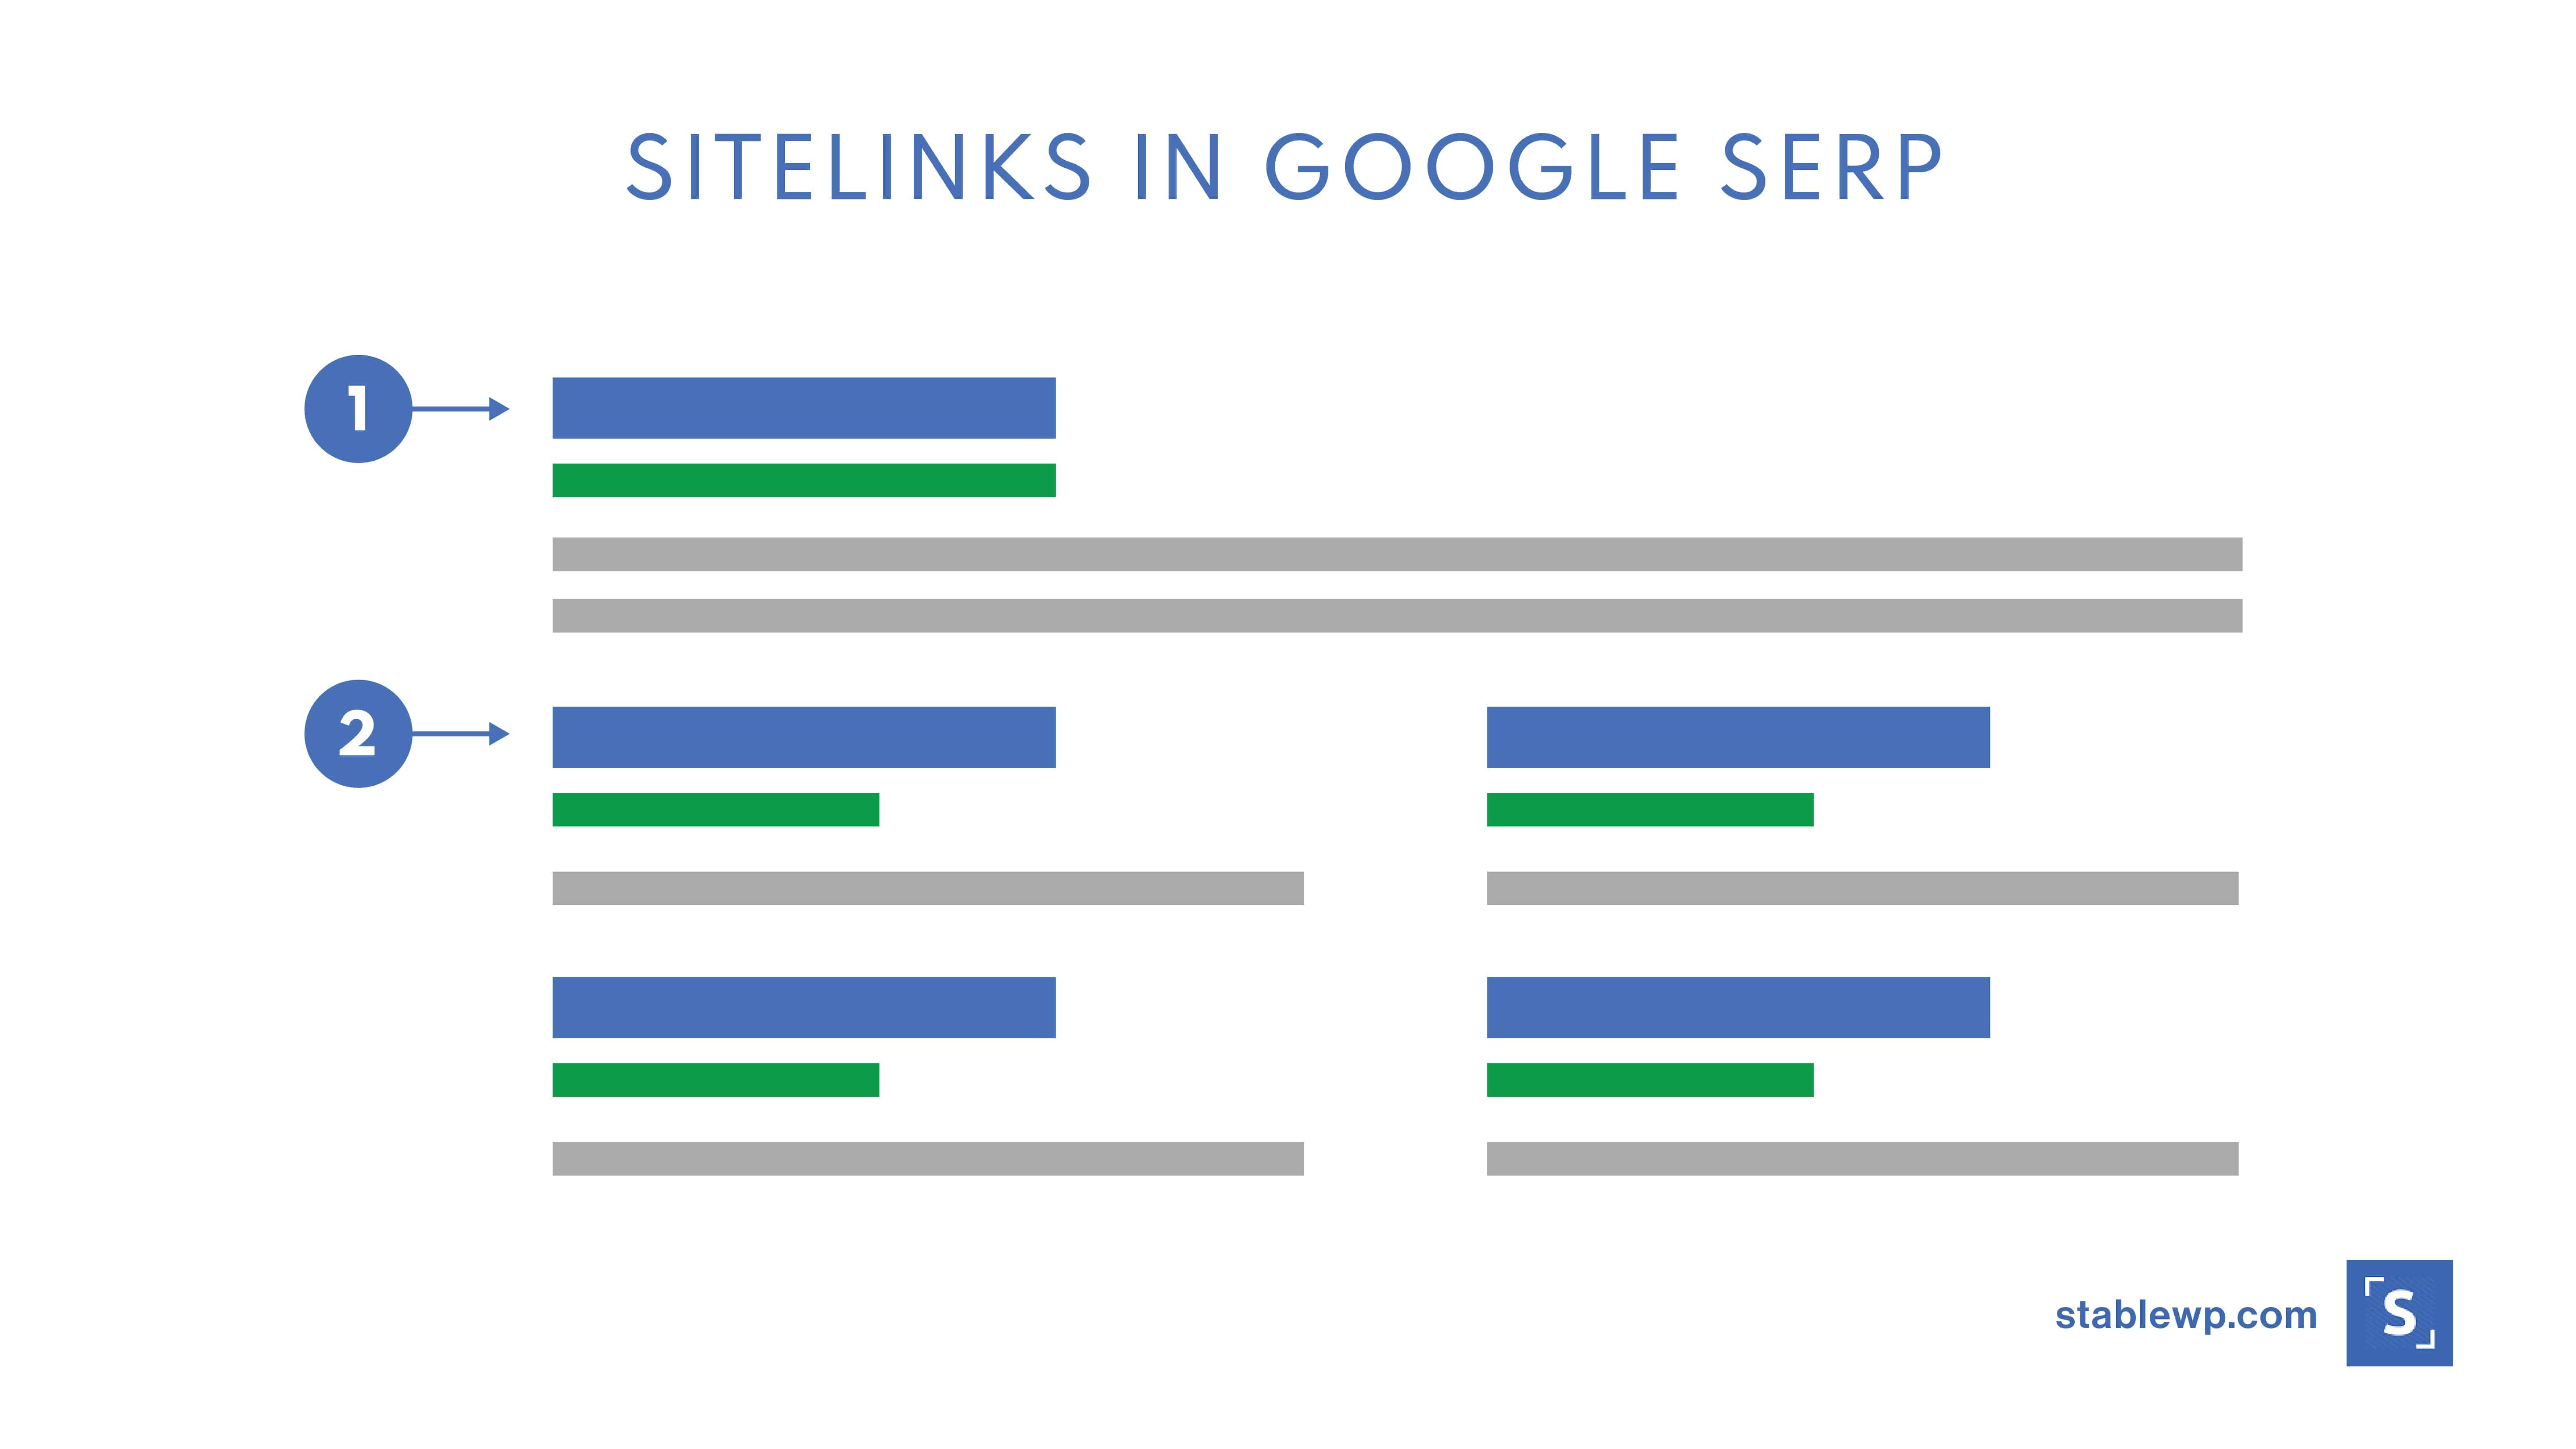
- Does Google show site links with your listing
- Is the (meta) description below your home page accurate
- Does Google show a knowledge graph next to your listing
- Is the information in your GMB page accurate
- Does Google show other pages relevant to your brand (your social media, citations, reviews, etc.)
Ideally, your listing should look like this:
For more details on how to dominate Google SERP for your branded search, check out our comprehensive guide.
3. Make sure the right version of your website is indexed
Almost every website has these four versions:
- http://yoursite.com
- https://yoursite.com
- http://www.yoursite.com
- https://www.yoursite.com
However, for good SEO sake, only one version should be used as the ‘final destination’ address. Otherwise, Google might see each of these versions as separate properties, which can cause all sorts of problems.
You need to consolidate all different versions of your site into one. Preferably, this should be the HTTPS version since secure websites (which is what the “S” stands for) get a slight boost in rankings.

To check if only one version of your site if browsable, simply type in each version into the address bar and check if it redirects to the HTTPS version.
![]()
If you get automatically redirected to the HTTPS version (like in the GIF), you’re all set.
If not, then just create a 301 redirect from each version to the HTTPS version of your site.
One more thing, you need to verify each variation of your site in Google Search Console as separate properties.
And finally, go to your GSC site settings for each property and set your preferred domain.
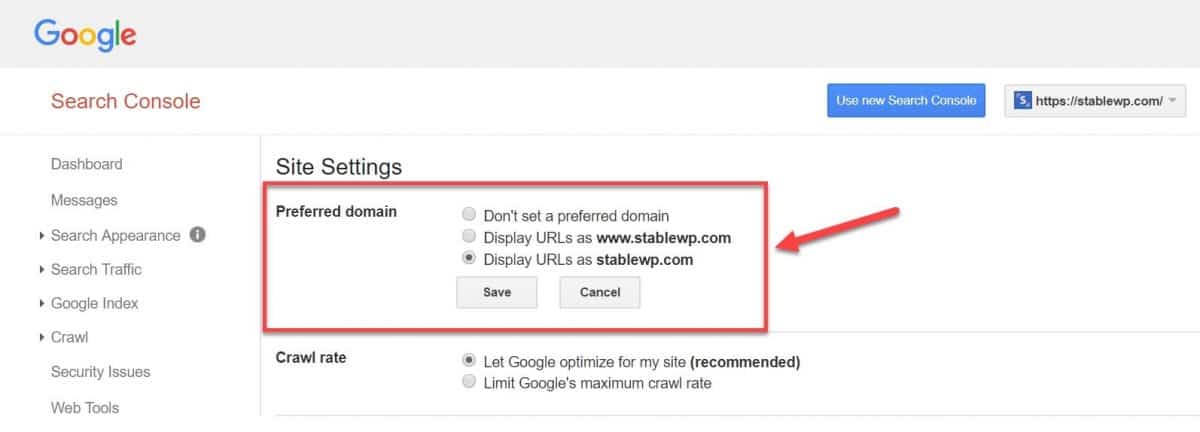
While we’re at the subject of Google Search Console, there’s one more critical thing to check…
4. Detect any indexation issues
Another critical thing to check is if there are any indexing issues.
Remember, pages not (properly) indexed by Google will never show up in search results, no matter how good they are.
Head over to your Index Coverage report in Google Search Console and look for any indexing issues.
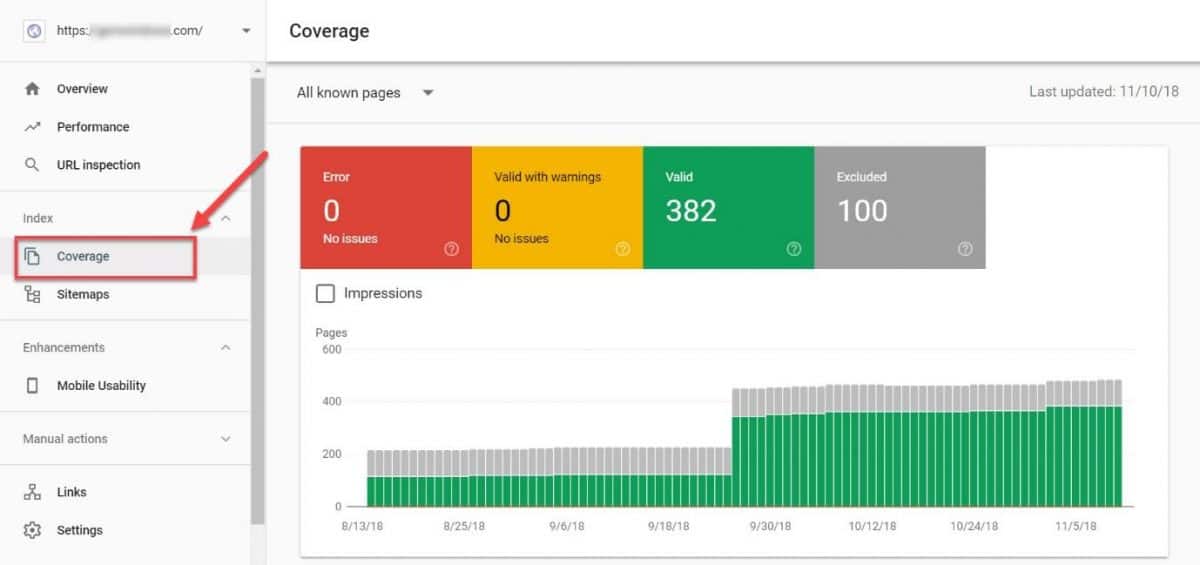
Be sure to check for:
- Number of pages that are in Google index
- Errors
- Sudden drops in the number of indexed pages
- Index bloat
- Check if excluded pages are rightfully excluded
Find an fix any issues that may appear ASAP. For a deeper dive into how to identify and fix indexing issues check out our in-depth GSC guide.
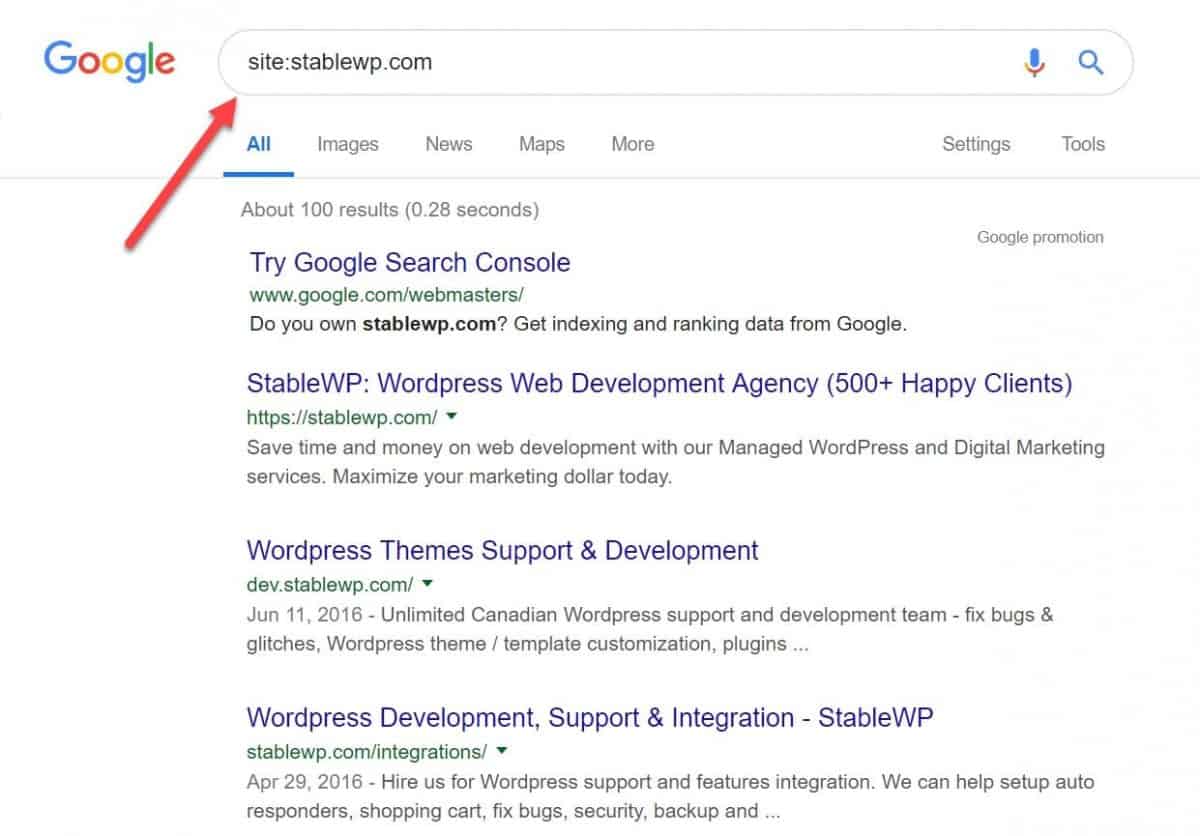
You can also manually check the indexing status of each of your pages using Google search operators.
For example:
site:yoursite.com
Just plug in the “site:” search operator followed by your domain, and eyeball the search results for all indexed pages.
Although it’s an easy way to check all your indexed pages, I wouldn’t recommend relying solely on this method since it takes time to scan all results (especially if you have thousands of pages) and you still won’t be able to identify any indexing problems.
5. Check for Google penalties
If during the above-mentioned SEO audit you detect that some of your pages or your entire site isn’t appearing in Google, the reason might be a Google penalty.
If for whatever reason Google finds your site isn’t compliant to their webmaster quality guidelines, you will get penalized.
The result of getting a Google penalty is that some pages or your entire site will not be shown in Google search results!
No need to be alarmed though, unless you were involved in some shady (blackhat) SEO practices, there’s no need to be afraid of Google’s penalties.
It’s still worth checking, and it’s pretty easy to do. Just fire up your GSC and check the Manual Actions report.
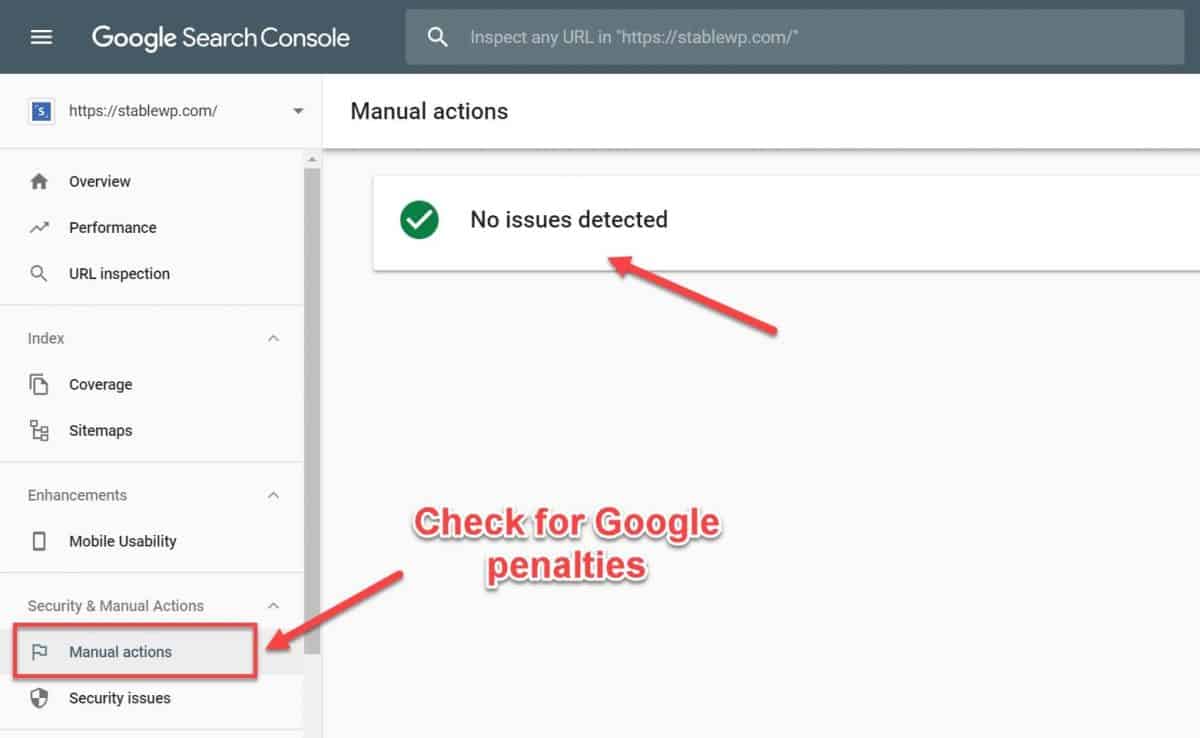
According to Google:
“Most issues reported here will result in pages or sites being ranked lower or omitted from search results without any visual indication to the user.”
As you can see, our website is squeaky clean and free from any penalties (manual actions).
If some manual actions do appear in your report, expand the description of the result to see:
- Description of the issue
- Pages affected
- Steps to fix the problem
Make sure to follow Google’s guidelines for fixing the issue, then request a review to get your penalty lifted.
6. Run a website crawl
To double-check for any indexing issues and crawl errors, you can run your own website crawl. There are many SEO audit tools available for this, like:
- Screaming Frog (free version available).
- Beam Us Up (free)
What these SEO tools do is that they crawl your site in the same way as Google spider would.
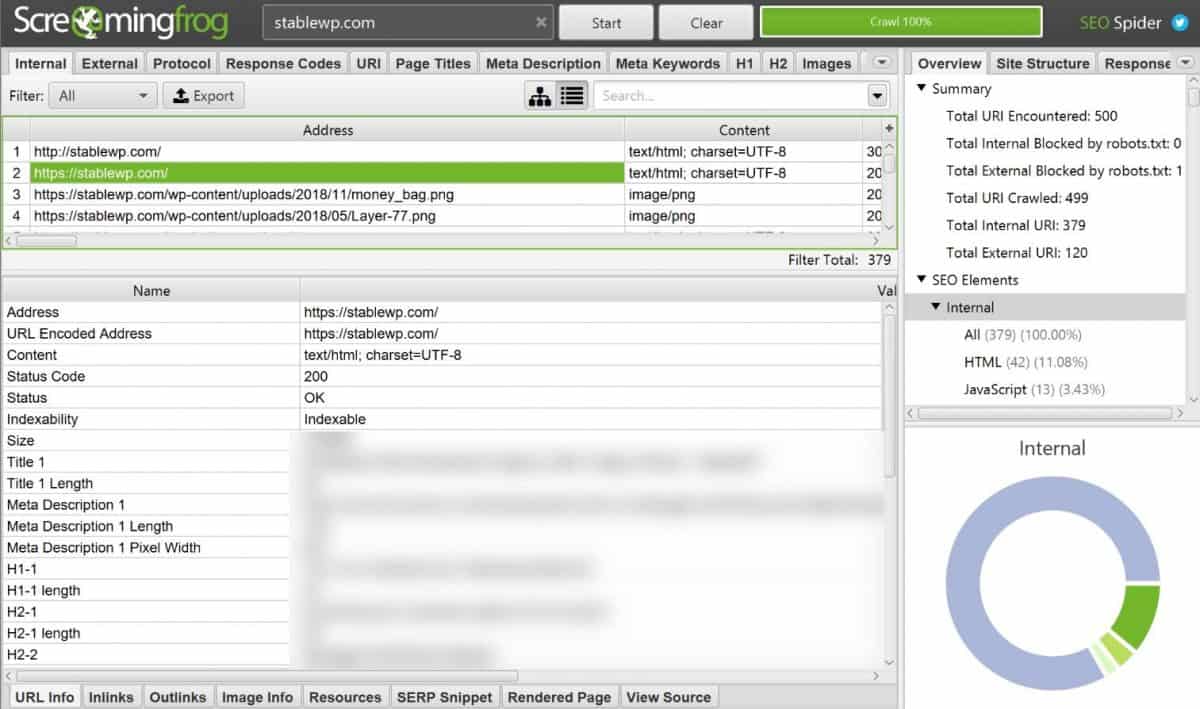
With SEO audit tools such as Screaming Frog, you can get in-depth info on the crawlability and indexability of your site.
For example, it can check if there are any pages that crawlers can’t access. This may happen if you blocked specific pages in your robots.txt file (we cover this later).
While there are many pages that serve no purpose for Google and should be noindexed (comments, tags, archives, etc.), you want to double-check if all pages that are blocked, should be blocked.
Once you confirm that Google can access all of the essential pages you want to rank, you’re done with the top priority SEO audit part and can move on to the next.
Step #2: Ranking audit
Surely you don’t want to rank only for your brand name. Actually, most of the time people are Googling for other terms (keywords), like “how to…” solve a problem or do something.
That’s why the second part of your SEO audit should focus on your target keywords and ranking performance.
7. Assess your target keywords
Start by evaluating your target keywords. These are the search terms that you’re trying to rank for.
Ideally, your target keywords should bring in organic visitors who are interested in what you offer, so when they arrive on your site, you can raise awareness with valuable content, capture their lead info, and then nurture them towards a sale.
When assessing your target keywords, ask yourself these questions:
- Do you have a specific list of target keywords or are you just shooting in the dark? Having thousands of target keywords is not specific, so narrow down your list. You can always add new keywords as you grow.
- Are you targeting relevant keywords? Look closely if your target search terms are likely to bring the right visitors.
- How difficult is it to rank for your target keywords? Size up your competitors to determine who you’re up against. See if you’re trying to outrank big corporations with immense marketing budgets, in which case you’re in for an uphill battle.
- How will your target keywords help you achieve your goals? Are you trying to raise awareness or get more revenue?
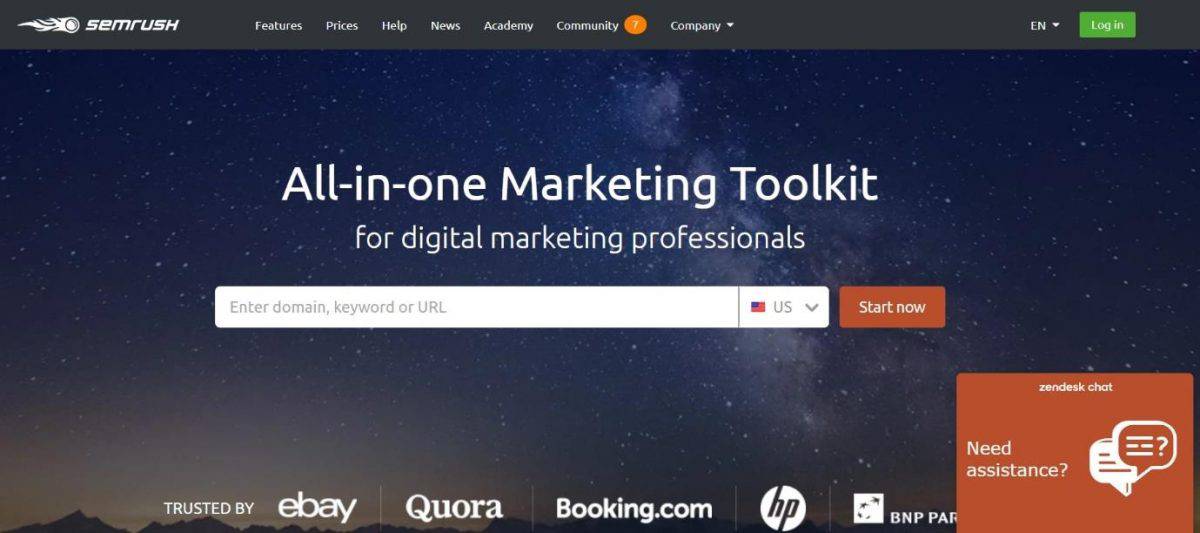
There are plenty of keyword research tools out there, ranging from absolutely free (like Google Keyword Planner and Ubersuggest) to premium paid tools (such as SEM Rush, Moz, and Ahrefs).
Select the right keywords that actually align with your SEO goals.
For best results, find relevant long-tail keywords, instead of broad terms like “auto insurance” or “hardwood furniture.”General terms like these have insane competition, and they’re not likely to bring you any profits.
On the other hand, long-tail keywords will bring you targeted traffic, visitors that are much more likely to buy from you.
If you’re stuck, you can always use our guide on how to find the most profitable target keywords.
8. Examine keywords you’re already ranking for
After revising your target keywords, you should examine the keywords you’re already ranking for. And you can do this for free using Google Search Console.
Open up your Performance report, and under Queries tab you’ll get a detailed list of all search terms that conjure up your site in Google.
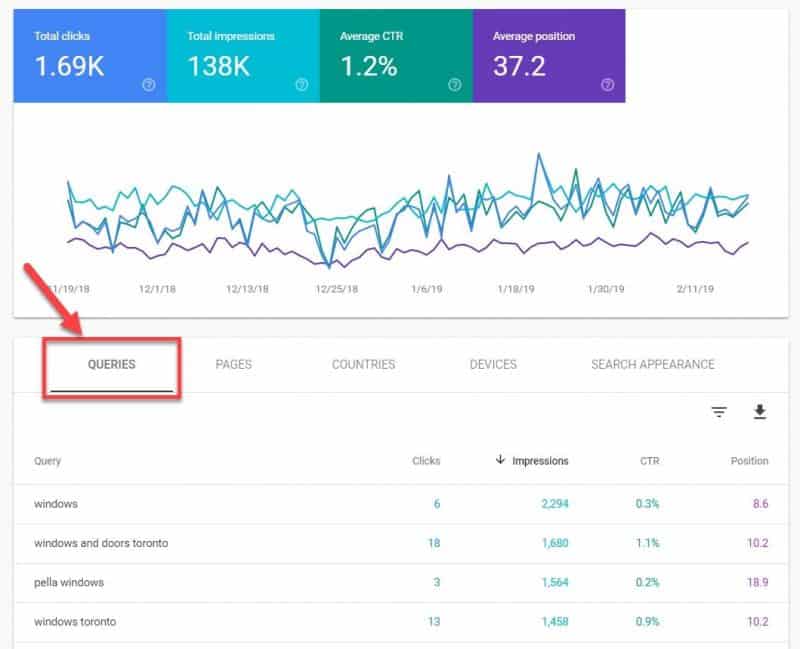
This report includes details for each query such as the number of clicks, impressions (how many times your site appeared in the results), click-through rate (CTR), and your position in the SERP.
Auditing the keywords you already rank for includes:
- Check to see if you’re ranking for your target keywords – Make sure you’re ranking for your target keywords, and also check your position for each one. If your site doesn’t appear for your target keywords or is positioned very low, you need to improve your content and/or your SEO efforts.
- Identify keywords with high impressions and low CTR – These are an excellent opportunity for you because of the high search volume and traffic potential for these queries. You just need to optimize your title tags and meta descriptions to match users’ intent to get more people to click through. This is a low hanging opportunity that can result in a ton of traffic.
- Check if you’re ranking for all your branded search terms – In the first step, you checked if you’re ranking for your brand name. In this step, you should review your other branded search terms, such as queries related to your products/services, your location, etc.
- Investigate if there are any unexpected keywords that you’re ranking for – If you find unrelated queries in this report such as casino, betting, viagra, etc., this might be a sign that your site is hacked and you need to take immediate action.
You can also check the Search Appearance tab to see if your site is ranking for any rich snippets like knowledge graphs, breadcrumbs, review stars, etc.
9. Analyze your organic search traffic
Obviously, your primary SEO goal is to get organic search traffic.
That’s why it makes perfect sense to audit how your rankings translate into actual visitors on your site.
Even more importantly, you’ll want to determine if your organic traffic is turning into paying customers.
For this, you need to fire up your trusty Google Analytics and navigate to Acquisition > Overview > Organic Traffic report.
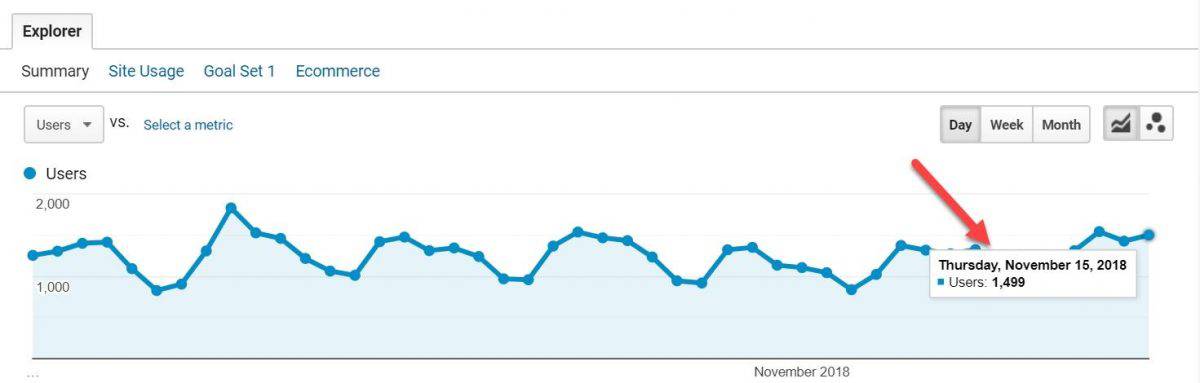
This report shows that in November of 2018 the number of visitors from organic search was roughly around ≈1500 per day.
Not bad.
From the same report, click on the Landing Page tab to check which pages bring in the most search traffic.
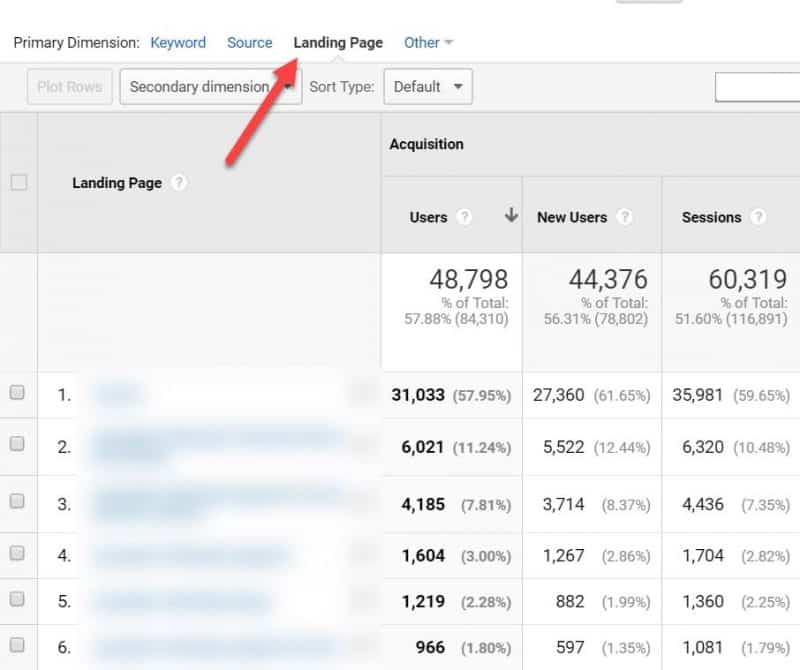
If you see a large variety of pages in this report, it’s an indication of solid SEO, since multiple pages on your site are able to bring in organic visitors.
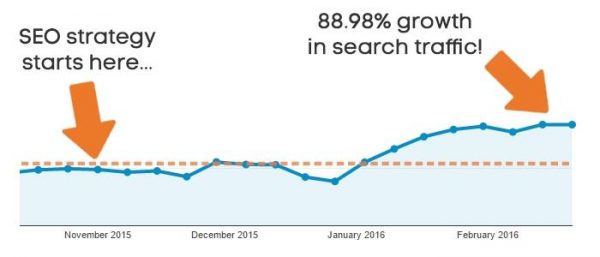
Finally, set a slightly longer time frame (6 months) to analyze your search traffic over time.
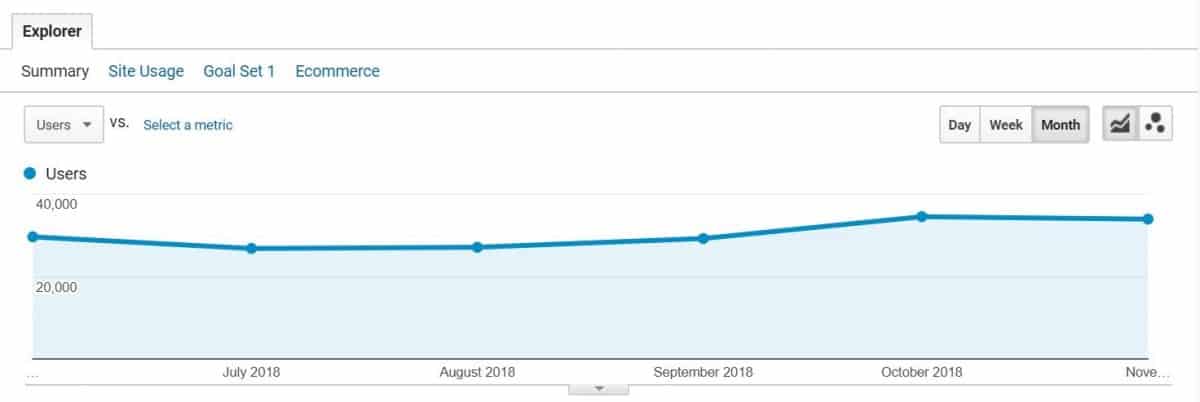
In our example, you can see a steady rise in organic traffic which is a good thing.
If you notice any sudden dips in traffic at certain times, this might be an indicator of a serious issue (such as a Google penalty).
Make sure to compare results against the same period in previous years. If you see similar dips every year around the same time, this could just be a seasonal thing (if you sell ski equipment, you’re not likely to get much search traffic during summer).
Otherwise, check for Google penalties or other major SEO issues.
Step #3: Technical SEO audit
Don’t worry, even though this part is called a Technical SEO audit; you don’t have to be a developer to do it. There are many tools that can assist you even if you’re not super techie.
Still, it’s essential to check technical details to ensure your site can be properly indexed and that you provide excellent user experience (which is appreciated by both search engines and users).
There’s a lot to cover here, so let’s get straight to it.
10. Verify that your site is mobile-friendly
In 2018 mobile devices accounted for over 52% of all internet traffic!

So it stands to reason why Google insists on their mobile-first indexing.
For you, this means your SEO mindset needs to shift to mobile-first as well.
Make sure your site is 100% mobile-friendly.
You can easily check this with another tool from Google’s arsenal called Mobile-Friendly Test.
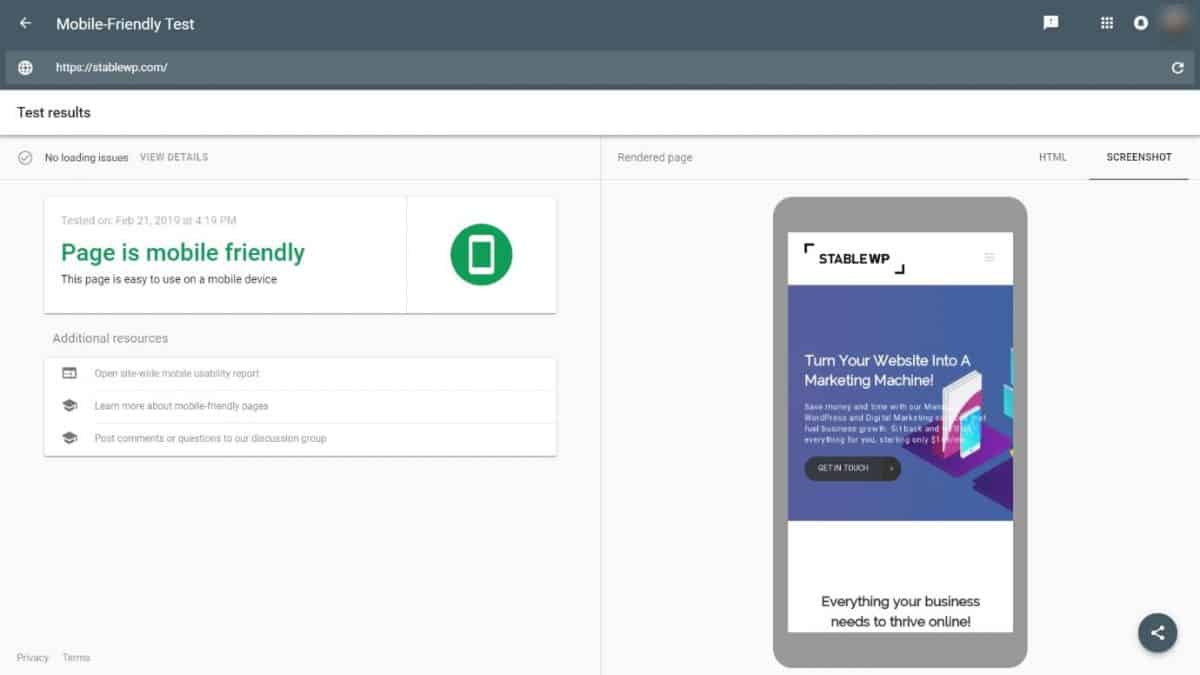
If you run into any loading issues, be sure to resolve them following Google’s recommendations.
Generally, ensure your WordPress theme is lightweight and responsive, so your site looks and performs well on both mobile and desktop devices.
Also, consider using AMP (accelerated mobile pages) for even better performance on smartphones. This does come with a caveat since your website will be stripped down to bare essentials and might not be suitable for everyone.
11. Ensure your site is super-fast
Google has confirmed the site speed to be one of the major SEO factors a while back. But recently Google put even more emphasis on speed and loading time with the Page Speed Update from 2018.
Now, more than ever it’s crucial to get your site “up to speed” (pun intended).
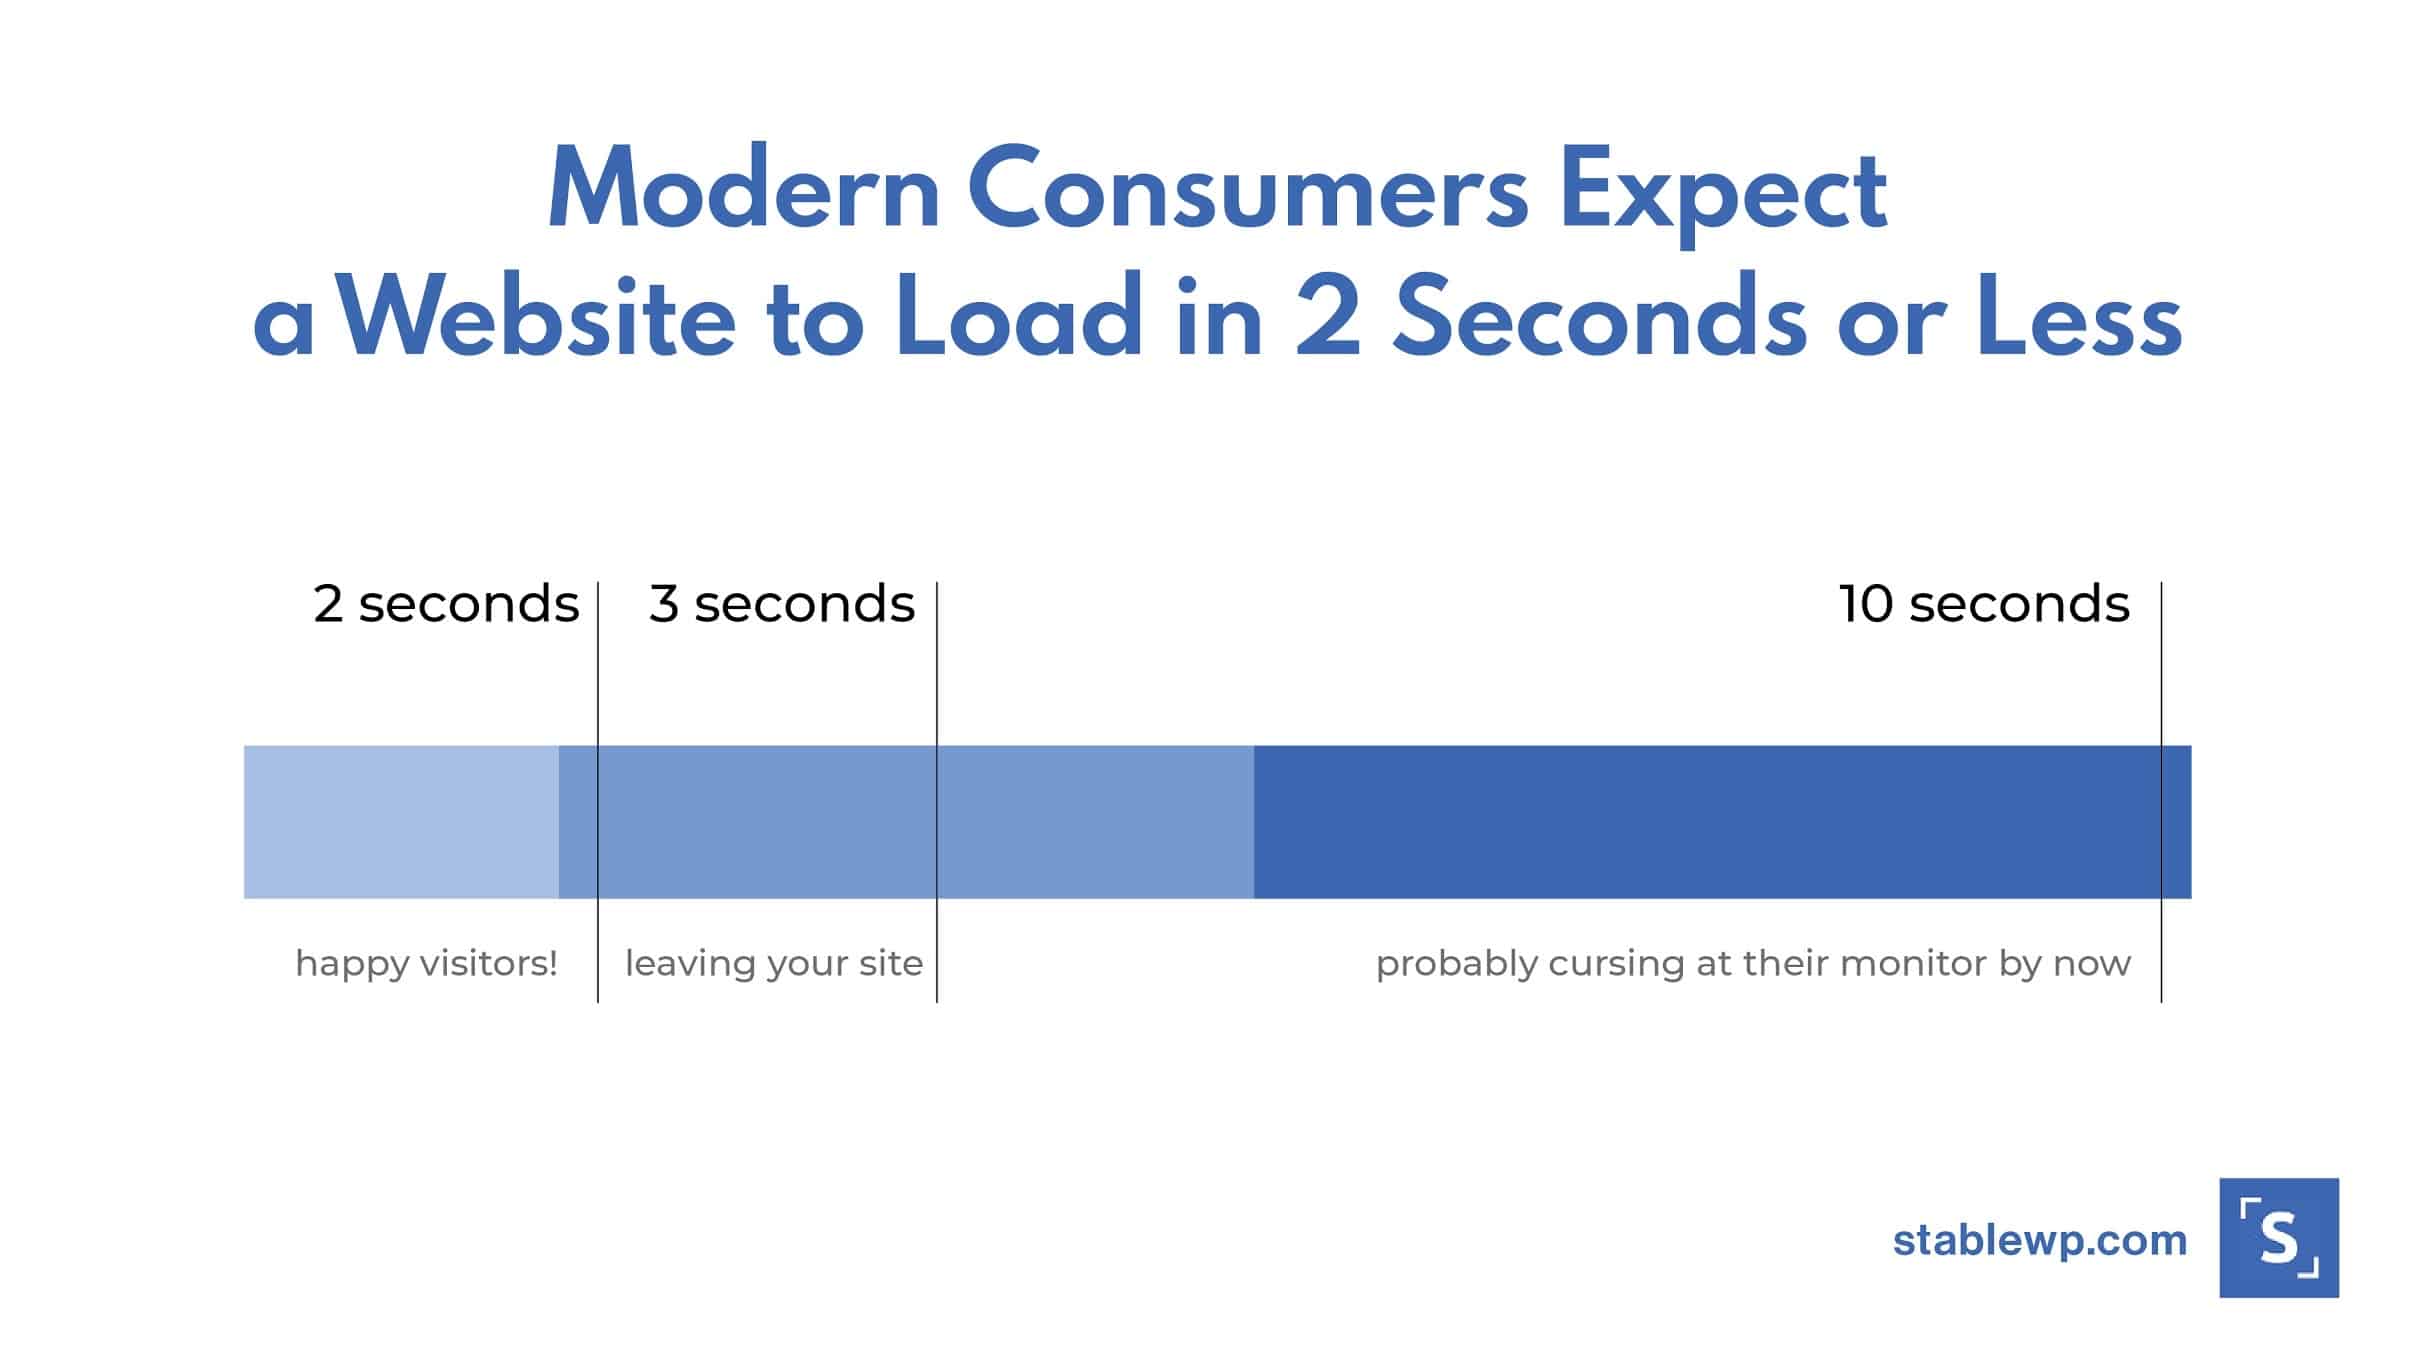
Speed is also essential for driving conversions since modern consumers expect loading times to be under 2 seconds.
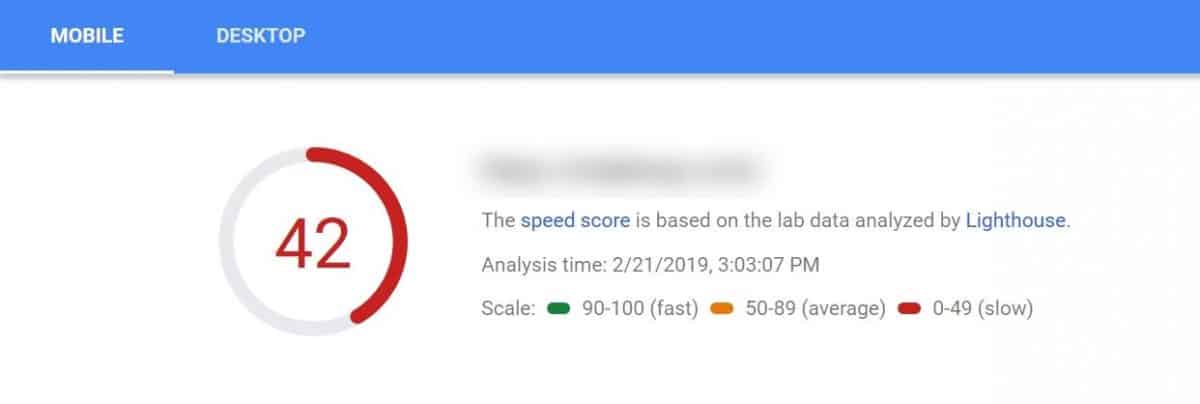
But first, you need to check your current speed, and you can do so with the help of Google’s own Page Speed Insights.
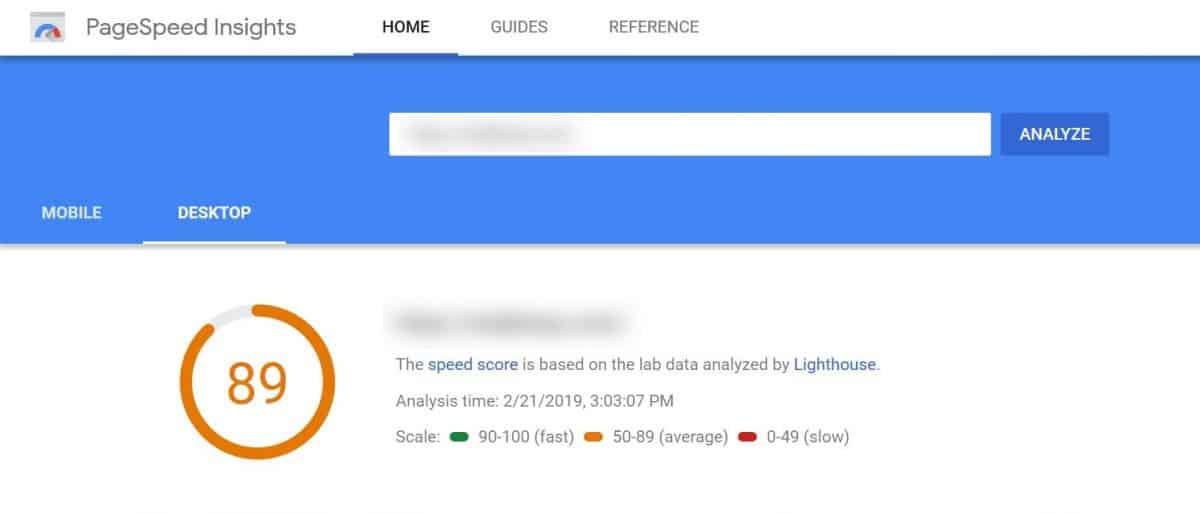
Be sure to check both your page speed on the desktop and mobile devices because of Google’s mobile-first approach.
If you get speeds that are under 50, you need to take immediate action to fix your loading times.
This tool also comes with some suggestions on how to fix your speed, however, if you want a more in-depth analysis of your page use GTmetrix or Pingdom.

To improve your speed be sure to:
- Optimize your images
- Enable caching
- Reduce HTTP requests
- Utilize lazy loading
- Use CDN
- Enable G-zip compression
- Remove render-blocking JS and CSS
We have you covered with the most comprehensive speed optimization tutorial on the internet. Check out our step-by-step guide on how to make your site load in less than a second.
Fix your loading time issues, and you’ll be climbing up the ranks in no time.
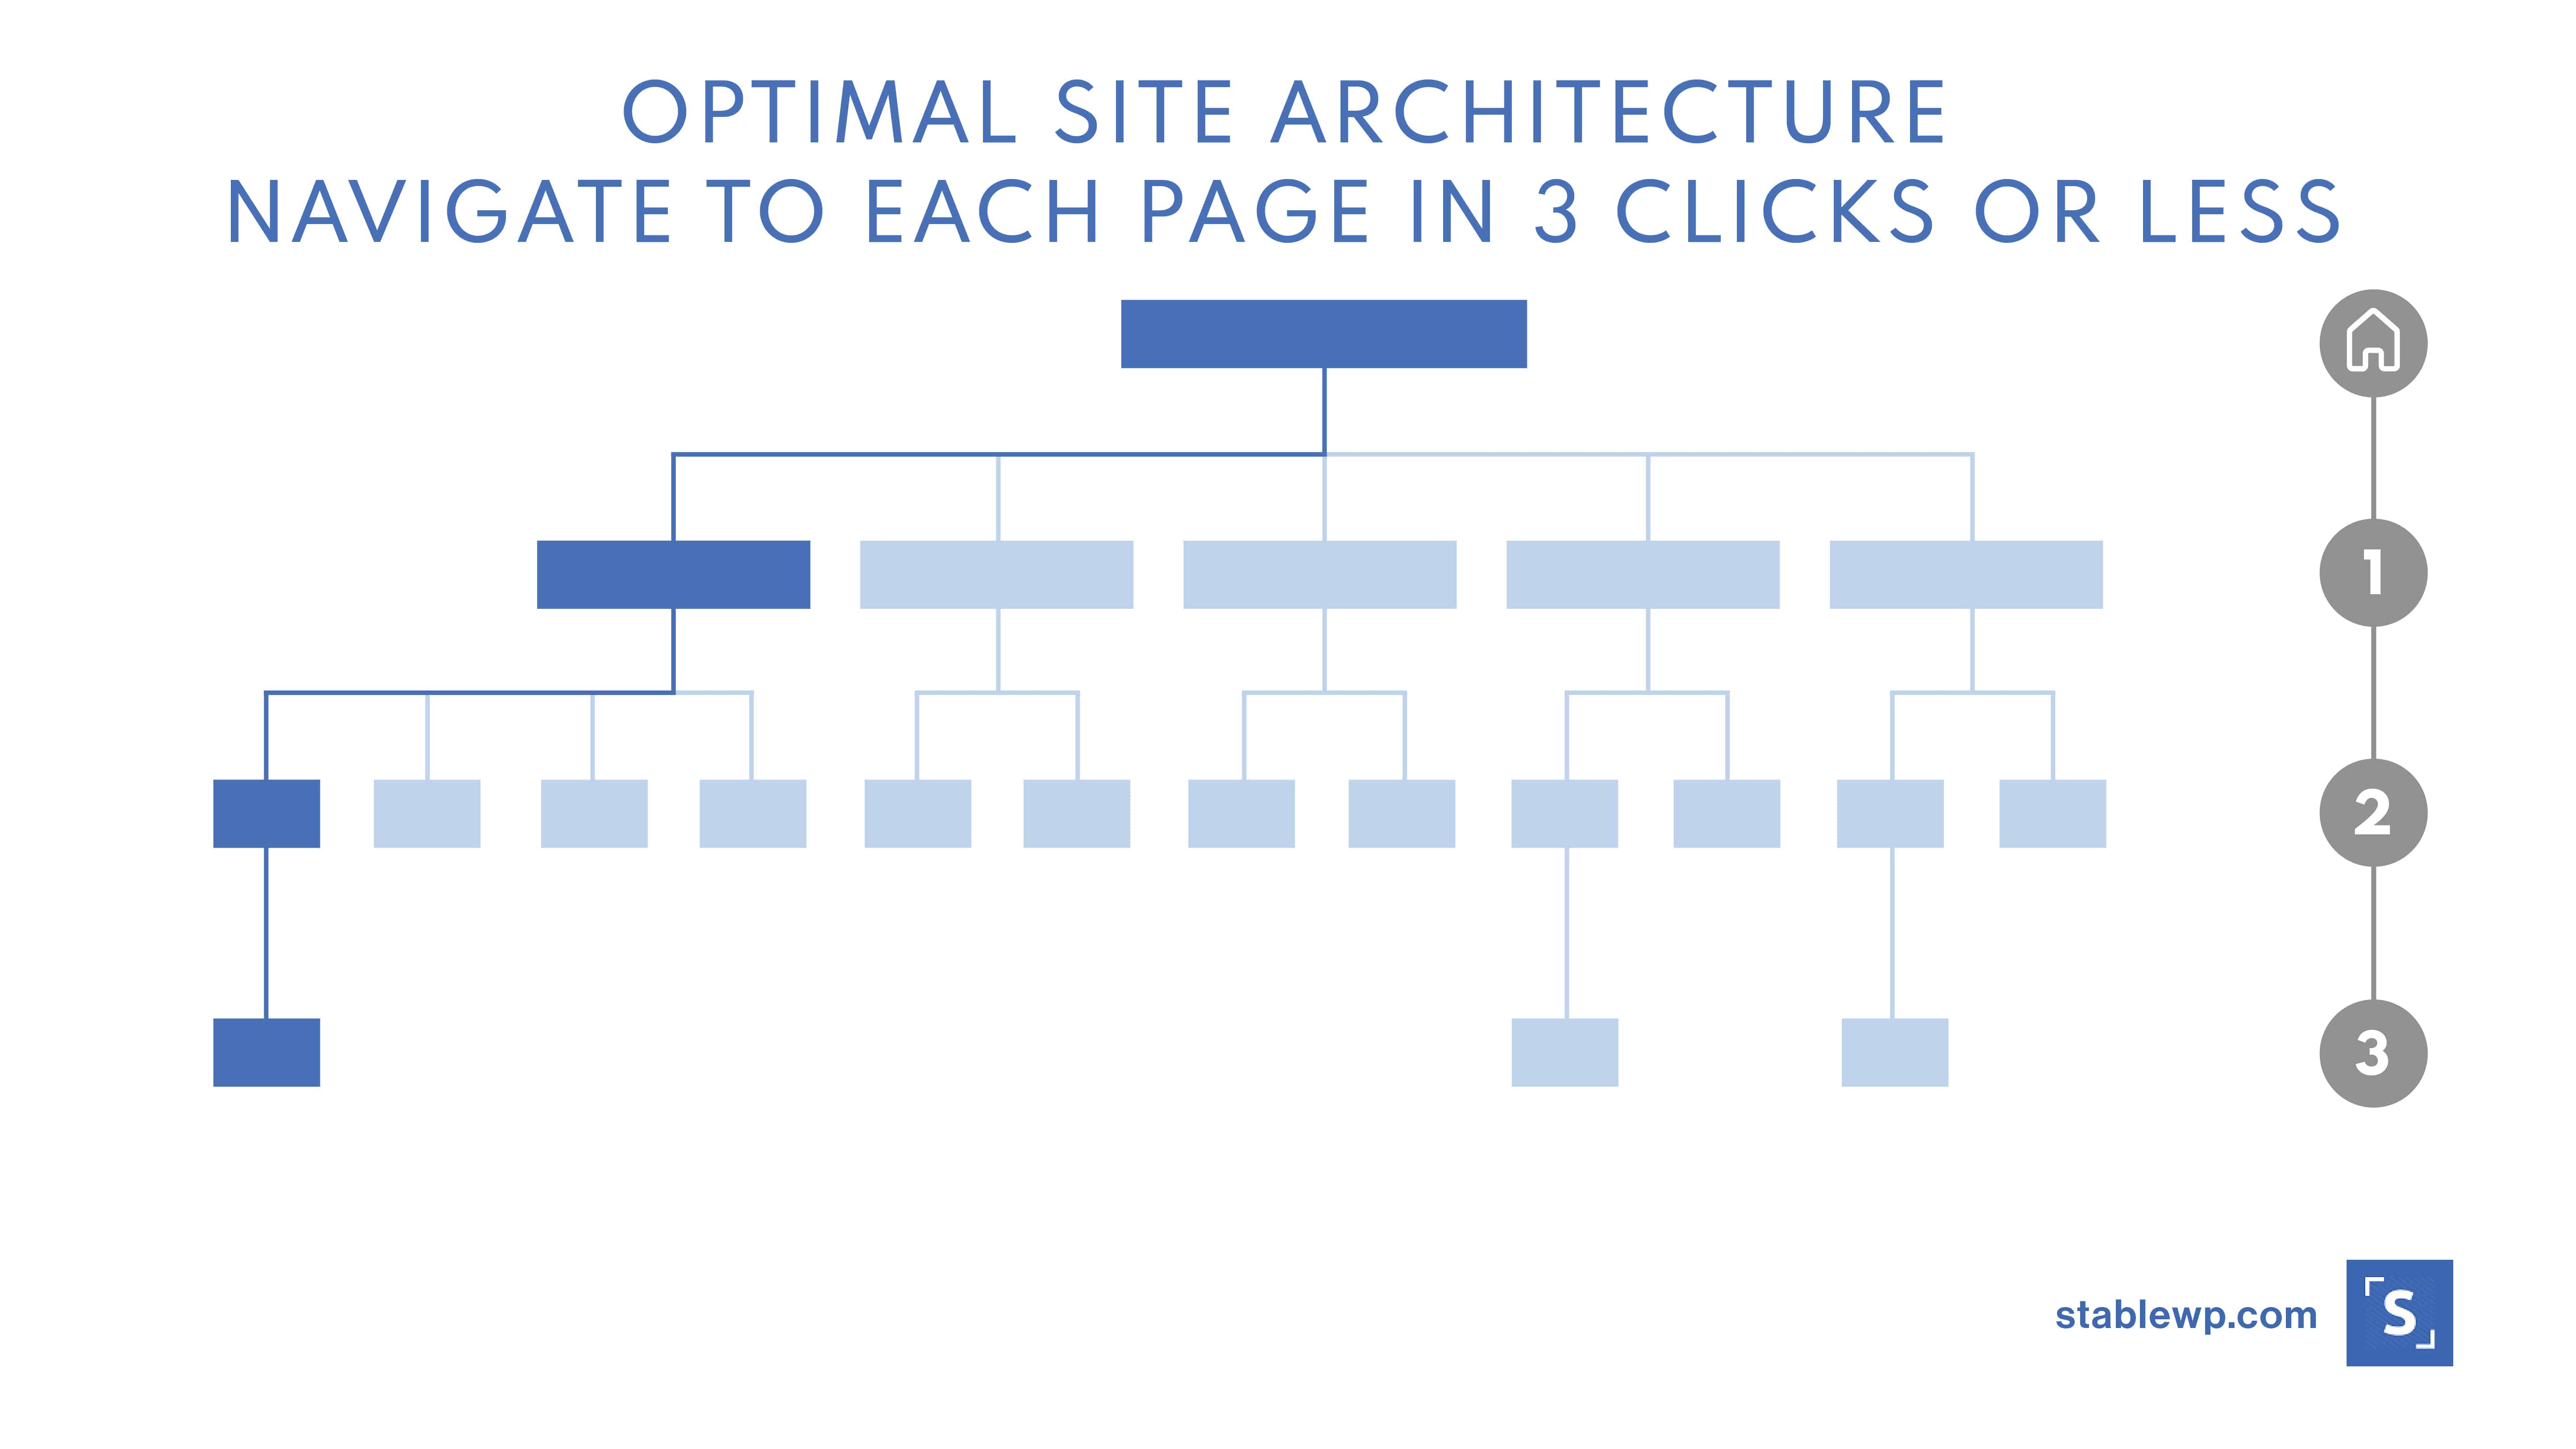
12. Double-check your site architecture
Your site architecture is another critical part of SEO, yet you’d be surprised how many people simply overlook it when building their websites.
In simple terms, site architecture is how the pages on your website are organized.
From an SEO perspective your site architecture is important for two main reasons:
- It helps search engines find and index all your pages
- It signals Google (and others) which pages are most important (at the top of the hierarchy)
When inspecting your site architecture ask yourself these questions:
- Are your pages organized in a logical way
- Can search engines find each page on your site
- Is it easy to find and navigate to important pages on your site
- Is your architecture flat or deep (hint: it should be as flat as possible)
Good site architecture is also the top prerequisite to get those site links mentioned earlier.
Additionally, a well-thought-out site architecture also helps with good user experience.
The rule of thumb is to have a shallow site architecture where each page can be accessed with three clicks or less!
Unfortunately, many websites are not designed with SEO in mind, especially older sites or those built without professional help. So do take time and audit your architecture.
In some very unfortunate instances, you may need to contact your web development team to overhaul your entire website.
13. Verify you’re using an optimal URL structure
Your URL structure is tightly connected with your site architecture. WordPress has correctly configured your URL structure by default. So, if the previous step didn’t indicate any issues, this one should be fine as well.
It’s still worth checking though, and it will only take a minute.
Make sure each page has a unique URL that corresponds to your site architecture.
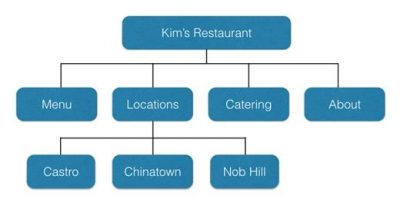
For example, the URL structure for the Nob Hill location should be:
https://kimsrestaurant.com/locations/nob-hill
Avoid having URLs with numbers in them, like so:
https://yoursite.com/82395469
And finally, make sure to include your target keywords in your URLs, and separate words with hyphens (-).
You can easily set the correct default permalink structure in WordPress by going into Settings > Permalinks and tick the box that says “post name.”
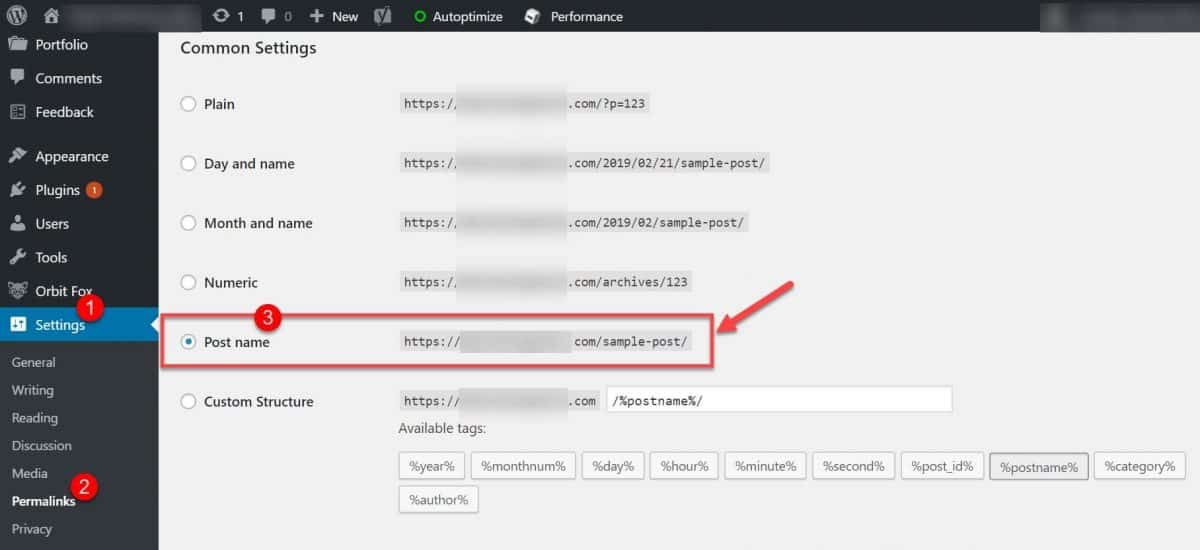
That’s all there is to it. You can now proceed to the next item on our SEO audit checklist.
14. Inspect your robots.txt
Managing your pages with robots.txt is one of the basic SEO practices.
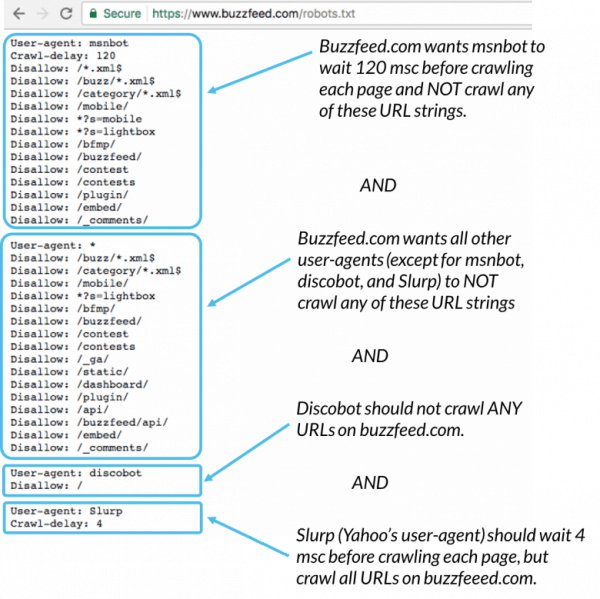
Your robots.txt file is used to control which pages should be accessible to search engines.
With this file, you can directly tell search engine spiders which pages they should crawl and index. For example, you can block specific pages like your checkout page, subscription confirmation (“thank you”) page, etc.
Robots.txt file also allows you to control the behaviour of crawlers, so you can set limits and delays to save resources and boost performance.
Make sure to inspect your robots.txt file to ensure that important pages are not blocked. Look for the “Disallow:/” instruction in your file and make sure the pages are set correctly.
You can access your robots.txt file in WordPress by going into the Yoast SEO plugin Tools > File Editor option.
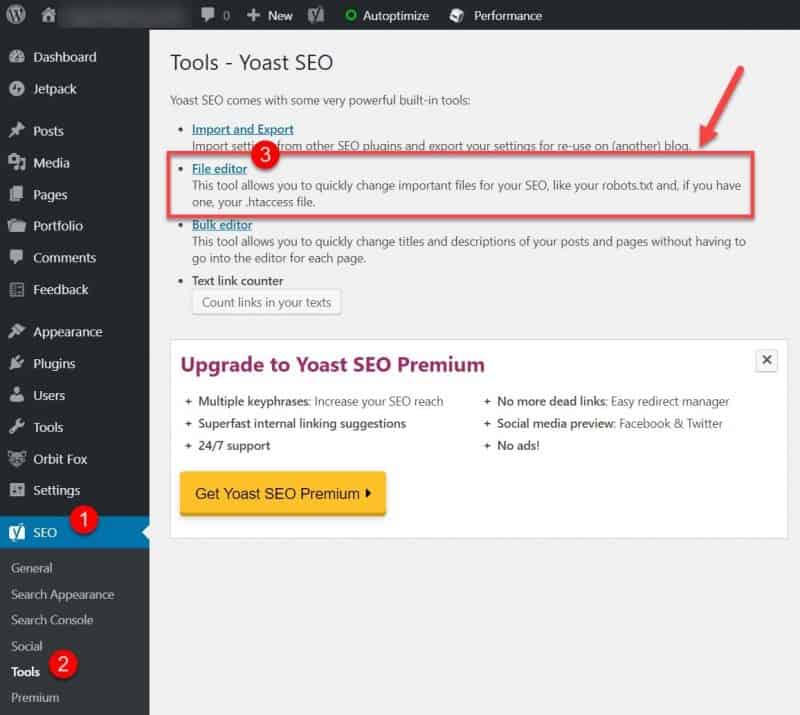
From here you can also create a new robots.txt file if you don’t have one already.
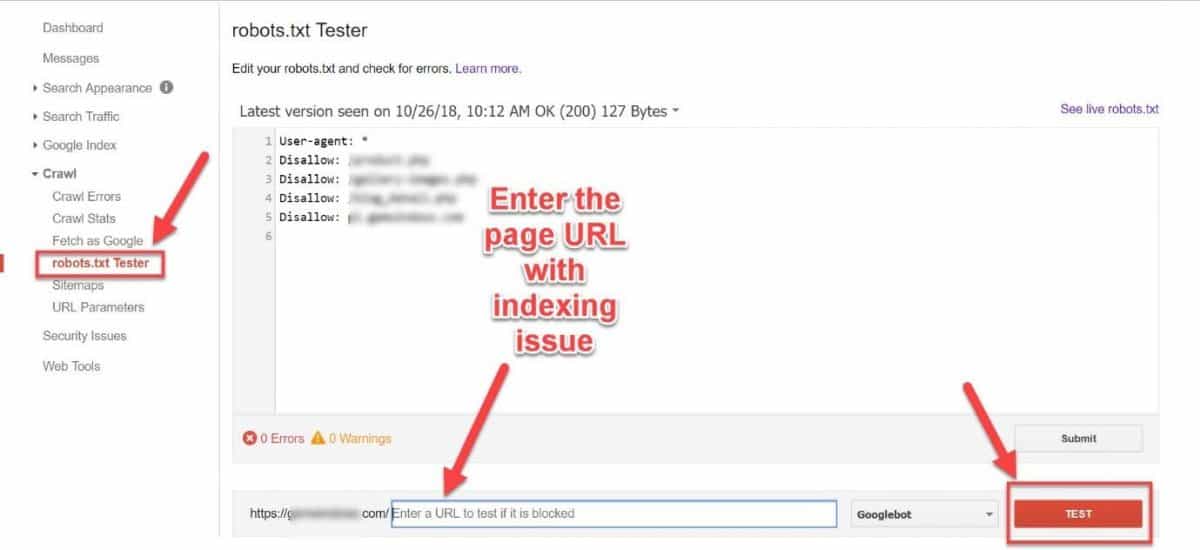
You can also use the Search Console to edit and test your robots.txt file for errors.
15. Confirm your sitemaps
An XML sitemap is a list of pages on your site Google needs to index. It’s a way of organizing your website, identifying URLs and the data under each section.
Sitemaps improve SEO by helping Google find out what pages are present and which have recently changed, and to crawl your site accordingly.
To check your sitemaps, go into your Google Search Console and open up the Sitemaps report.
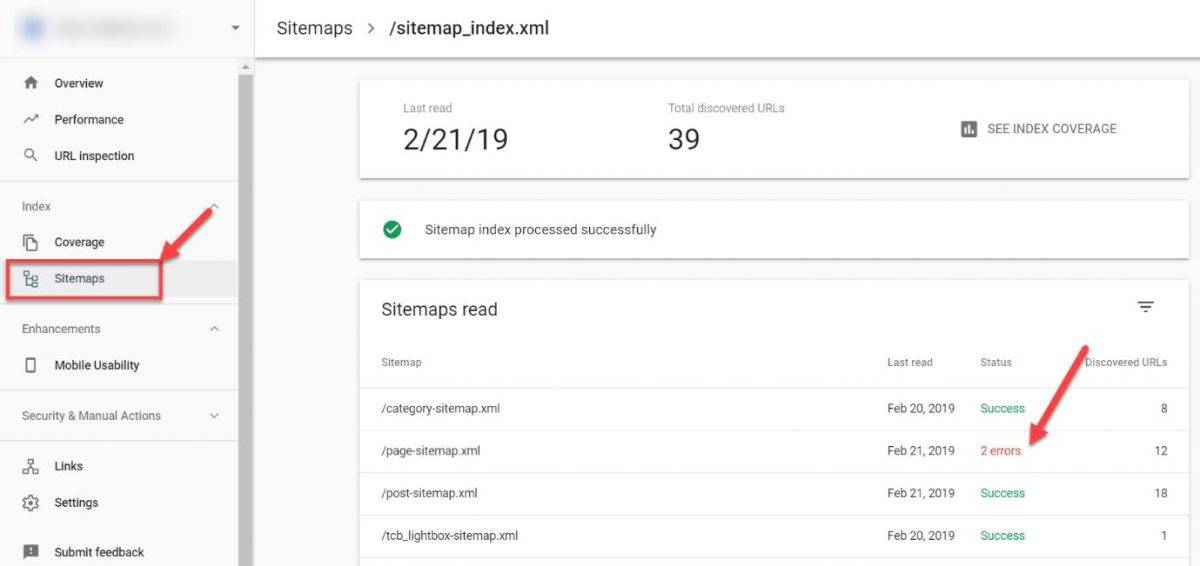
Make sure to investigate any errors that you notice here to avoid indexing problems.
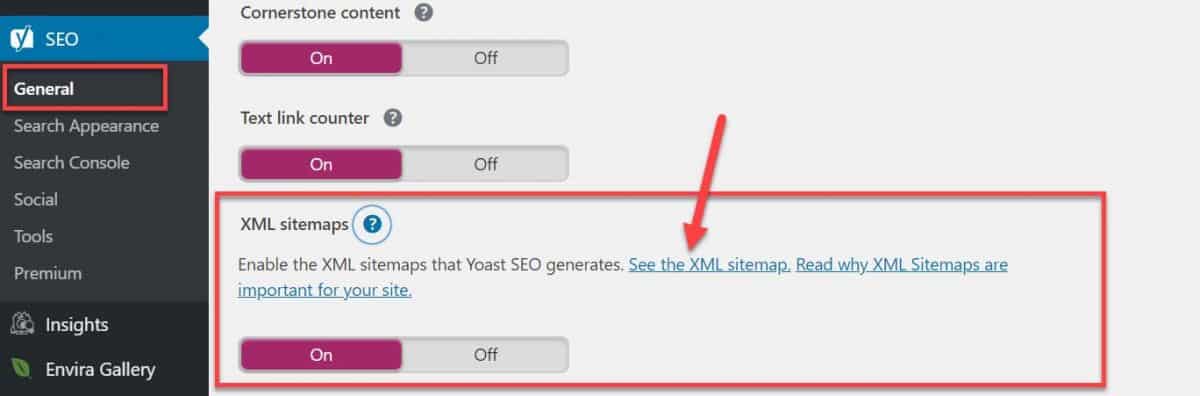
If you don’t have XML sitemaps, Yoast SEO plugin will automatically create one for your site. Just navigate to General > Features Tab and enable sitemaps.
Finally, submit your XML sitemap in your GSC.
If you don’t have a WordPress website, you can use the XML-sitemaps tool to create one for free.
16. Make sure you have breadcrumbs enabled
Breadcrumbs are another elementary part of technical SEO. They help users navigate your website and get back to your home page by following the menu links.
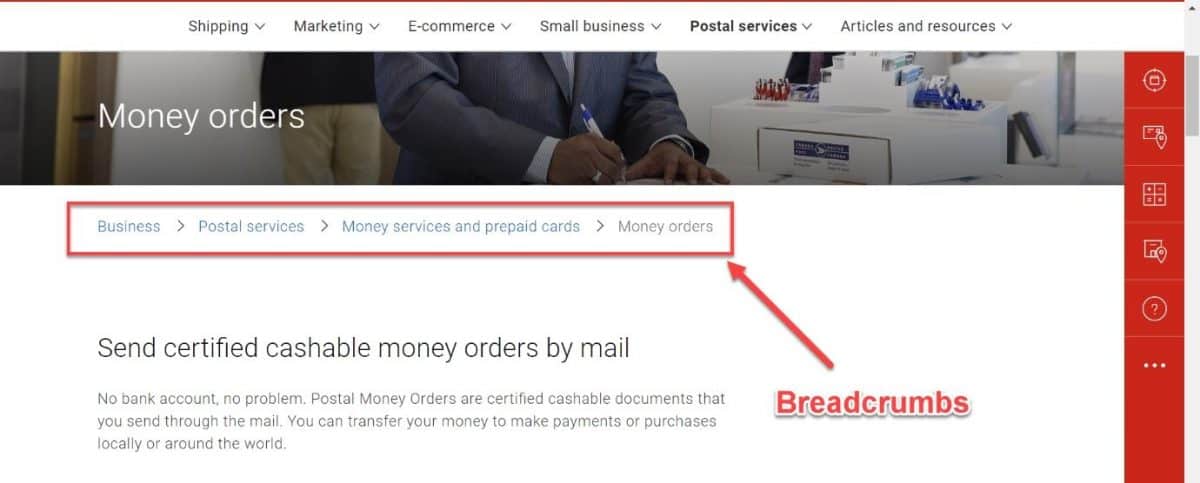
Google recommends enabling breadcrumbs because it’s another way of figuring out how your website is structured.
Besides that, breadcrumbs may also appear in search results.

To enable breadcrumbs in WordPress, add the following piece of code into your header.php at the end.

Then go into your Yoast SEO settings Search Appearance > Breadcrumbs tab to enable and configure your breadcrumbs.

Make sure everything is properly configured, and you’re good to go.
17. Ensure you have set a canonical URL set
A canonical URL lets you tell search engines that certain similar URLs are actually the same. Similar pages occur for a number of reasons, one of them being the www/non-www and HTTP/HTTPS variants of your site.
With a canonical tag, you tell Google which version you want to be indexed and shown in the search results. This solves the problem of duplicate content which plagues many websites.
It’s similar to what the 301 redirect does, only without the actual redirect which can improve performance. That’s why setting a canonical URL is sometimes referred to as a “soft redirect.”
The SEO benefit of setting a canonical tag is search engines know which is the main version of your page so it can count all the links pointing at all the different versions as links to the canonical version.
This helps link juices flowing towards one page, instead of dissipating all over multiple pages.
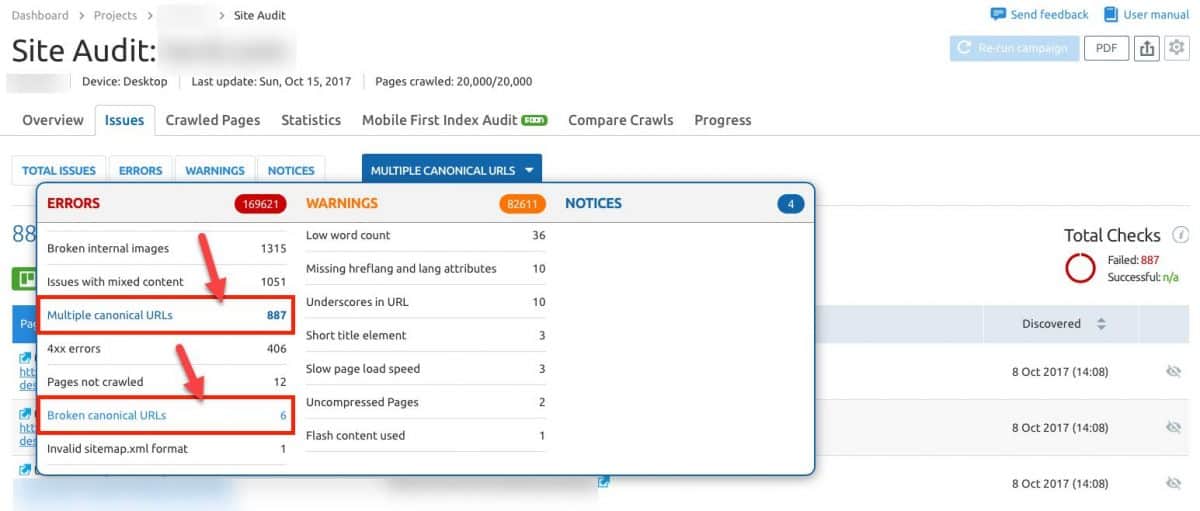
Use the GSC URL inspection tool to check which page Google considers canonical. With SEMrush Site Audit tool, you can run a thorough inspection of your canonical tags to identify problems like
- Broken canonical links
- Multiple canonical URLs
You can learn more about how to do a complete site audit with SEMrush in Copyproblogger’s guide.
18. Verify you have structured data enabled
Google uses structured data (aka schema markup) to better understand the content of your pages. It provides additional information to search engines which helps you get those attractive search features such as:
- Reviews
- Prices
- Local Packs
- Social profiles
- Rich snippets, etc.
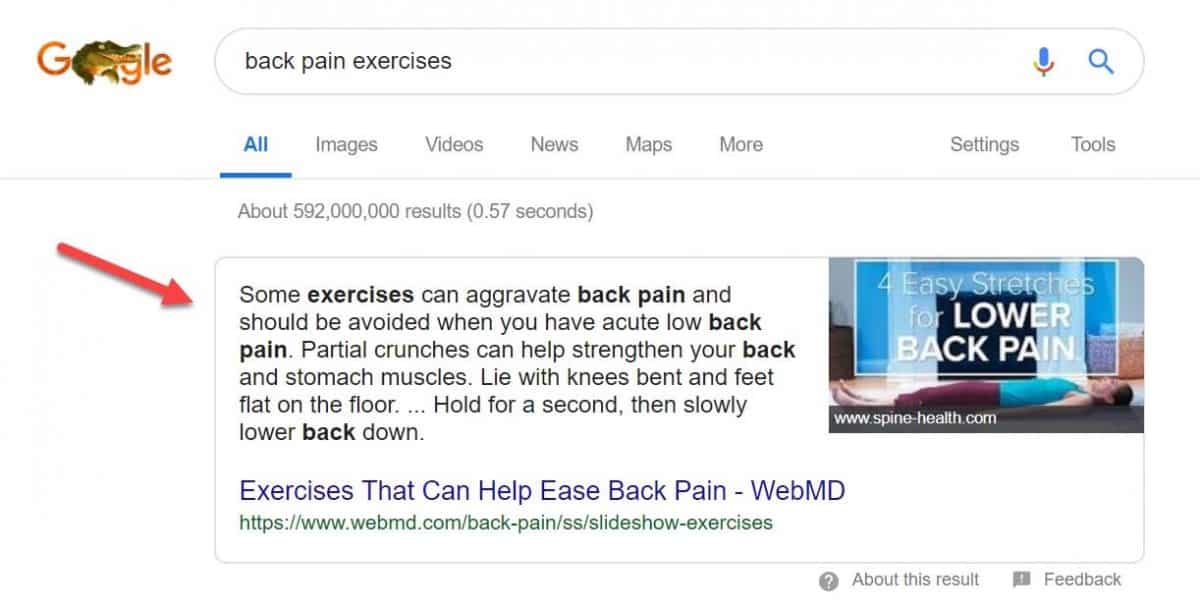
Featured snippets can do wonders for your SEO and entire business. According to research having snippets in SERP results in 4x higher CTR and even a 677% increase in revenue!
Provided that you did your SEO homework and enabled structured data on your site, you need to test it to ensure it’s set up properly. For this, you can use Google’s Structured Data Testing Tool.
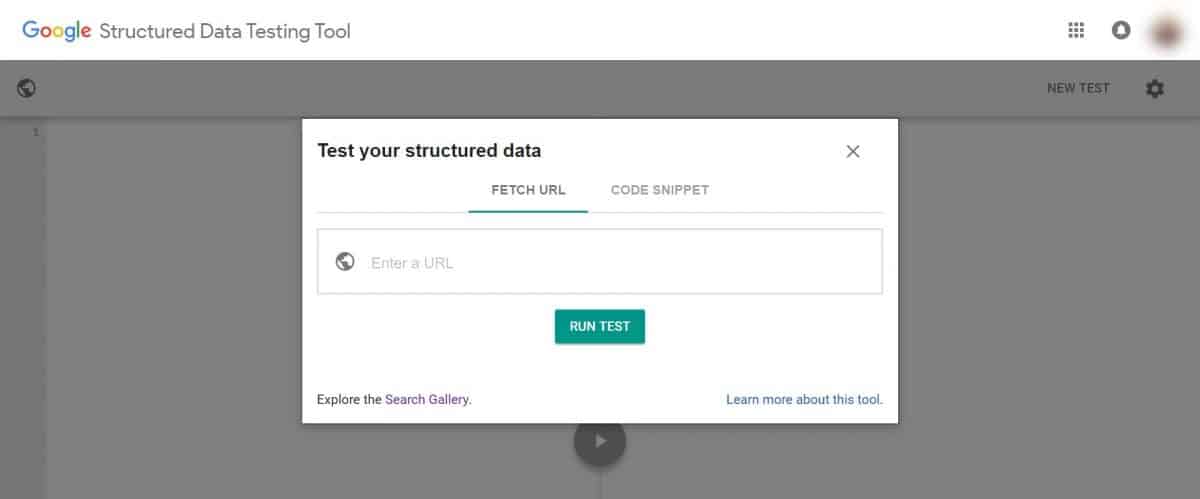
You can also use GSC Structured Data report to check in on your schema markup health.
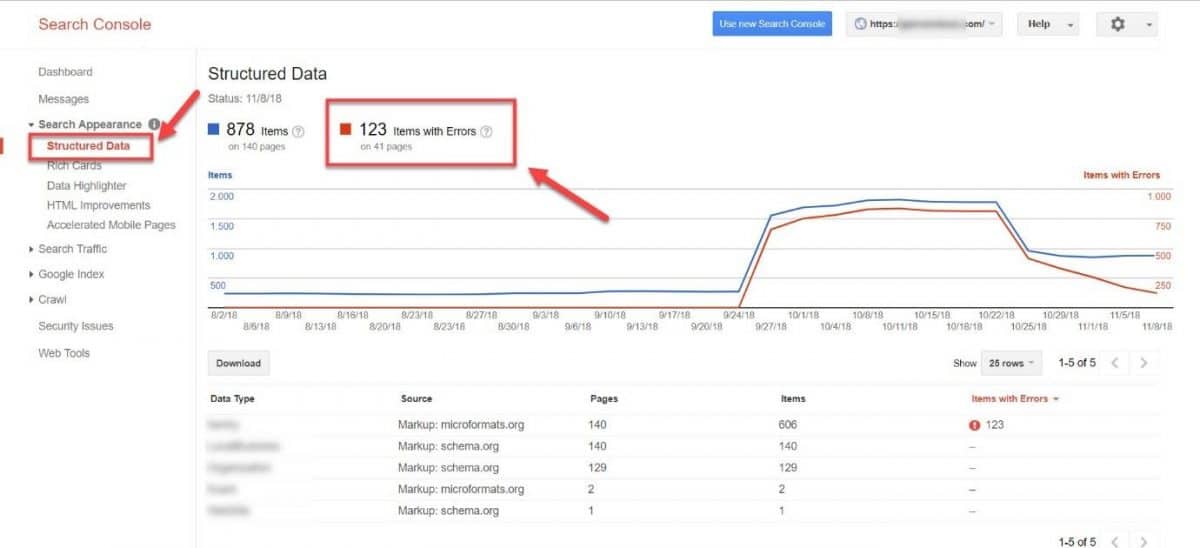
If you do encounter any structured data errors, be sure to address them ASAP.
19. Inspect your 404 pages
404 pages are very useful; they appear when a user reaches a page that is not found on your website. They most often occur when a page no longer exists on your site.
Google removes your 404 pages from their index, which in normal circumstances is precisely what you want.
However, in some instances, this can hurt your SEO. This may happen if the page you removed and replaced with a 404 had a lot of backlinks.
In that case, your link juice and authority is wasted away, since Google completely disregards all the links that point to a 404 page. To find these pages go to your GSC Coverage report and check your Excluded pages for the “Not Found (404)” message.
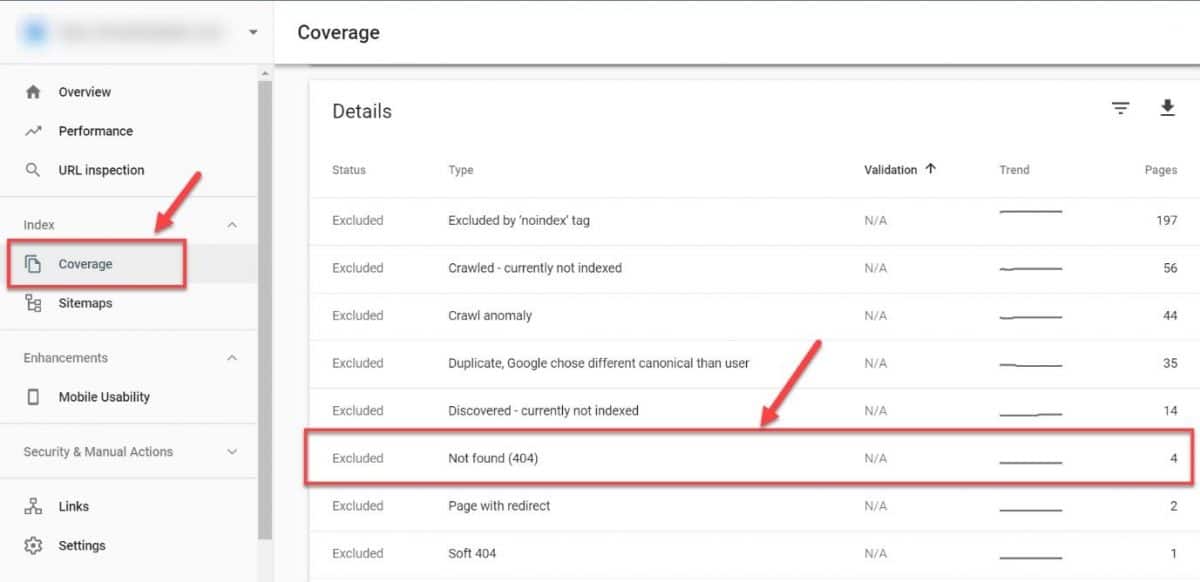
Prospect these pages for link equity. If you do find some pages with valuable link juice, reclaim those links with a 301 redirect pointing to a relevant (existing) page on your site.
20. Make sure you have HTTPS
Having a secured website is one of the top priorities for Google, which is why they officially confirmed HTTPS to be one of the ranking factors.
HTTPS means that your connection is secure with an SSL certificate which encrypts the link between the server and the browser. This enables secure browsing and even payments.
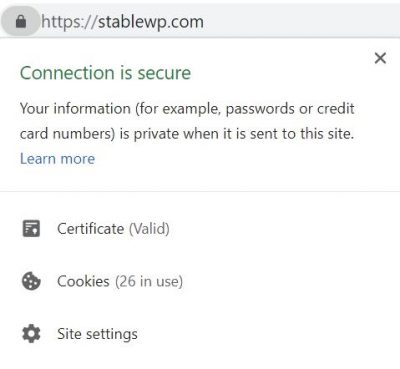
Check your URL for the HTTPS tag and make sure your visitors’ information stays private and secure.
21. Check for redirect issues
The final step in the technical SEO audit section is to check for any redirect issues.
There are three types of issues you should look out for:
- Unnecessary 301 redirects
- 302 redirects – These are temporary redirects used to divert traffic while you work on a page. However, they don’t pass link juice to the other page. That’s why 302 redirects need to be changed to 301s to pass link authority.
- Redirect chains – These are strings of redirects connected together. Redirect chains dilute your link authority and only bring partial link juice to the final page in the chain. They also hurt your page speed, that’s why you need to identify and break them up.
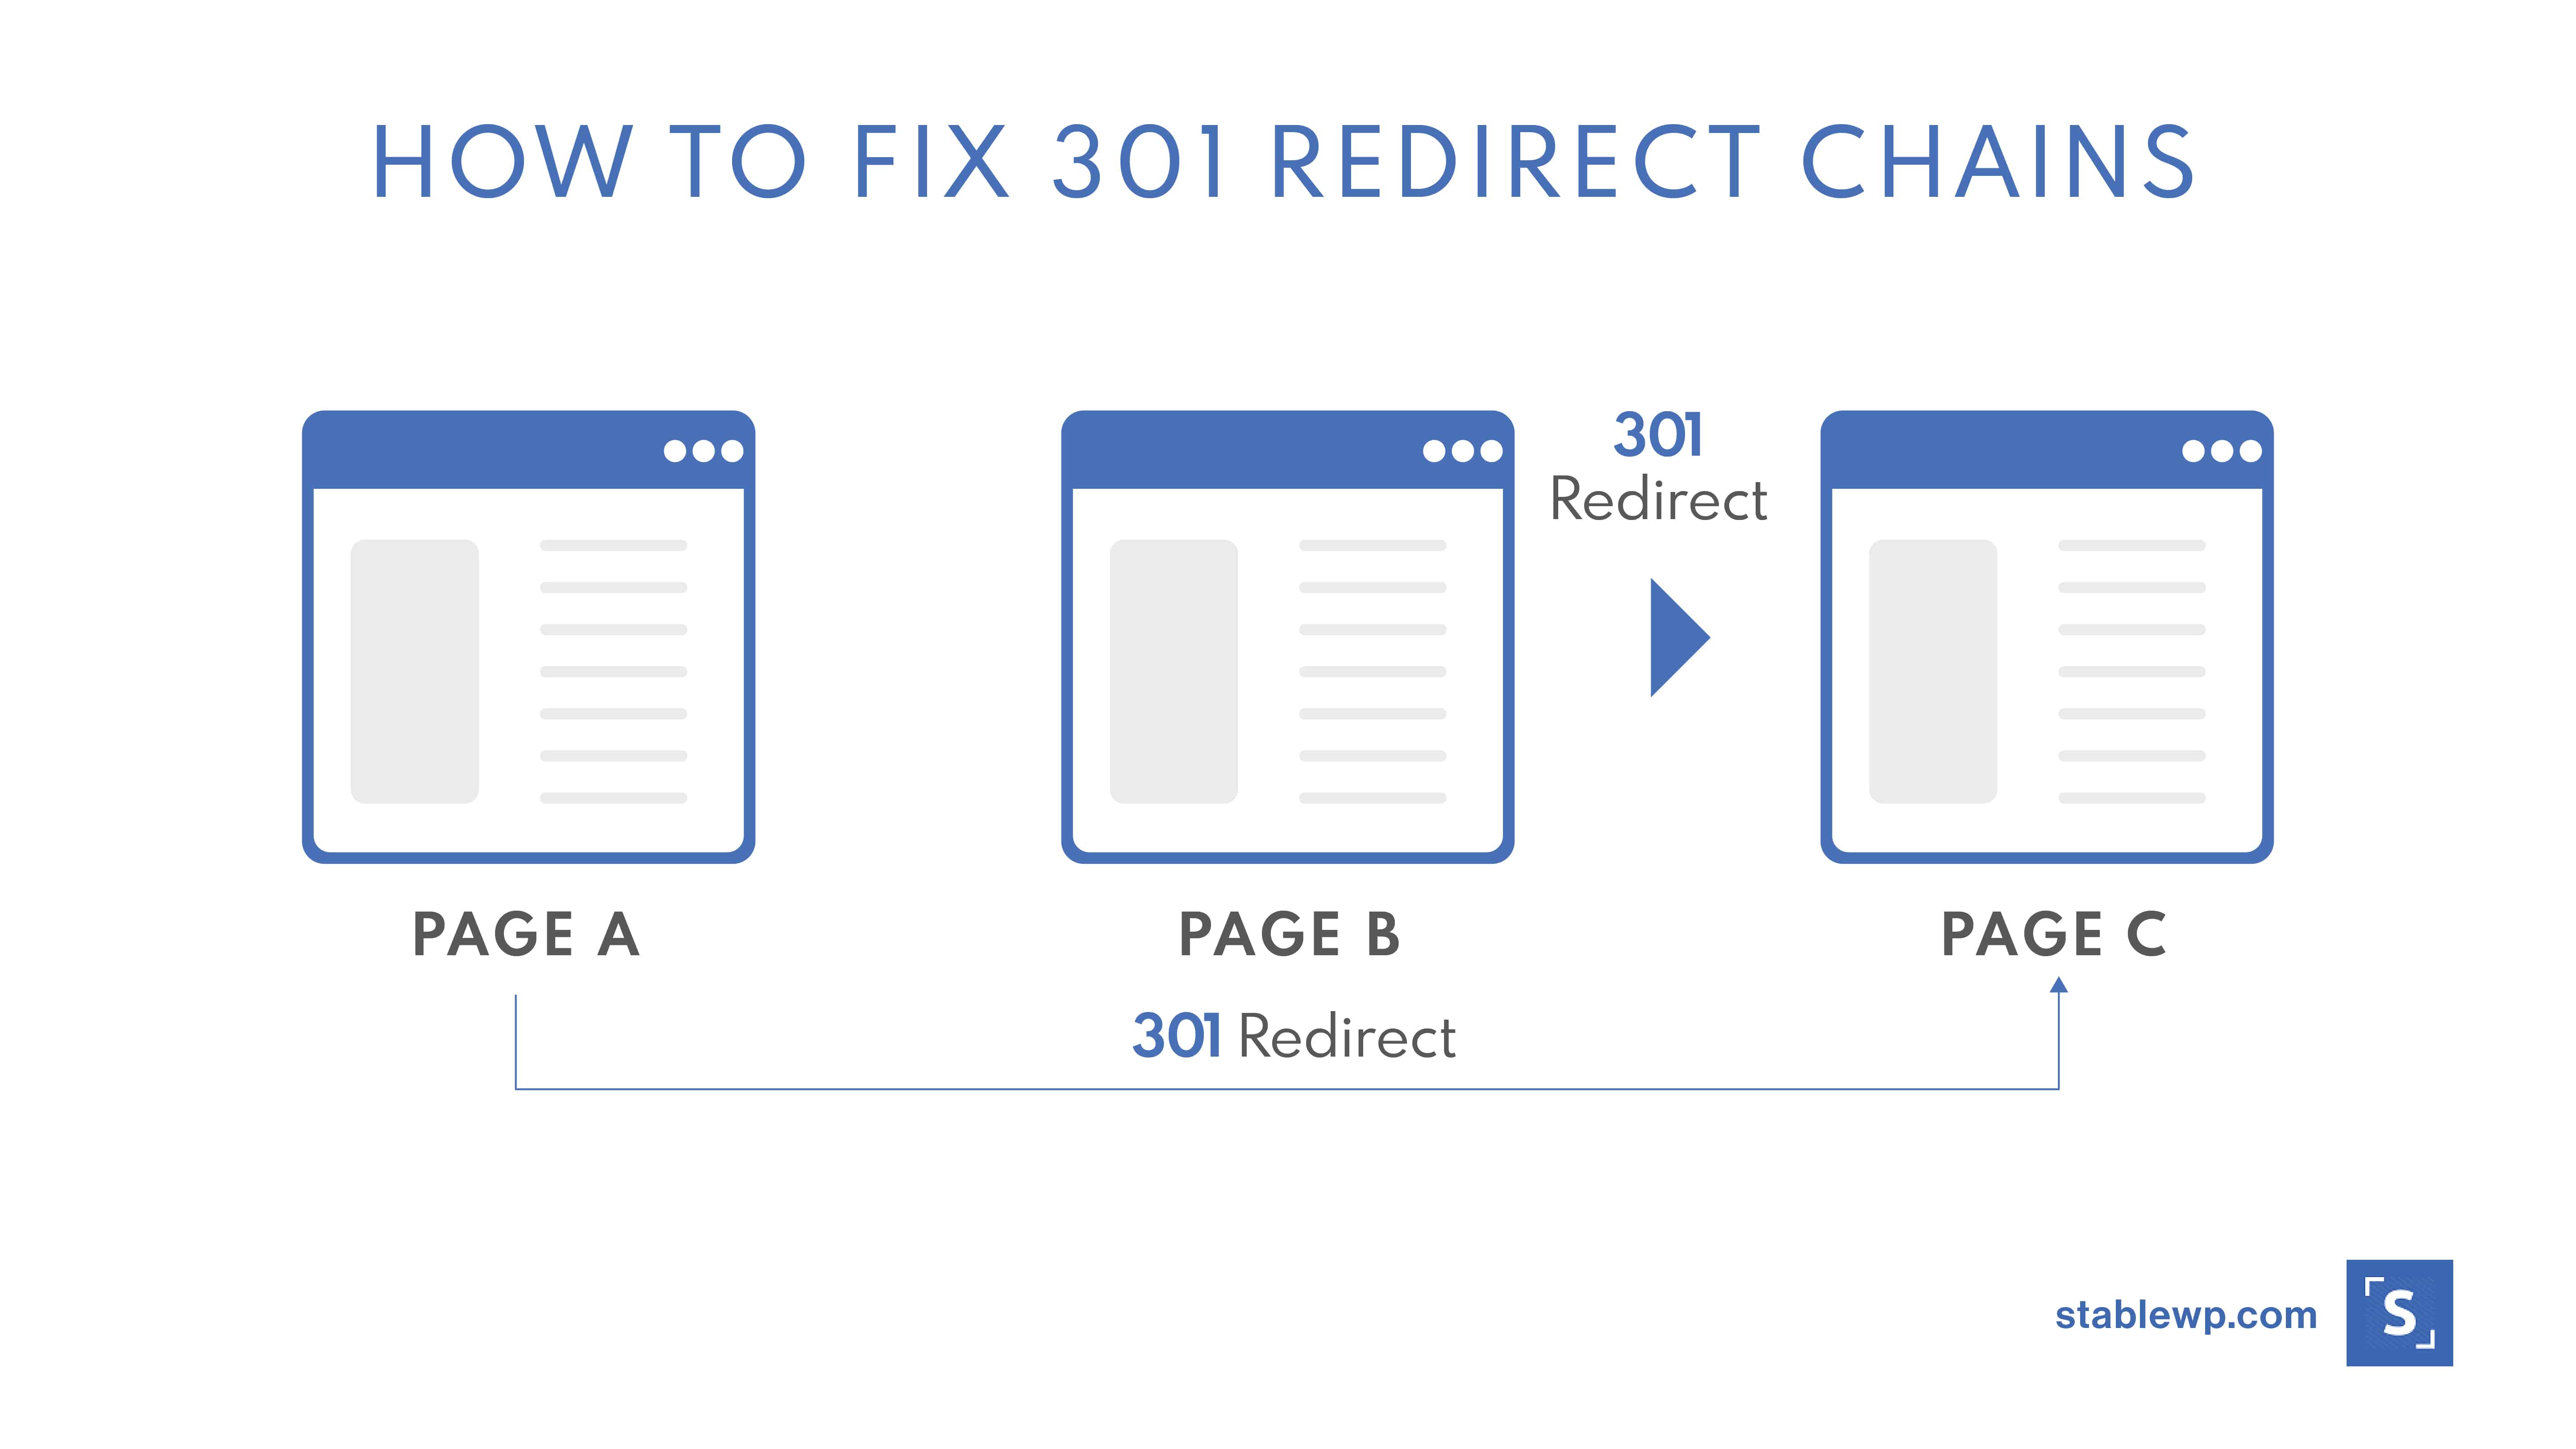
Use Screaming Frog to identify redirect issues by going into the Response Codes tab and choosing Redirections (3xx) filter.
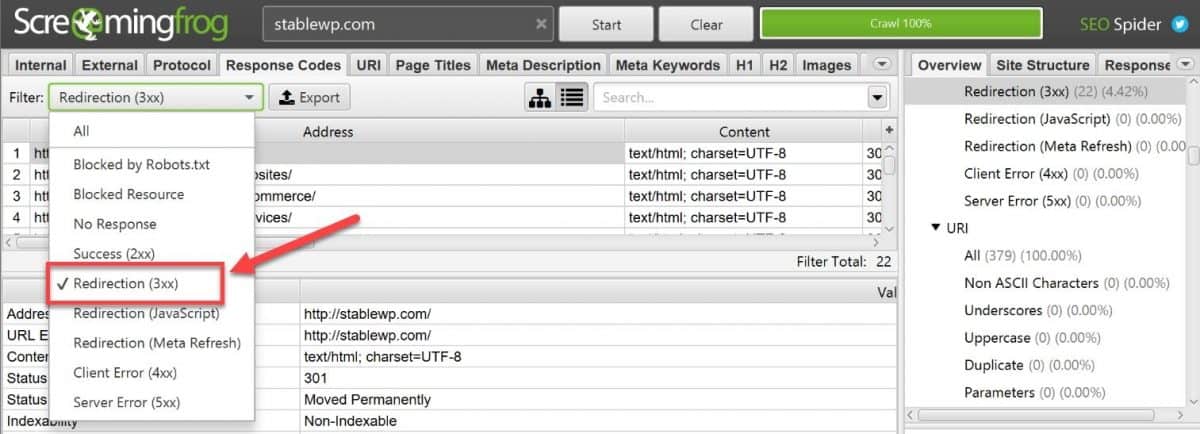
To find redirect chains, select Report and then click on Redirect & Canonical Chanis.

Step #4: On-page SEO audit
Provided that you meet the basic technical SEO requirements, On-page SEO is the most important part that gets your website ranked in search engines.
Your On-page SEO goal is to optimize content so that search engines can understand it’s meaning and the keywords you’re trying to rank for.
That’s why you need to take special care of the following section of your SEO audit.
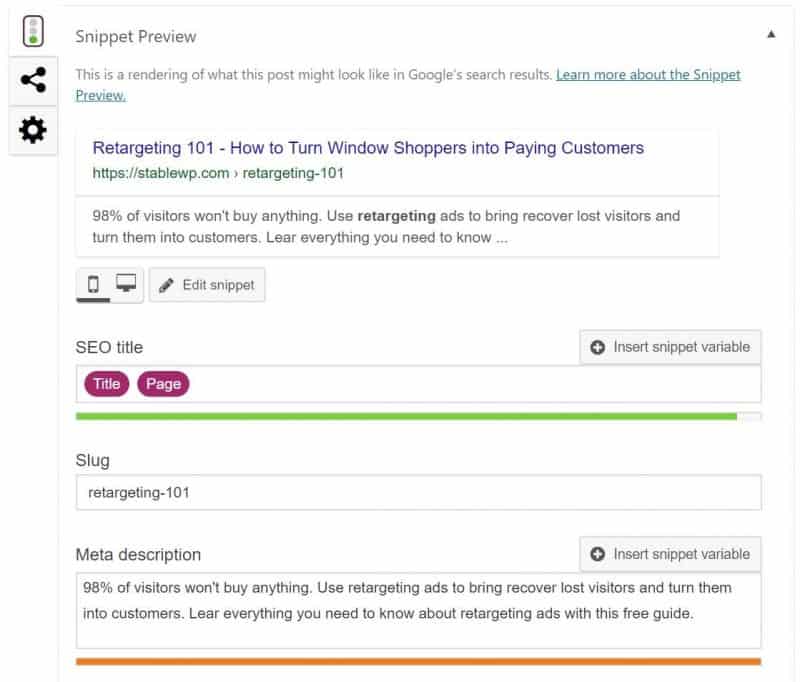
22. Examine your title tags and meta descriptions
Title tags and meta descriptions work in tandem to generate organic traffic from Google search results. Hook users with a magnetic title, then reel them in with the meta description to click through and visit your page.

Inspect your title tags and meta descriptions:
- Does each page have a unique title and description
- Are they attractive and within the character limit
- Do they contain your target keywords
- Can users understand what the page is about based on your titles and descriptions
- Are the descriptions actionable, inviting users to click through
You can easily edit your title tags and meta descriptions using Yoast SEO snippet preview below each page.
You can check out our full On-page SEO guide with Yoast plugin and learn how to optimize your posts quickly.
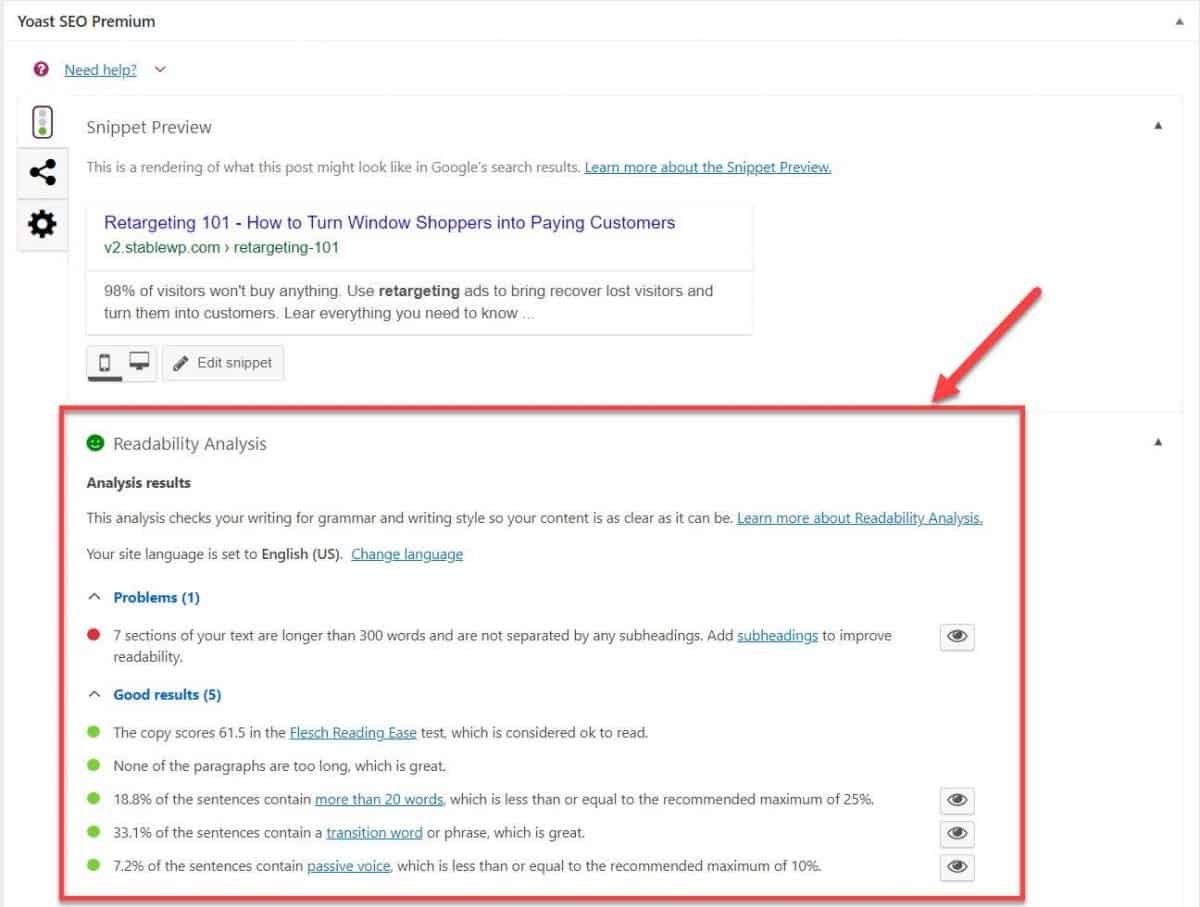
23. Check your headings and formatting
Times have changed, and people no longer read online, they scan the page in search for the most valuable information.
To be successful in 2020 (and beyond) you need to optimize your content for skimming.
That’s why you need to audit your content and make sure that you follow these best practices:
- Keep your intros very short
- Write short and to the point paragraphs
- Break up your text into sections with headings (h2, h3, h4…)
- Use lots of visuals like images and videos
- Include bullet points to explain steps, benefits or summarize important points
- Insert clickable table of contents to allow users to jump to any desired section
You can track the readability of your content using Yoast SEO Readability Analysis at the bottom of each post.
24. Inspect your internal linking
Internal linking is extremely important for SEO, but somehow it’s very often overlooked.
Internal links give your site structure, and they help search engines understand how your content is interconnected.
More connected > more relevant > higher rankings
Check your internal linking in Google Search Console Links report, and have a look at all the pages containing internal links.

Keep an eye out for orphaned pages. These are pages without any links on other pages pointing to them.
For Google, orphaned pages are practically invisible. Crawlers can’t access them since they can’t find them.
You can find orphaned content with the help of Screaming Frog. If you’re using Yoast SEO Premium, you can easily find these pages within your WordPress dashboard.
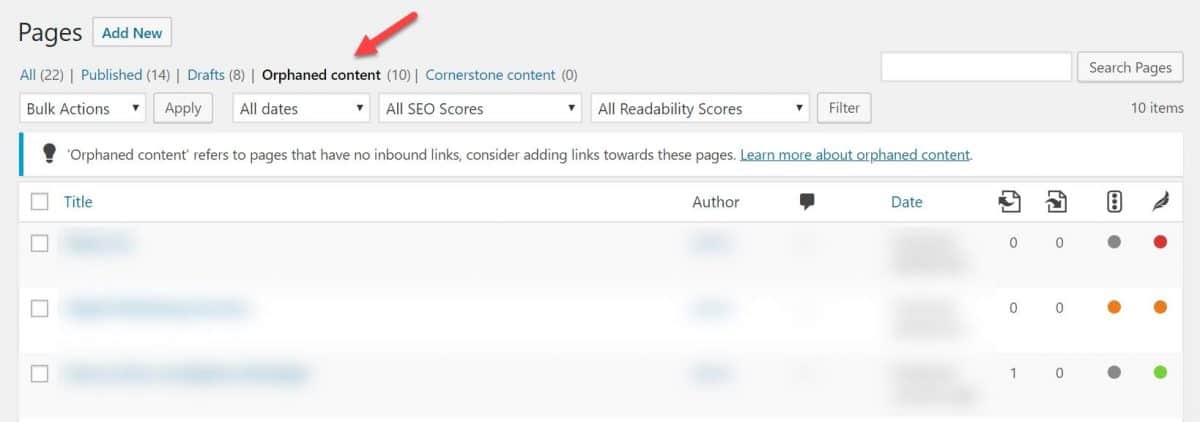
Make sure to add meaningful internal links to these pages to get them under Google’s radar.
Also, sprinkle internal links to other pages whenever it makes sense to get the link juices flowing and improve your SEO.
25. Audit your image SEO
The next step is to check your image SEO. Optimizing images is not only useful for search engines to understand your content, but there’s also another opportunity for you to rank in Google Image Search.
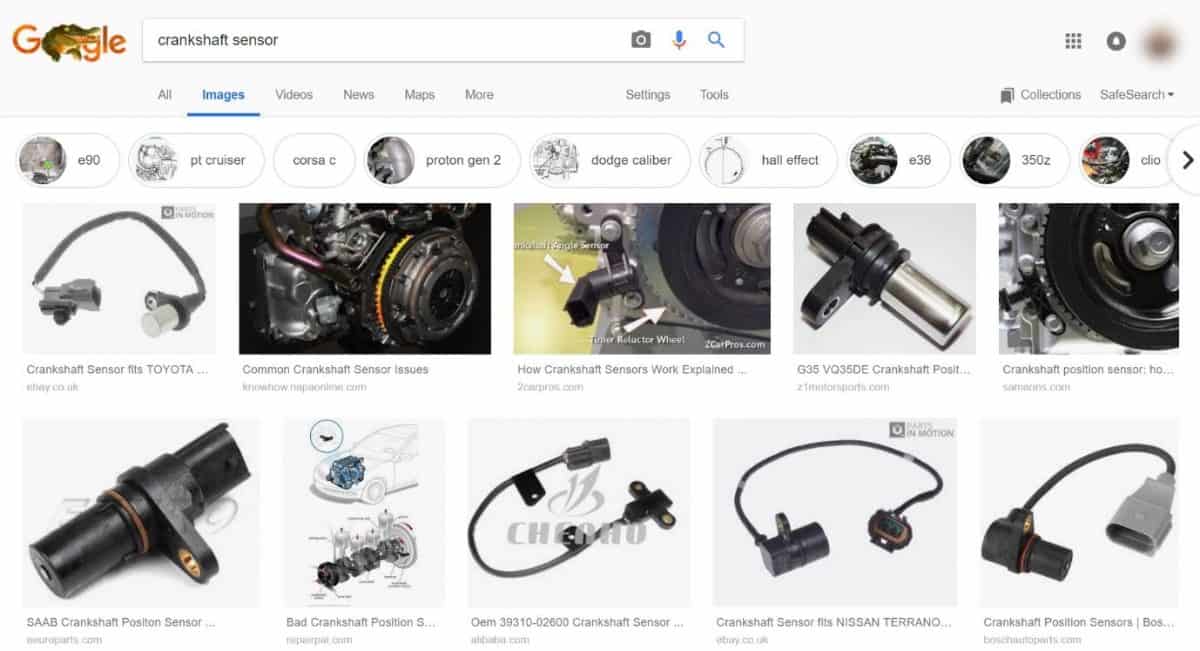
When checking your image optimization be on a lookout for the following issues:
- Missing alt attributes
- Broken internal/external images
- Non-optimized images size
- Images without descriptive filenames
There are a lot of tools to use for an image SEO audit. I recommend using Screaming Frog or SEM Rush Site Audit to look for image-related issues.
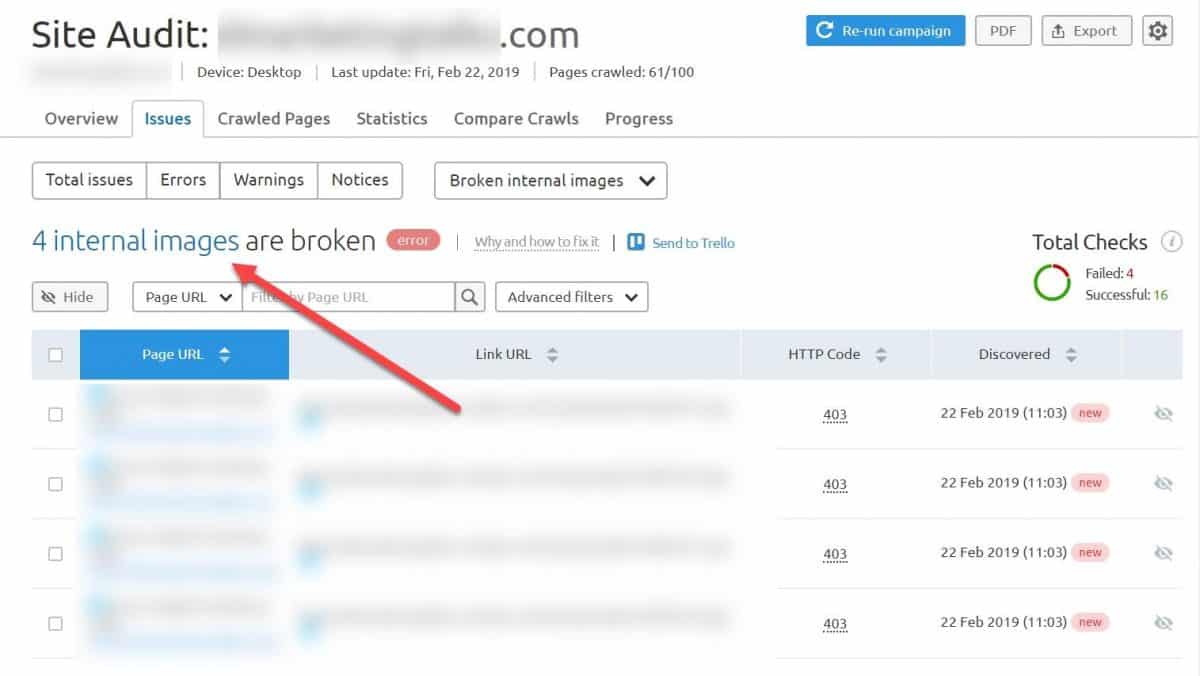
Be sure to address any issue by either fixing the problem or removing the image entirely (if it’s no longer useful).
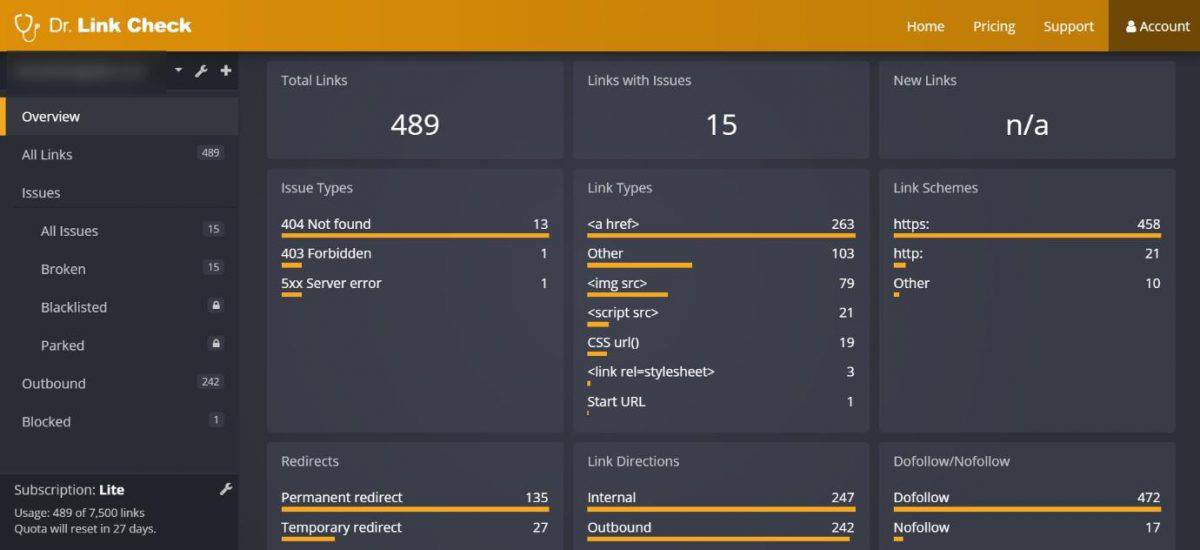
26. Check for broken links
Broken links on your site are detrimental to your user experience. This applies to both internal and external links.
From the search engine optimization standpoint, broken links affect your SEO by diluting your Page Rank.
So it’s critical to check for any broken links on your site.
You can go to GSC and manually dig through for broken links in the Coverage report, or you can use a (free) tool like Dr. Link Checker to inspect links on your website.
Once you find broken links on your site, you have a few options:
- Replace broken links with working links
- Remove links, if they’re not useful anymore
- Leave the broken link (404 pages) if there are no backlinks on the page
- Add a 301 redirect if the page has a lot of valuable backlinks
If you decide to leave the broken link, make sure your 404 page provides useful alternative pages users might want to go to.

27. Eliminate zombie pages
Not all pages on your site should be indexed. There are many pages that might be useful internally, but they serve no purpose of appearing in Google.
These are your zombie pages, and they include:
- Archive pages
- Author pages
- Categories and tags
- Author pages
- Pages with dummy text
- Special pages (like 404, thank you page, checkout page, etc.)
You can check for zombie pages using Google Search Operator site:yousite.com or inspecting the GSC Coverage report.
Once you find pages that don’t meet SEO standards, you can either:
- Remove them if they’re not useful
- Block them in your robots.txt file (mentioned earlier)
There’s even an easier method using noindex tag, which you can set from your Yoast SEO Taxonomies dashboard (or at page level).
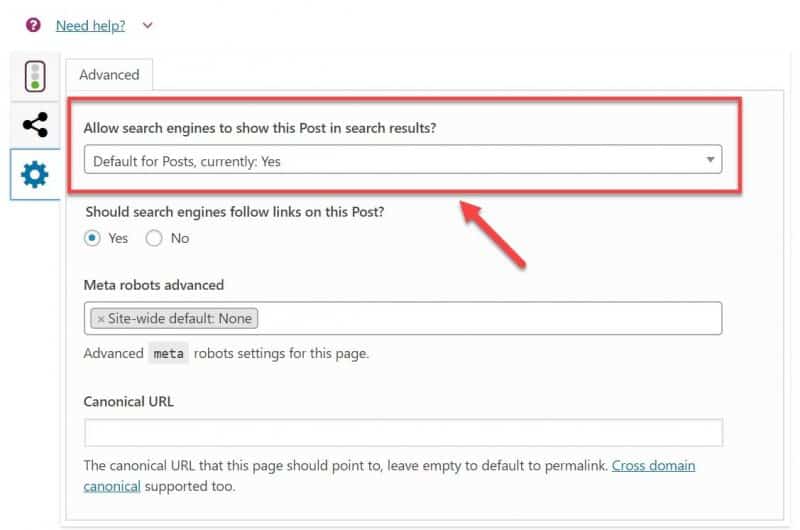
Now, your pages with the noindex tag won’t be indexed and therefore won’t be shown in search results.
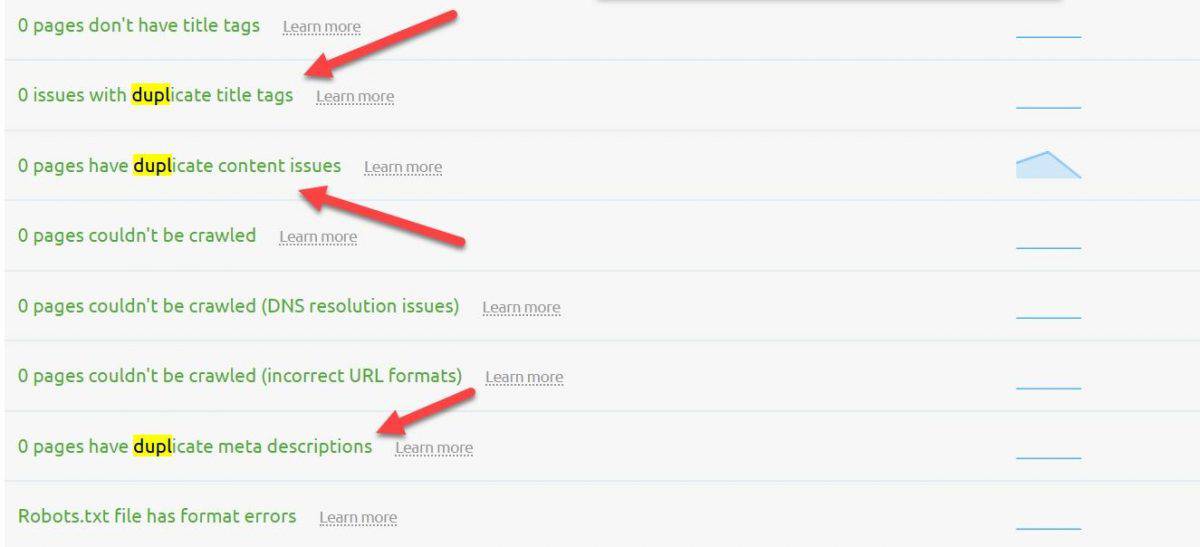
28. Check for duplicate content
There are two types of duplicate content:
- Duplicate content across multiple pages on your site
- Plagiarized content, duplicate content that’s the same as on other websites
Google hates duplicate content, and if it finds some on your site, you may suffer some big traffic losses. This happens due to Google de-indexing pages with duplicate/plagiarized content.
So, first of all, inspect your content for plagiarism. Use Copyscape to find potential duplicate content across the web.

Investigate any duplicate content that comes up in the results.
If you find someone syndicating your content ask them to link back to you (ideally with a .rel=”canonical” link) That way you can also earn some potentially valuable backlinks.
On the other hand, if you find someone scraping vast numbers of your content, like entire blog posts, don’t hesitate and file a DMCA complaint.
When it comes to duplicate content on your own website, use SEM Rush Site Audit and look for any duplicates.
If you notice any duplicate content issues be sure to take care of it:
- Add canonical links to all duplicate pages
- Add HTML links from all duplicate pages to the canonical page
- Redirect similar pages to the canonical URL
29. Evaluate the quality of your content
The final step of On-page SEO audit is to run a full content audit.
Sometimes you just have to let go.
In your SEO audit, this means deleting low-quality (underperforming pages) from your site.
Yeah, you heard me! Remove any pages that don’t live up to your standard, and you’ll see a big traffic boost.
Low-quality pages don’t make you look good in the eyes of Google, and they can drag your entire site down.
Ask yourself the following questions when inspecting your content:
- How much traffic does each page get
- Is your content unique and original
- How in-depth do you cover the topic (avoid thin content)
- Is your content useful and informative
- How engaging is it
- Is the information accurate
- Are there any spelling/grammar errors
Use Google Analytics to find low performing pages by going to Behavior > Site Content > All Pages report.

Based on your traffic analysis you can do the following:
- Find low‐quality pages with little to no traffic
- Improve them if possible, then relaunch
- Otherwise, delete them and redirect (301) the URL to a relevant page
Also, be on a lookout for keyword cannibalization. This happens when you target a single keyword with multiple pages on your site. What ends up happening is your pages competing amongst themselves for the same keyword.
In such a case, the best practice is to combine all of these pages into one beast-of-a-page that will have even higher chances of ranking.
Part #5: Analyze your UX signals
Google takes user experience (UX) very seriously. That’s why UX is one of the top-ranking signals.
Brian Dean explains how Google’s RankBrain uses UX signals with this very informative graphic:
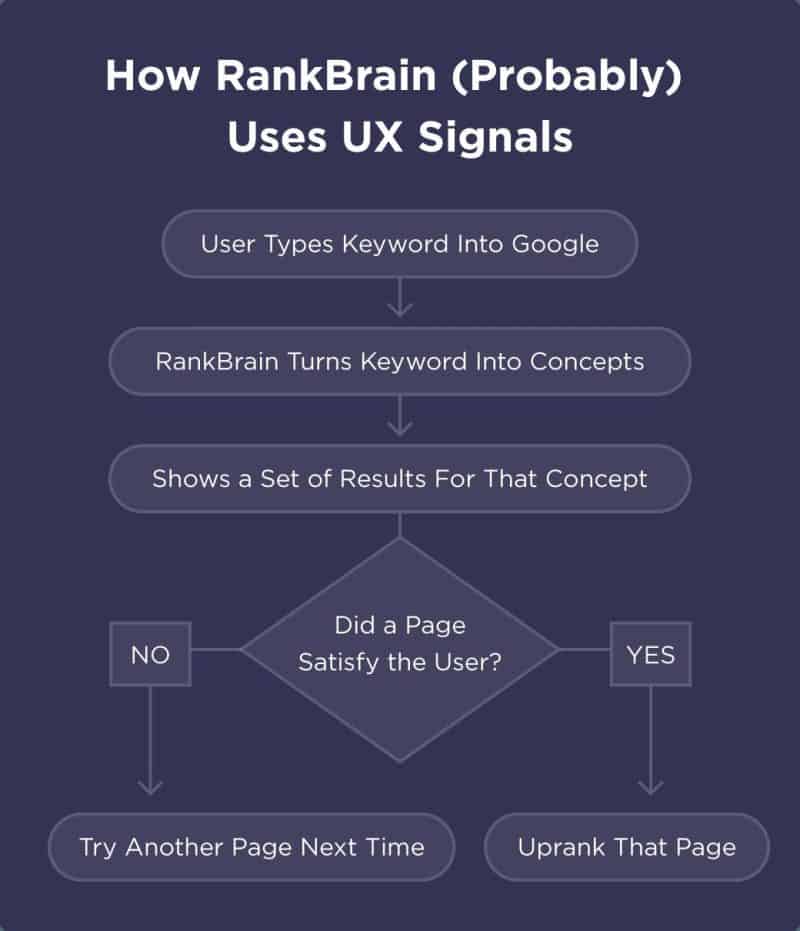
In short, Google tracks how users are interacting with your site to determine if you provide a good user experience.
For you, this means you should check how optimized is your site for UX signals.
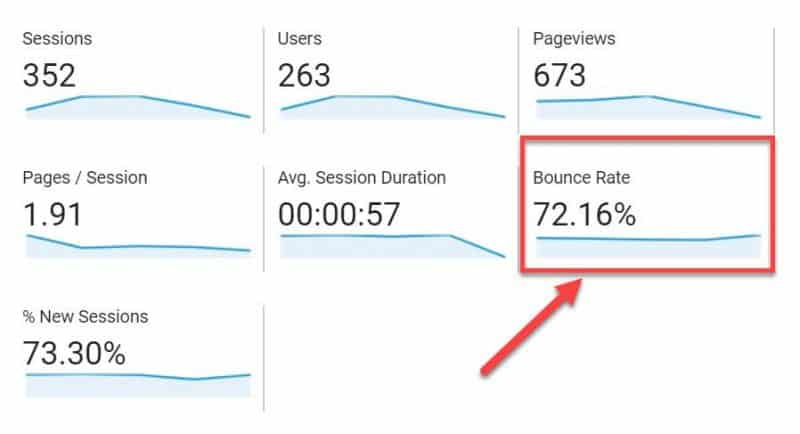
30. Examine your bounce rate
The first UX signal you should inspect is your bounce rate.
A bounce rate is the percentage of single-page visits to your site. In other words, it’s when visitors leave your site without interacting or visiting any other pages on your site.
You can track your bounce rate using Google Analytics.
There are many reasons why you could have a high bounce rate. It’s important to get into the root of the problem and find out why people are bouncing.
Learn everything about the bounce rate in our in-depth guide on how to reduce your bounce rate and improve conversions.
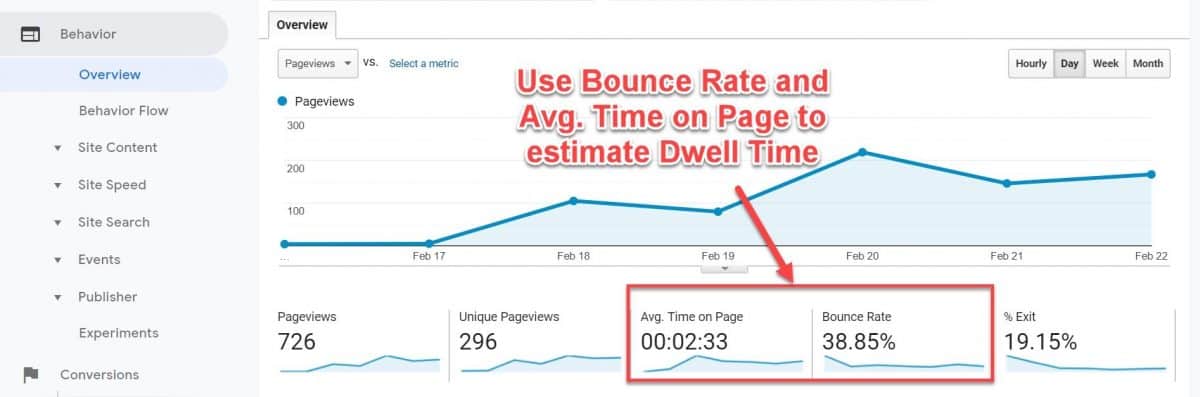
31. Keep an eye on your dwell time
Dwell time is the time a visitor spends on your site after clicking on a result in the SERP, but before returning to the search results. As such, it’s a good indicator of relevance and UX.
If the person spends more time on your page (longer dwell time) it means they’ve likely found what they were looking for. On the other hand, if they spend less time, and return to the search results, it signals that your page wasn’t very relevant or useful.
If your dwell time remains short, over time, your page will be pushed further down in the SERP.
Unfortunately, there’s no way to measure your dwell time directly.
Still, you can estimate dwell time by looking at two existing metrics in Google Analytics – Bounce Rate and Average Time on Page.
To optimize your content for dwell time (UX) do the following:
- Create relevant content
- Improve the quality of your content
- Improve the performance of your page
- Sprinkle internal links
Optimize your pages and content for engagement and your dwell time, along with your rankings will soar quickly.
32. Monitor your goals and conversions
Conversions are the key to your business success. One of your primary SEO goals is to attract the right visitors, those you can convert into paying customers.
That’s why you want to track how your search traffic translates into conversions and sales.
From a business standpoint, this will help you see if your SEO helps you achieve your business goals (get more leads and sales).
For this, you need to set up Conversion Tracking in Google Analytics.

For e-commerce users, you also have e-commerce tracking enabled which helps you monitor performance and sales across all of your products.
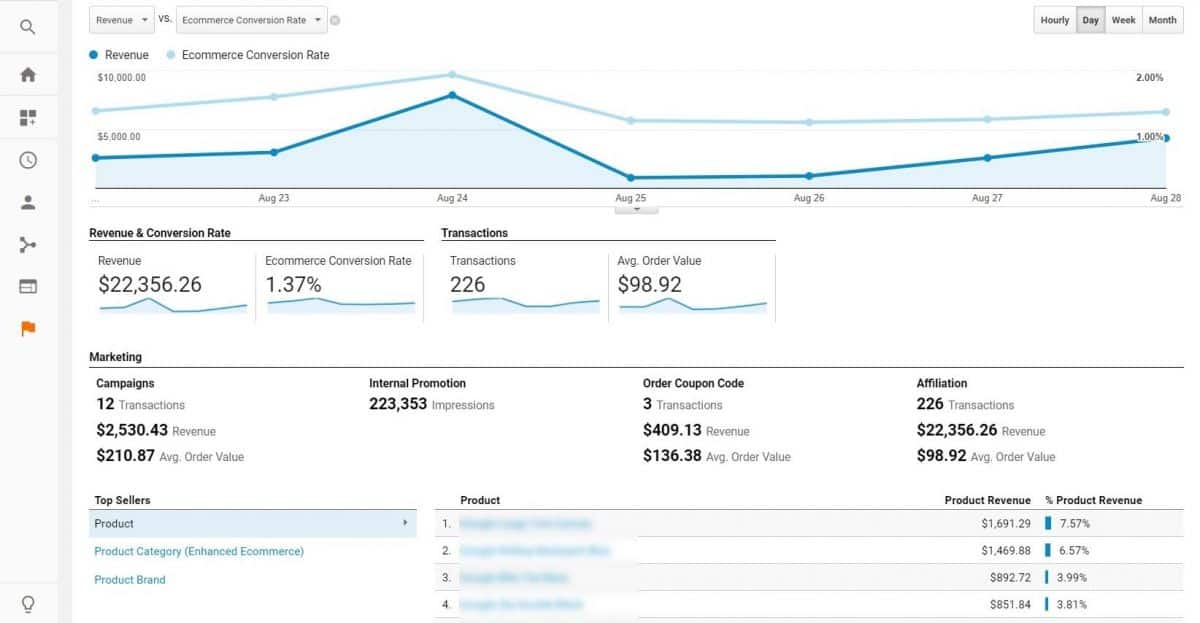
Be sure to inspect your entire online sales funnel, and look for conversion optimization opportunities :
- Capture visitors’ contact information
- Make it dead-simple for leads to contact you
- Provide enough useful info about your business
- Show social proof
- Optimize your checkout for faster conversions, etc.
33. Inspect your exit pages
An Exit page is the last page a user is on before they decide to leave your website. In other terms, it’s the page where the visitor exits your site.
Your exit pages are not necessarily bad; people have to exit your site from somewhere. However, you want to keep an eye on pages with unusually high exit rates.
Fire up your Google Analytics, and the Behavior > Site Content > Exit Pages examine the %Exit column.
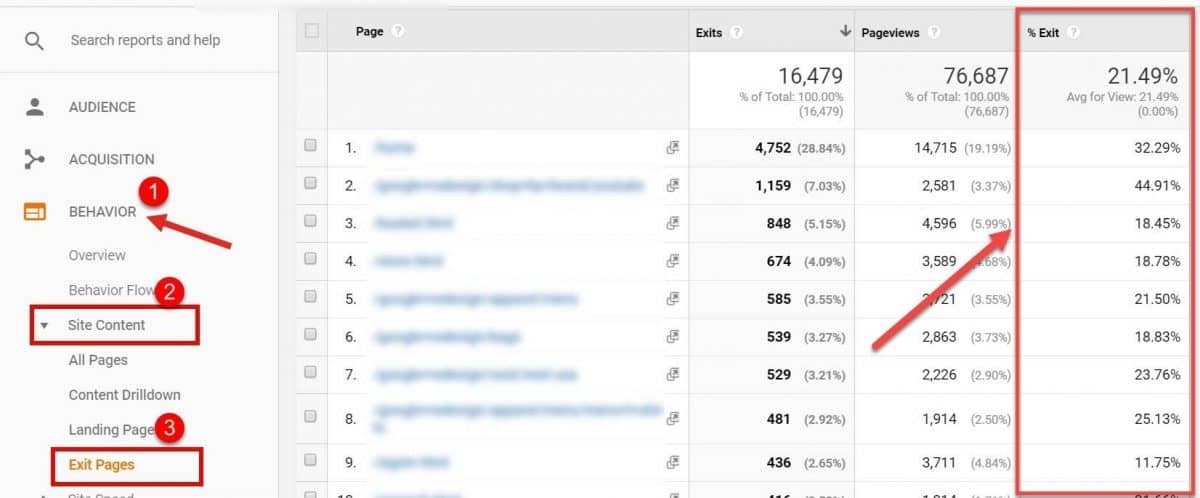
Investigate any pages with an extremely high exit rate and determine what is it that makes people leave from these exact pages. Check for these issues:
- Problems with performance (e.g. loading time)
- Thin content
- Not enough useful information
- Poor readability
- No clear CTA
- Too many distractions (e.g. pop-ups, ads, auto-play videos, etc.)
- Broken images
- No internal or broken links, etc.
34. Compare new vs returning visitors
The final step in this section is to compare new vs returning visitors.
Having returning visitors is a great signal that your site is worth visiting again. Additionally, with returning visitors, you have more opportunities to convert them into customers (after all that’s what it’s all about).
Go into your Google Analytics once again and navigate to the Audience > Behavior section to check the New vs Returning visitors report.
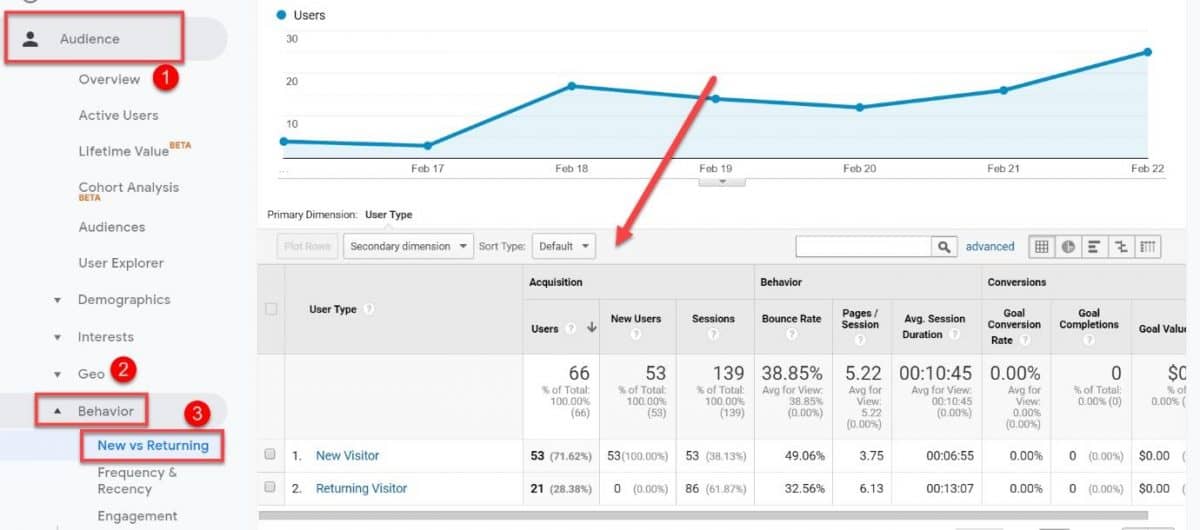
Getting new traffic is hard and time-consuming, so you want to have as many returning visitors as you can.
Look for any opportunities to keep your existing visitors coming back for more.
Step #6: Backlink analysis
As you may know, backlinks play a huge role in SEO. They determine the site authority which is among the strongest ranking factors.
Not only that, but backlinks are a very important source of referral traffic.
With that said, backlinks can make or break your site, which is why you need to analyze them during your SEO audit.
35. Audit your backlink profile
The first order of business is to check your backlink profile.
You can inspect your backlinks using GSC external links report. However, if you want a more in-depth analysis, I suggest using SEM Rush (or other pro tools like Ahrefs, Moz, Majestic SEO).
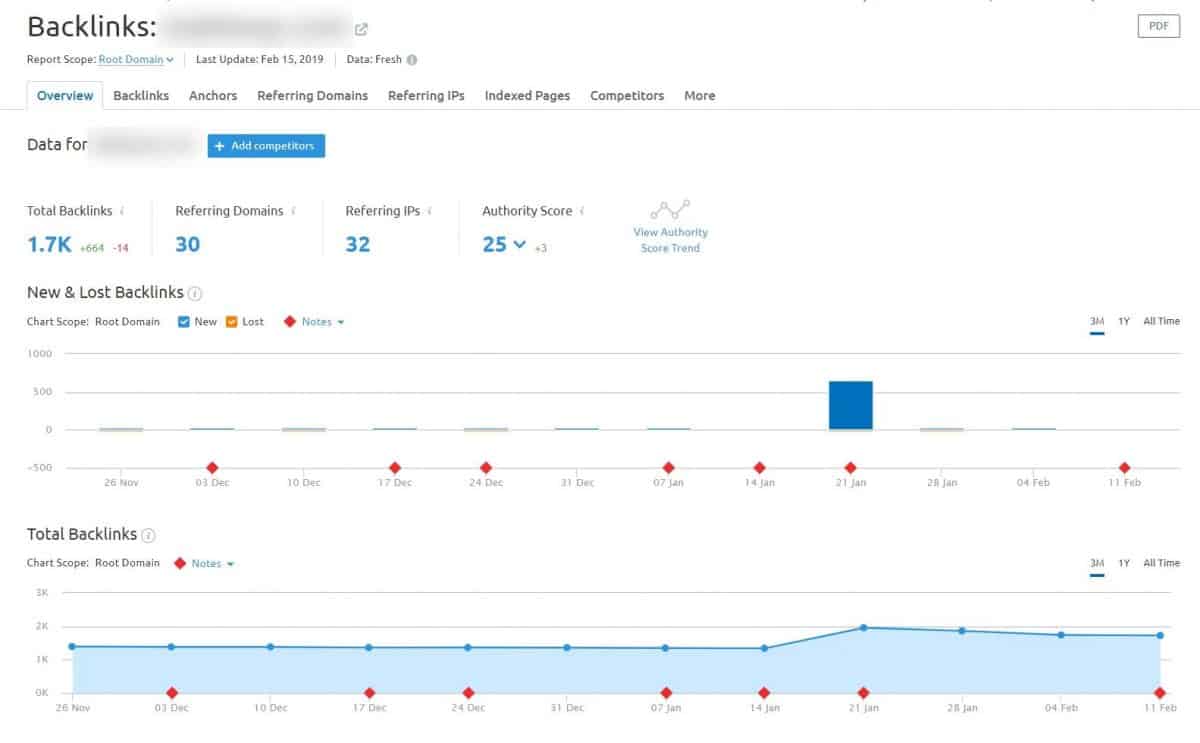
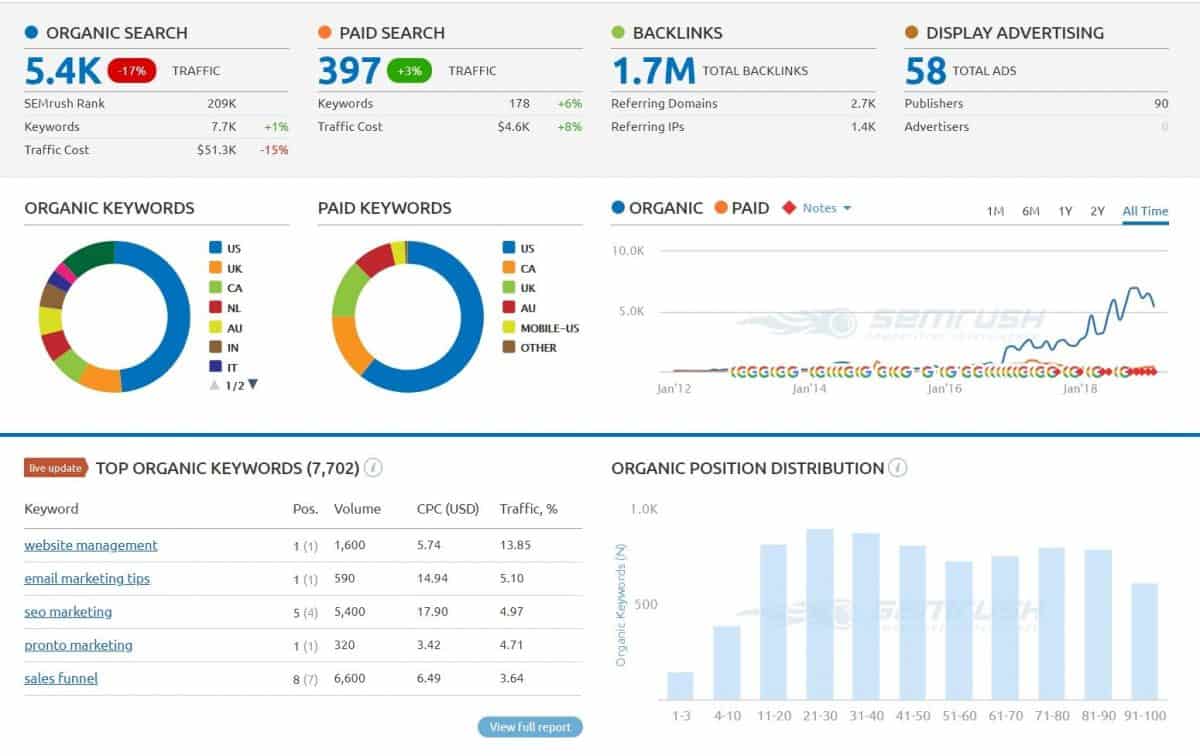
Here you can see details about your backlink profile such as:
- Total number of backlinks
- Number of referring domains
- Your domain authority score
- New vs Lost backlinks chart
- And how your backlink count moves over time
Be sure to check if your backlink count moves in the right direction. If you notice big declines in the number of links, you have to dig deeper into why you’re losing backlinks.
Next, click on the Backlinks tab you can see even more information about your backlinks as well as each link individually.
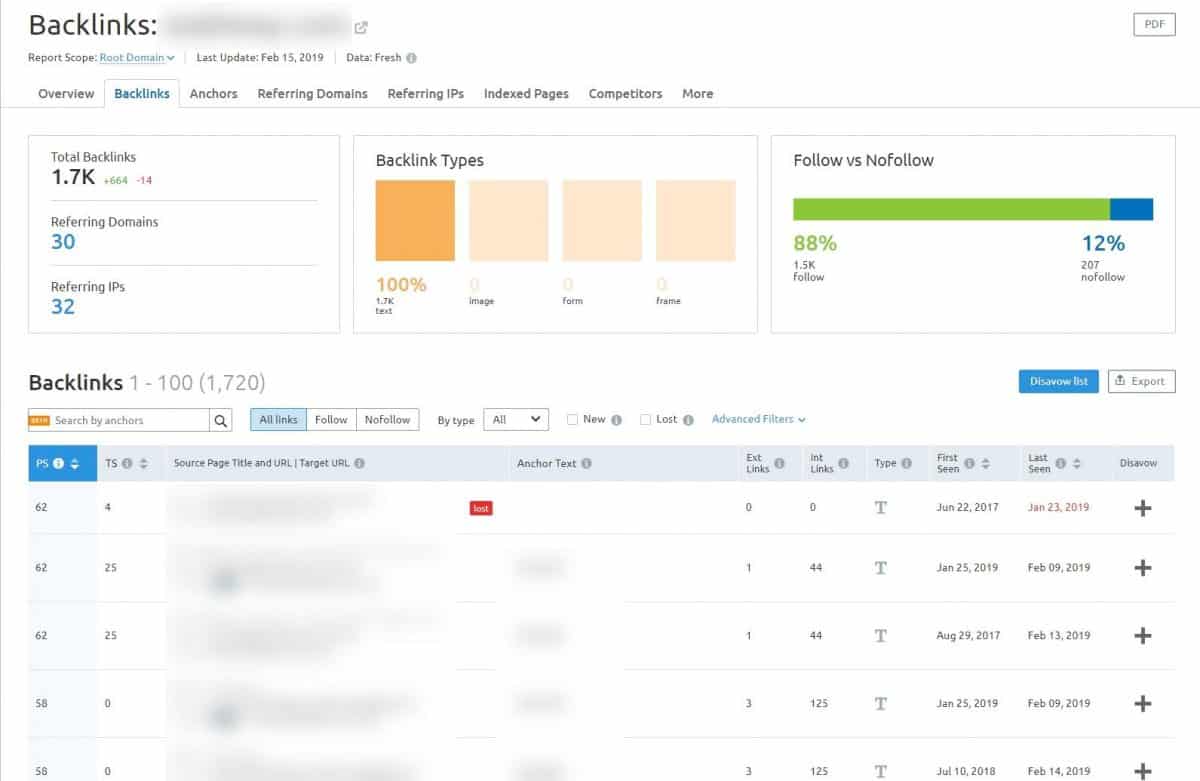
The goal of this step is to assess your backlink profile and your domain authority, overall. This will help you estimate if you have to make more efforts to build links.
You can learn how to build a ton of links with our 32 link building strategies.
After that, let’s go into a deeper analysis of your backlinks.
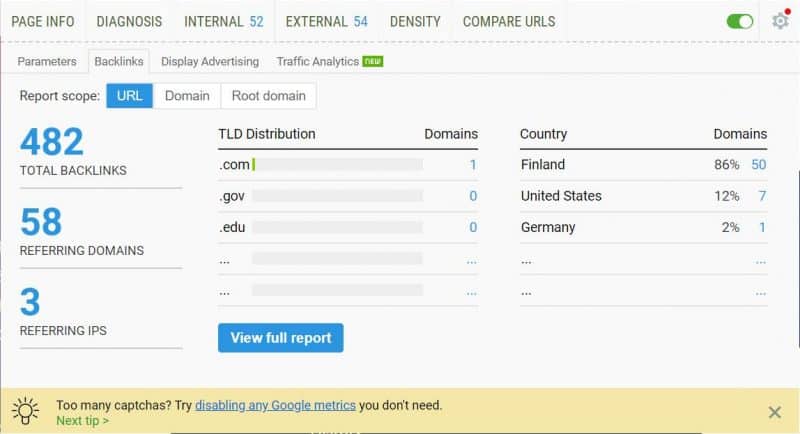
36. Inspect referring domains
In this step, you will dive deeper into referring domains and learn exactly who is linking back to you.
Switch to the Referring Domains tab in the SEM Rush report and have a look.
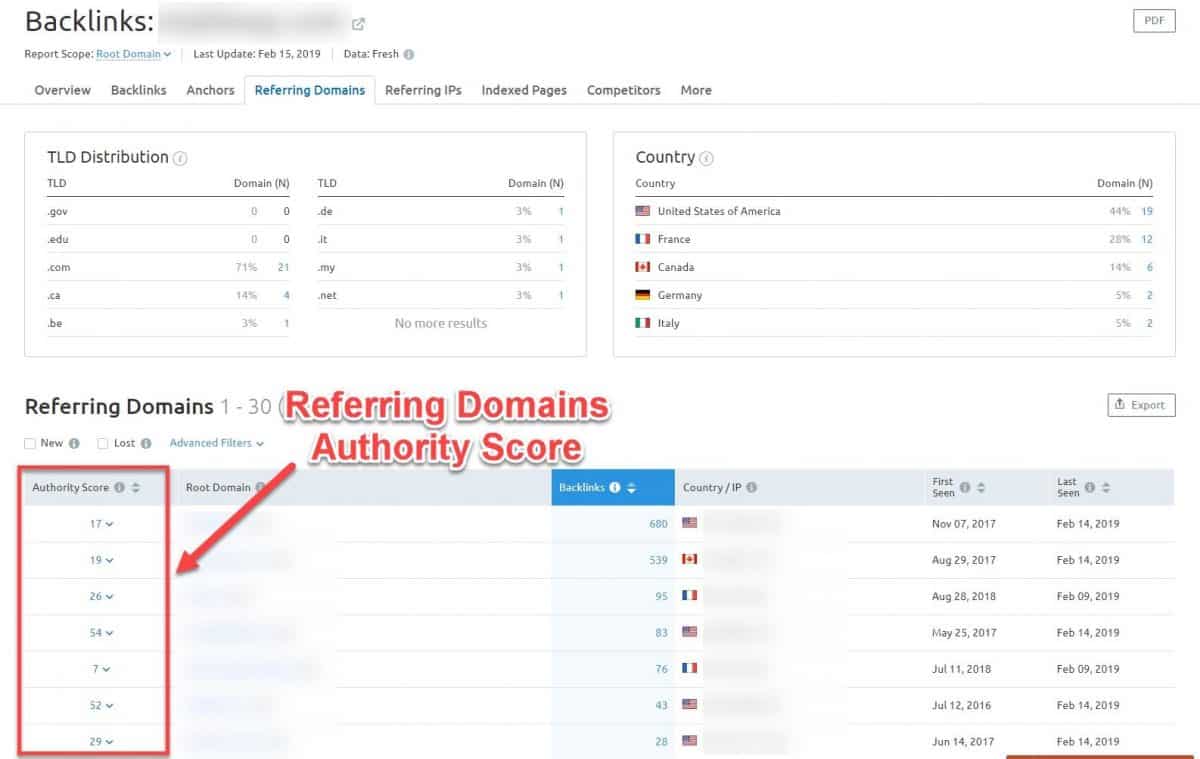
Here you can see the number of backlinks by country as well as the TLD distribution of your backlinks.
Below you can inspect each individual domain along with their authority scores. This will help you understand the quality of your backlinks.
Having a diverse portfolio of referring domains is a good thing, from an SEO perspective. Search engines consider this more natural and will give you more SEO points for having a varied set of links.
Be on a lookout for anything suspicious, like unexpected referring domains (such as links from payday loans or porn sites) and low-quality links.
Ensure that most of your backlinks are relevant and high-quality, which translates into more authority for your site and an SEO boost.
37. Check the anchor text
While you’re here, check your anchor text distribution.
Head over to the Anchor tab to see the most popular anchor text used when linking back to you.
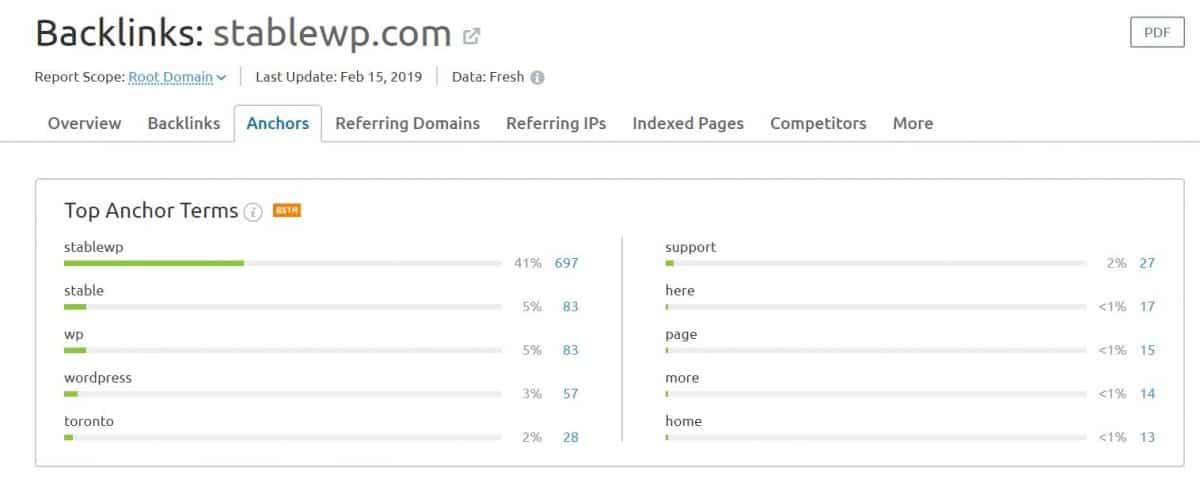
When it comes to anchor text, what you want to see is that the bulk of your backlinks are linking with branded or generic anchors (like in our example). Branded anchors help build trust and can positively impact your SEO.
Be wary of over-optimized anchor text here. If you see a very large number of keyword-rich and spammy anchors, you might be a target of negative SEO.
The goal of negative SEO is for your site to be penalized by Google. So be sure to investigate any suspicious activity.
38. Identify toxic backlinks
Toxic backlinks are links that come from spammy websites or have been acquired from illicitly (like link networks and spammy websites).
Unlike low-quality links which simply don’t add any value, toxic links will hurt your site since they can be a cause of various Google penalties.
You can manually scrape reports previously mentioned. However, I recommend using Backlink Audit tool by SEM Rush to find potential toxic backlinks automatically.
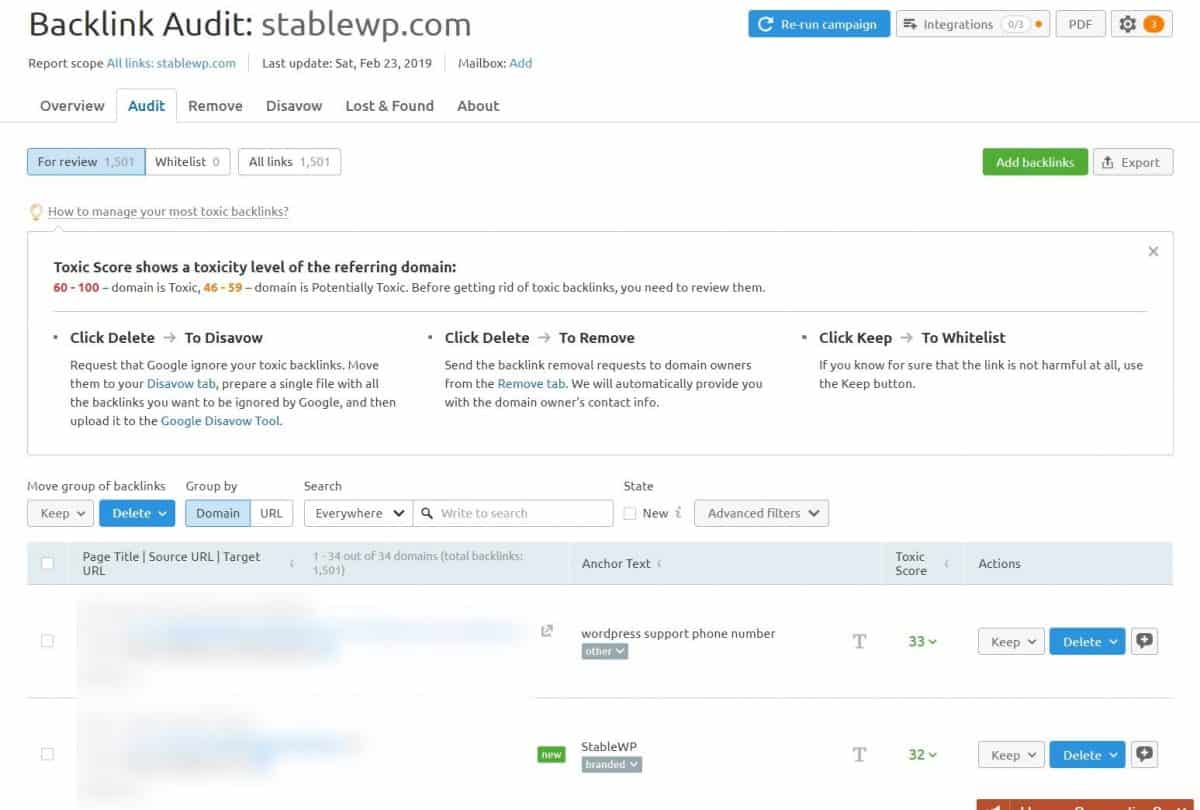
Check the toxicity score of each backlink to ensure you do not have any bad backlinks on your site. Scores between 46-59 are potentially toxic, while anything above 60 is toxic and you need to get rid of it ASAP.
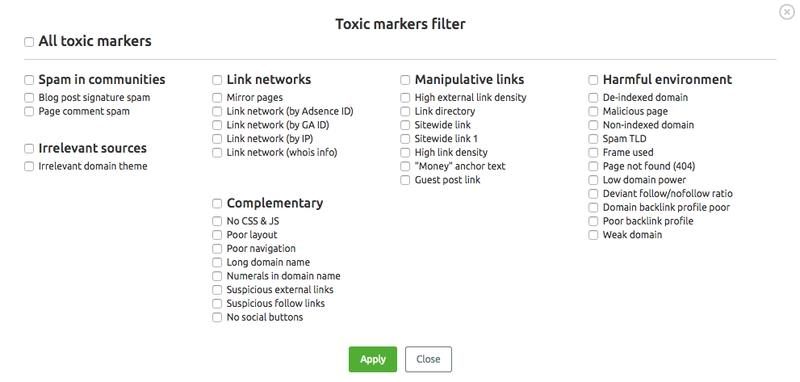
SEMrush uses over 30 markers to identify toxic backlinks, such as link networks, manipulative links, harmful environments, etc.
If you notice any toxic links on your site, immediately disavow and remove them before they cause any bigger problems.
39. Investigate new internal linking opportunities
On a lighter note, the final step in the backlink audit is to find new link building opportunities.
Once again, open up your GSC and look at the External Links report.
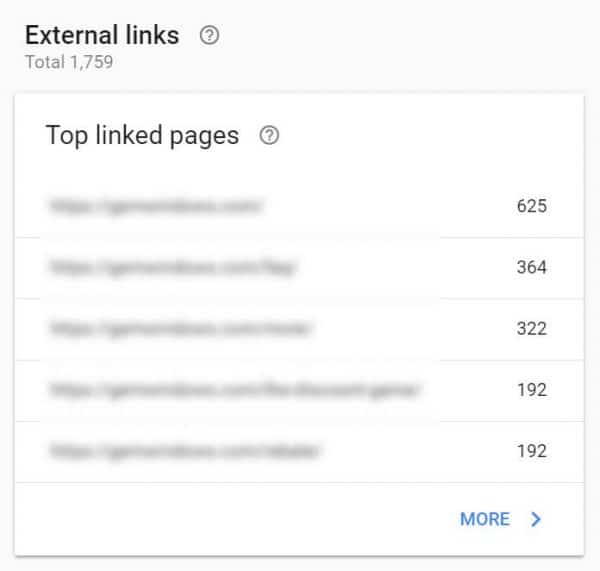
Look for pages on your site that have an abundance of backlinks. These pages have the highest page authority on your site.
Now, all you have to do is interlink these pages with other pages you want to rank. This will help you spread link juices to your important pages and boost their authority as well.
And with a little luck, you will see an uplift in rankings, very fast.
40. BONUS: Competitive analysis
This is a bonus, Off-page SEO audit step; spying on your competitors to find new SEO opportunities.
We’ll keep it brief here since we already have a beast of an article on competitive research.
Let’s go over three main steps in your competitive analysis:
- Find keywords your competitors are ranking for
- Check out competitors’ pages that are ranking for these terms
- Investigate who is linking back to your rivals
You can again use SEM Rush to gather intelligence on your competitors.
You can also use SEO Quake Chrome extension to analyze rivals while browsing the internet.
Or you can use other tools such as SpyFu, Ahrefs, SimilarWeb, etc.
41. BONUS: Verify NAP consistency for local SEO
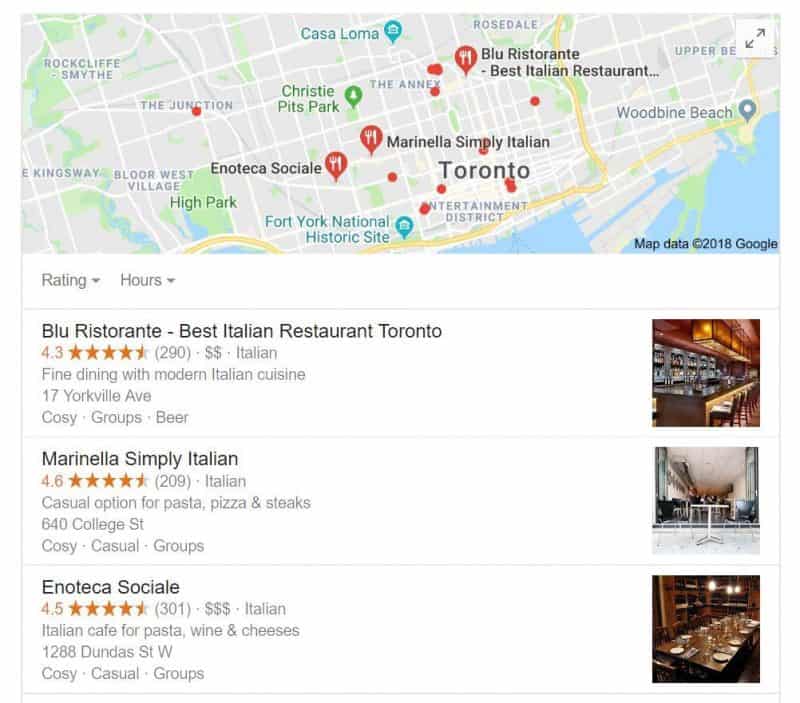
Finally, we reached the end of our SEO Audit Checklist. The last item is focused on local SEO.
Do a Google search for your brand or products/services and analyze what comes up. Ideally, your business should appear in the famous Local 3-Pack.
To ensure you’re ranking in the Local 3-Pack, check the following:
- NAP consistency (NAP – name, address, phone number)
- Your Google My Business listing
- Reviews
- Citations in local directories
- Schema markup (location-specific markup)
You can use a tool like Bright Local and Yext to help you with local SEO.
Over to you
Thanks for sticking around during this loooong article. The goal was to give you an in-depth guide on how to perform a comprehensive SEO audit.
Hopefully, now you’re ready to run your own SEO analysis and find issues that are holding you back.
Make sure to check all the areas, fix the issues and soon enough you’ll be climbing up the rankings and getting a ton of organic traffic.
Feel free to share the article with the world if you found it helpful. And don’t forget to drop us a comment down below or ask any questions if you have, we’re here to help.