
[fusion_builder_container hundred_percent=”no” equal_height_columns=”no” menu_anchor=”” hide_on_mobile=”small-visibility,medium-visibility,large-visibility” class=”” id=”” background_color=”” background_image=”” background_position=”center center” background_repeat=”no-repeat” fade=”no” background_parallax=”none” parallax_speed=”0.3″ video_mp4=”” video_webm=”” video_ogv=”” video_url=”” video_aspect_ratio=”16:9″ video_loop=”yes” video_mute=”yes” overlay_color=”” video_preview_image=”” border_size=”” border_color=”” border_style=”solid” padding_top=”” padding_bottom=”” padding_left=”” padding_right=””][fusion_builder_row][fusion_builder_column type=”1_1″ layout=”1_1″ background_position=”left top” background_color=”” border_size=”” border_color=”” border_style=”solid” border_position=”all” spacing=”yes” background_image=”” background_repeat=”no-repeat” padding_top=”” padding_right=”” padding_bottom=”” padding_left=”” margin_top=”0px” margin_bottom=”0px” class=”” id=”” animation_type=”” animation_speed=”0.3″ animation_direction=”left” hide_on_mobile=”small-visibility,medium-visibility,large-visibility” center_content=”no” last=”no” min_height=”” hover_type=”none” link=””][fusion_text columns=”” column_min_width=”” column_spacing=”” rule_style=”default” rule_size=”” rule_color=”” class=”” id=””]You’ve probably heard it already – Yoast SEO is one the most essential plugins for your WordPress website.
If you’ve been using WP for a while, chances are you also have it installed.
But just having it sit idly on your site is not gonna do much for you.
First, you have to configure it correctly. And you need to learn how to harness the full power this all-in-one SEO plugin provides.
Keep reading and learn how to set up Yoast and utilize it to the max!
Table of Contents
What is Yoast SEO?
With over 5 million active installs (autumn 2018), Yoast SEO is one of the most popular plugins for WordPress. It’s a mighty solution for professionals and beginners alike.
Yoast SEO is for anyone who wants to rank high on Google and get massive organic traffic.
Don’t get me wrong, this isn’t some magic bullet that will automatically get you on top.
You still have to do some work. But Yoast SEO will open the door to On-page optimization (even the techy parts) for everyone.
And no wonder Yoast is so popular:
- It’s free to use – You can use the majority of features completely free of charge, with only some very advanced options available in the premium version.
- Automate your SEO process – Once you configure it properly, it’ll do most of the optimization in the background without you even noticing. (More on this in the following sections)
- Write awesome SEO content – Yoast will continuously monitor your work and suggest improvements as you type. You can use it to enhance the readability of your posts and write keyword-rich content that both users and Google loves. With Yoast and some good keyword research, this can be a breeze.
- Help you with Technical SEO – You can easily add XML sitemaps, breadcrumbs, optimize permalinks, and other technical improvements essential for search engine crawling and indexing.
- It’s ready for WordPress Gutenberg –As we already discussed in one of our articles, Gutenberg is coming. It’s the new visual editor and the future of WordPress. Yoast is working hard to prepare for the full integration of Gutenberg, which is why they recently released their 8.0 update which works seamlessly with the new editor.
With all this in mind, it’s easy to see why Yoast SEO is a critical part of your, and every other, WordPress toolbox.
Install Yoast SEO plugin
First thing’s first, you need to install and activate Yoast on your WordPress site. If you already have it installed, skip to the next section and learn how to configure Yoast properly.
Locate the plugins menu, click on “Add New”, and search for “Yoast.” Then simply install and activate this plugin.
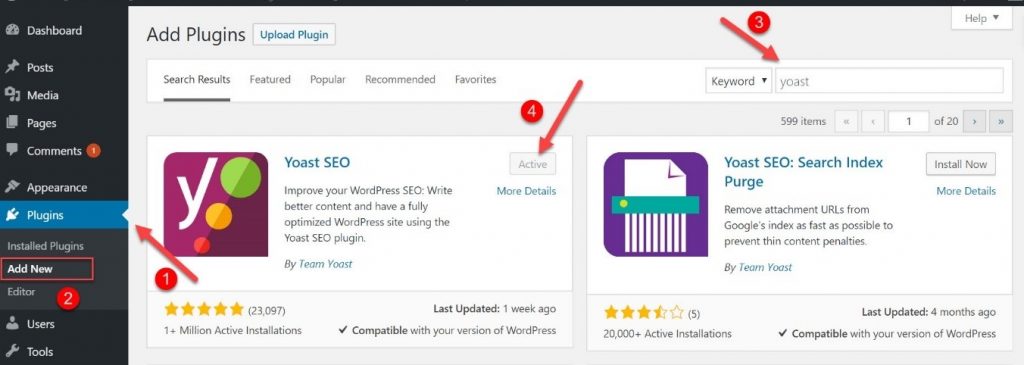
You can also download it from the WordPress plugin directory.
Once it’s active, find the Yoast SEO icon in the left side menu of your WP dashboard.

From here you can start setting up and configuring Yoast for your site.
How to configure Yoast properly
So far, so good. You installed and activated the Yoast SEO plugin. Now it’s time to set it up properly to enable you to unlock its full potential.
To someone just starting out, it might seem challenging. There are lots of menus, tabs, and options to go through.
But have no worries, I’ll guide you through what each of them is and how you should set it up.
So let’s get down to the nitty-gritty of Yoast SEO configurations and settings.
Yoast SEO plugin menu is categorized into 6 sections:
- General settings
- Search appearance
- Search console
- Social setting
- Tools
- Premium

General settings
The first time you power up Yoast, you’ll see a general dashboard like this one:

There are three tabs in the general settings menu:
- Dashboard
- Features, and
- Webmasters Tools
Dashboard Tab
Dashboard tab will greet you with the first time SEO configuration wizard, as well as “problems” and “notifications” bars.
The latter two will give you a quick overview of SEO issues you might need to address immediately when you log in. If there’s nothing here, you’re good to go. If there is, read on and get those problem fixed.

For first time users, the configuration wizard can be a good place to start.

It will take you through a 12-step setup process to help you configure some basic settings for your website.

The first step is just the intro. Click on the magenta “configure Yoast SEO” button and go to step #2.
Here you can set the environment for your site. In other words, is your site under construction, or is it live and ready for search engine indexation?

Pick the option that best describes the state of your website, and click on “next” to go to step #3.
Now it’s time to tell Yoast what your site is about. Is it a blog, an e-commerce store, a brick-and-mortar business, or something else entirely?

Pick the type that best matches your site and proceed to the next setting.
Choose whether your site represents a person or a company.

This information can help your site appear in Google’s knowledge graph, which is very prominently displayed in Google SERP.

If your site represents a company, set your business name and add your logo.

For a personal website, just add the name of the person its representing.
Step #5 is all about adding your social media profiles. Same as with the previous setting, this will help Yoast signal Google and other search engines what should be displayed alongside your site in SERP.
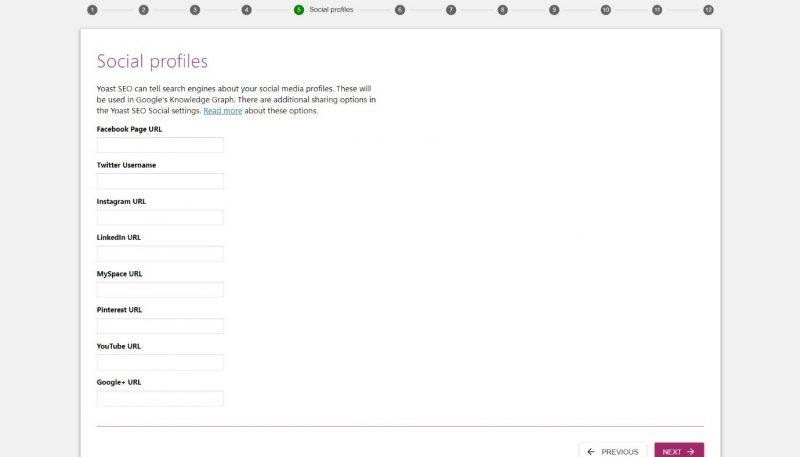
Add the URLs of your social media profiles (in case of Twitter, your handle).
No need to add links to every single one of these social networks listed. Just add the ones that you’re actively using.
Press next to go to step #6 – search engine visibility.
This step lets you set what type of content should appear in search engines. You can set the visibility of your posts and pages.
I, much like Yoast itself, advise you to leave both these options set to ON (default). This will enable all of your posts and pages to be discovered in Google and other search engines.

If for whatever reason you want to prevent some pages from appearing in SERP (i.e. thank you pages), you can later take a more granular control.
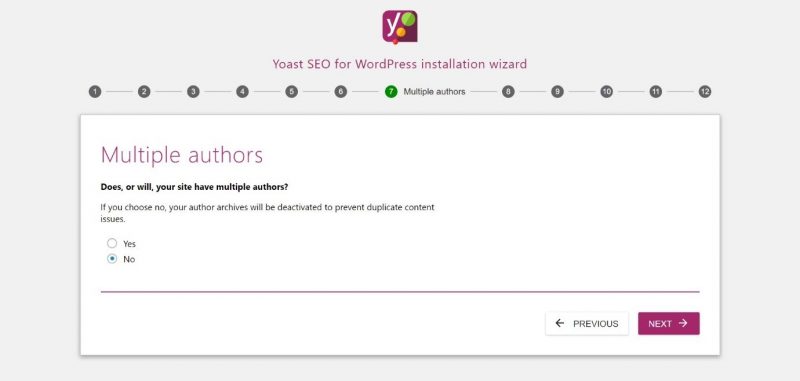
The next step allows you to set if you’re the only author or if you have multiple contributors that post on your site.
This is an important setting, even though it might not seem like it.
WordPress automatically generates author pages, which serve as an archive of all the posts from each author.
But if you write all the content yourself, your blog page will show the exact same collection of posts as your author page. This leads to duplicate content, which Google dislikes very much.
Step #8 is all about integrating your Yoast SEO plugin with your Google Search Console account.
It’s Google’s free tool that helps you measure and analyze your search traffic, performance, and fix any issues you might have with how you appear in Google’s search results.
GSC is another essential part of your SEO toolkit.
You can learn more about Google Search Console and how to set up your free account in our GSC guide.
Once you have your GSC account set up, click on the get authorization code button and enter the code below.

Next, it’s time to optimize your page title.
Having optimized page titles is not only good for SEO but also for users. Well-formatted titles grab attention and are likely to get you more clicks and drive more traffic.
And more click-throughs signal Google that you’re site is good quality, which helps you rank higher.
By default, Yoast makes your title according to the following template:
Post title “separator” site name
Step #9 allows you to set the site name and the separator you want to use across all your posts, so you can sit back and let it optimize your titles for you.

Mind you that you can do a more detailed configuration of your post titles in the Search appearance settings (which we’ll talk about later) as well as for each post individually.
Steps 10 and 11 are optional since Yoast will ask you to sign up for their newsletter and try to upsell you on their premium plugin.
Hit next until you get to the #12 step and the configuration success page.
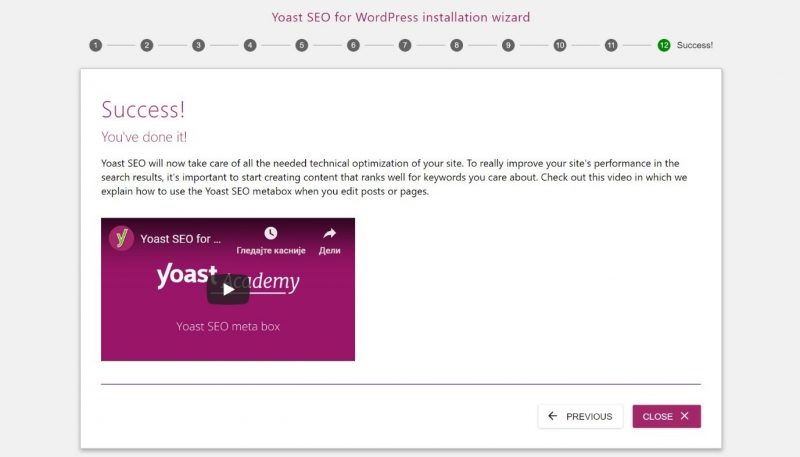
Congratulations, you configured your Yoast SEO plugin successfully.
But these were just the basic settings, essential to get started. To take full advantage of this plugin, there are even more settings available. And I’ll show you what each of them is and how to set them up properly.
Let’s go back to the General settings menu, and look at the other two tabs here.
Features Tab
In the Features tab, you can enable or disable some of Yoast’s features.

By default, all of these features will be turned on. Let me give you a quick rundown of what each of them means:
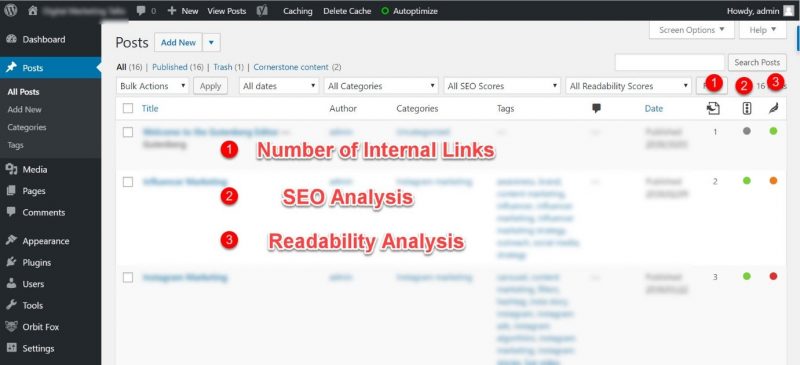
- SEO analysis – This is your content optimization checklist based on your target keywords. Yoast will grade your content and give you suggestions on how you can further improve your content.
- Readability analysis – Monitors your content for issues and grades it based on readability. This feature helps you write better content that your visitors will enjoy reading.
- Cornerstone content – Lets you mark the most important and most valuable content on your site. Enabling this feature, Yoast will help you track and easily improve your cornerstone content.
- Text link counter – Shows you how many internal links your post or page has. This can help you build an optimal SEO structure on your site.
- XML sitemaps – You can enable this to allow Yoast to automatically generate XML sitemaps for you.
- Ryte integration – Ryte will check weekly if your site is indexed in search engines and notify you of any potential issues.
- Admin bar menu – Adds Yoast icon to your admin bar menu with shortcuts and useful links to other tools available with Yoast.
![]()
- Security – Prevents authors from removing posts from search results and changing canonical URLs and only allows editors and admins to do this. You might want to keep this feature turned on.
See what features you find useful and leave them enabled, disable others to avoid distractions and annoyances.
Webmasters Tools Tab
The Webmasters tools tab allows you to add verification codes for the world’s 4 largest search engines:
- Google Search Console (mentioned earlier)
- Yandex – Russian search engine
- Baidu – Chinese search engine
- Bing – Microsoft’s search engine

Sign up for each Webmaster Tool using the HTML verification option, and paste the verification codes in Yoast (only the part within the quotation marks).
Search appearance settings
This section allows you to set up and customize how your site appears in search engines.
Search appearance settings feature a set of 7 tabs:
- General
- Content types
- Media
- Taxonomies
- Archives
- Breadcrumbs, and
- RSS
General Search Appearance Tab
The general tab will give you similar options like the ones described in the “title settings” step of the configuration wizard, with a few added options.

You have the same choice of title separators set if you’re using a personal or a company website, add your brand name as well as your logo.
This time, you’ll also be able to quickly navigate to your homepage and your blog page to set special titles and descriptions for each.
Your homepage usually targets a very broad industry keyword, so you want to optimize its title accordingly, which doesn’t fit into the template for your other pages and posts.
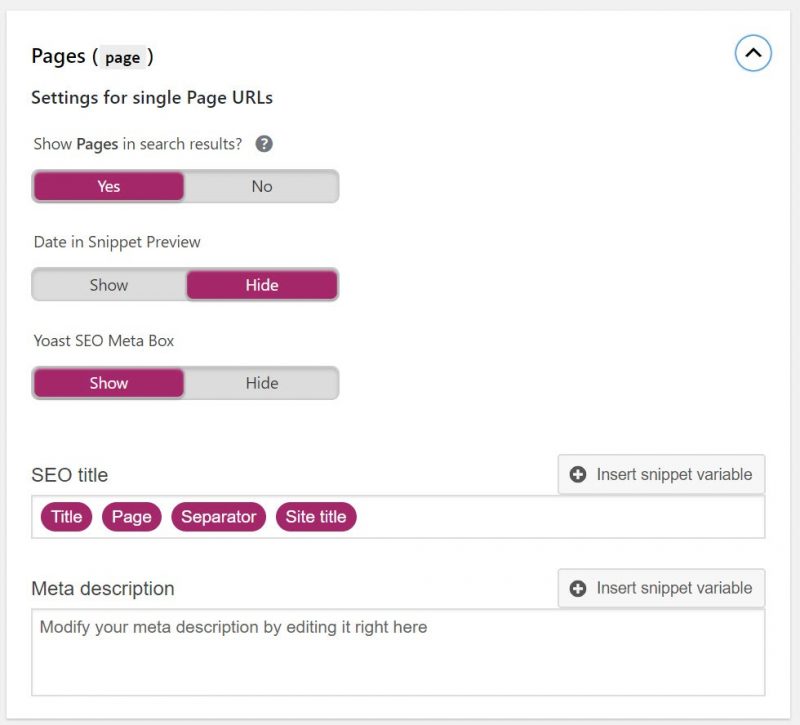
Content Types Tab
The Content Type tab allows you to set the search appearance for any type of content that you have (or plan to have). You can set which types of content should appear in SERP as well as their default descriptions.
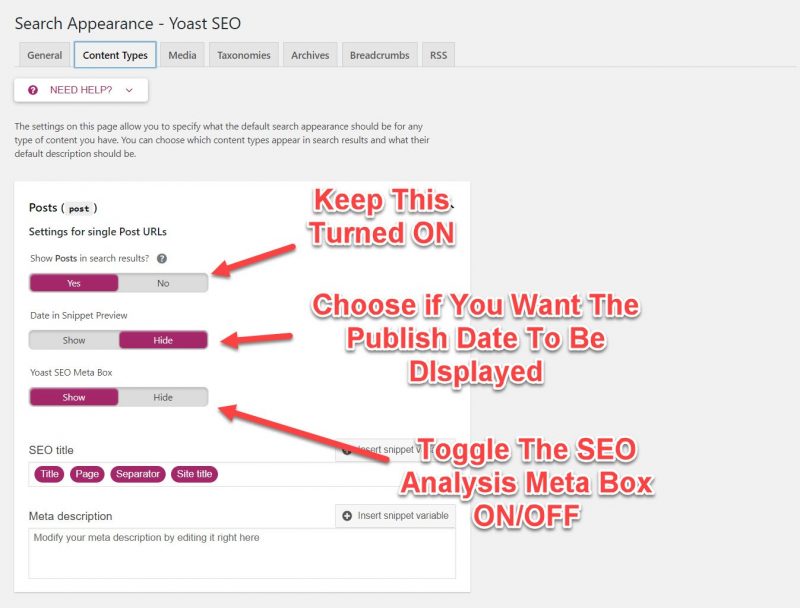
I suggest keeping all three of these switched on (not switched on by default). I presume you want your posts to appear in Google, so keep the first one on.
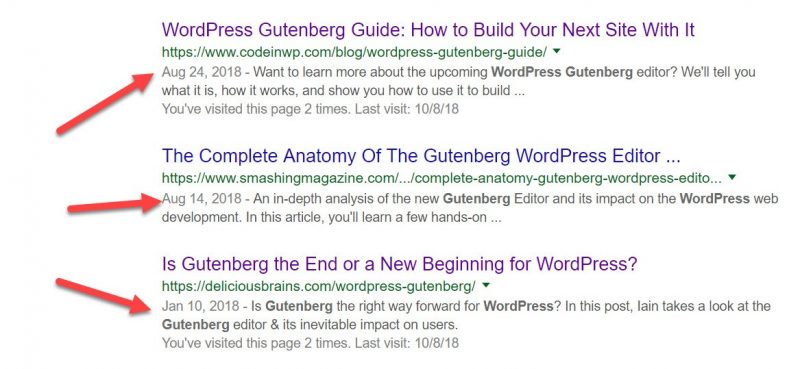
Including the “publish date” in for your site in search engines can signal that the content is fresh and still relevant, which can increase your click-through-rates (CTR).
And the SEO Meta Box will help you optimize content around your target keyword.
Below, you can also set the defaults for your SEO titles and your Meta descriptions. Again, this is how your site is displayed in Google SERP.
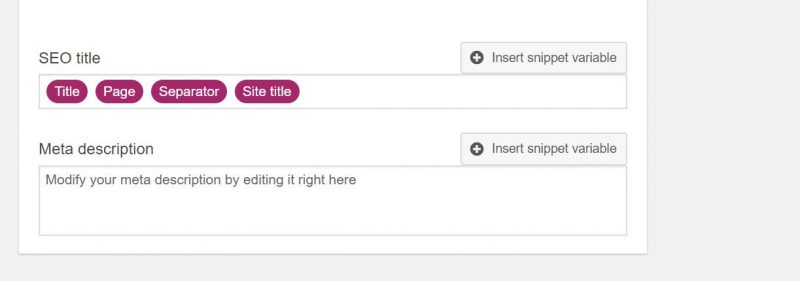
My best advice is to write custom titles and descriptions for each of your posts to keep them optimized and relevant.
But if that’s too much trouble for you, you can also set these defaults and Yoast will generate them automatically for you. Here’s a list of all the snippet variables available in Yoast.
Scrolling down, you can see the same options for your pages. Configure default settings for your pages the same way as with your posts.
Only this time, I’d suggest hiding “publish date” since your pages are not time-sensitive (unlike your posts), and there’s no need to include them.
Each time you upload a new image or video, WordPress will create a separate URL for each file, which may not be super useful for users to see.
Media Tab
The media tab allows you to redirect users to the attachment itself instead of the created URL.
Yoast (myself included) recommend keeping this turned on.

Taxonomies Tab
With taxonomies, you can control how your categories, tags, format-based archives, and URLs are displayed in the search results.

If you use categories to organize your content, it would be a good idea to also allow Google to display them in the search results. So keep toggle on “yes.”
Just make sure to have enough relevant content under each category. Also, optimize your categories around relevant keywords using Yoast’s Meta box.
In this case, you can also make use of the default SEO title and Meta description variables.

Tags, on the other hand, are not at all useful to be displayed in the search engines, so my best advice is to switch off their appearance in SERP.
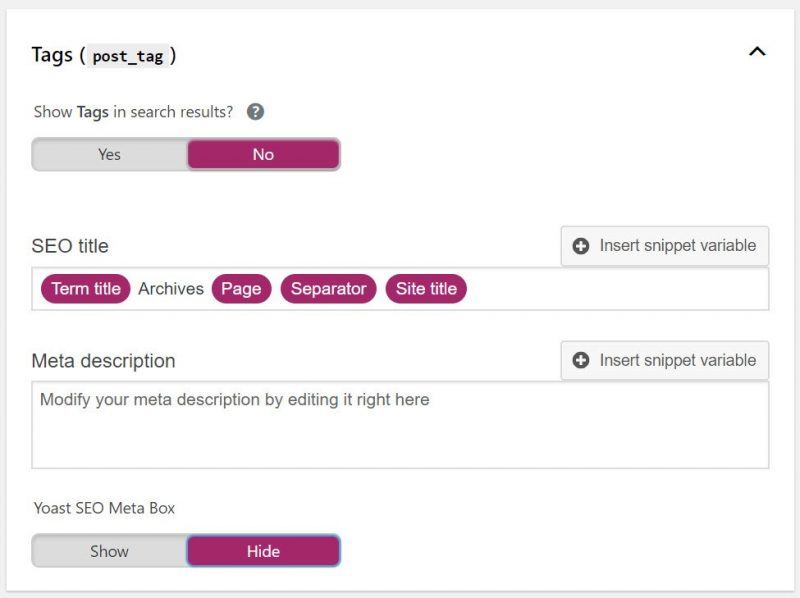
Having them displayed in the search results will cause a lot of duplicated content, which is a bad signal for Google (as mentioned).
The final two options are also best kept disabled since they won’t benefit your site in any meaningful way. The category prefix will only clutter your URLs and won’t help your navigation.

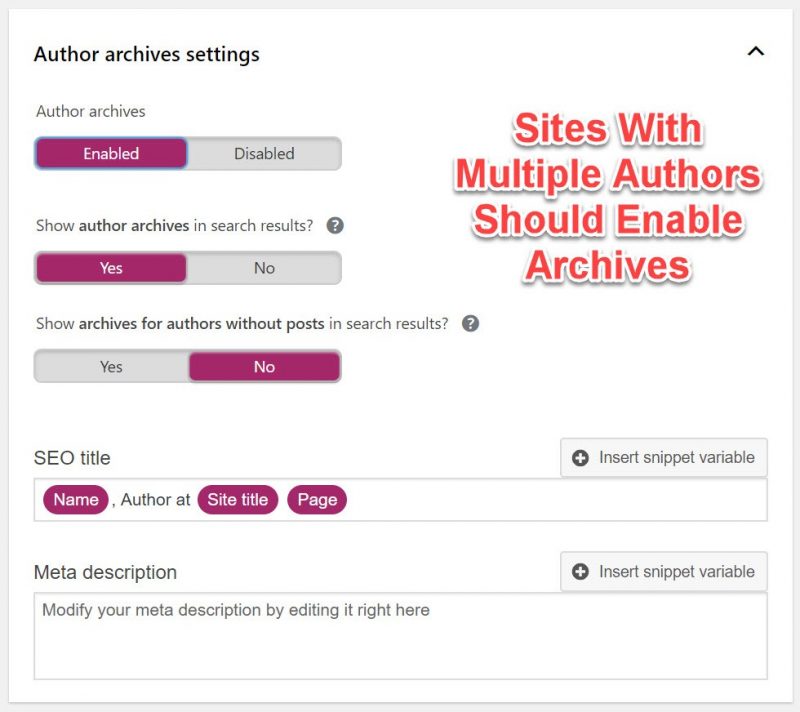
Archives Tab
Next is the archives tab. As mentioned previously, archives are collections of posts created by WordPress itself.
If you only have one person writing all the content, you should disable archives from appearing in search. Yoast will redirect the Author archive pages to the homepage and remove the Author sitemap.

On the other hand, if you have multiple authors working on your site’s content, it makes sense to enable this feature. In that case, you should also customize the sitemap.
Date archives should remain disabled to avoid duplicated content. They are also collections of your content, only this time sorted by date.
One post can fall into multiple archives, author, tag, and date archive, for example. If all of these archives appear in search, Google will see it as duplicated content and bad user experience, which will earn you negative points with Google.
That’s why it’s best to disable archives, or only enabling one that makes the most sense to your site.

If you still want to keep them on, for some reason, mark them as “no index.” This again is to avoid duplicated content.
Simply toggle the “show date archives in search results” to NO.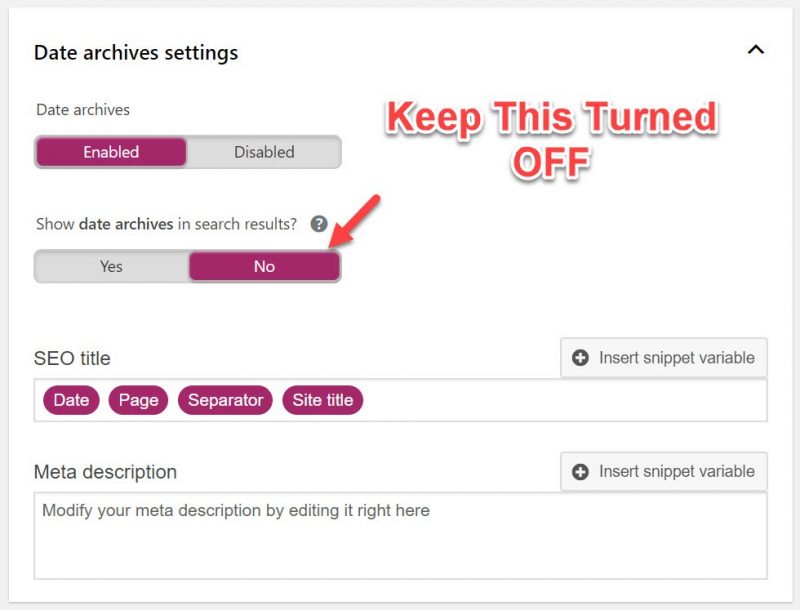
The last two options, “search pages” and “404 pages” by default won’t appear in the SERP, and they shouldn’t. So keep the settings here on default settings.

Breadcrumbs Tab
Yoast gives you the ability to easily create and add breadcrumbs to your site.
Breadcrumbs are the navigational text that appears on top of your content and implies your site architecture.

Google uses breadcrumbs to understand the structure of your site much better, which helps to index your pages.

Follow Yoast’s very own guide on how to optimize breadcrumbs for your site.
RSS Tab
The final tab in this section is the RSS tab. RSS enables users to subscribe to your RSS feed, so every time you post something new on your site, they can stay up to date using their RSS reader apps.
This means you get instant viewers whenever you publish a new blog post.
RSS setting in Yoast exists to protect you from nefarious people that scrap other blogs, and republish their content without even linking back.
What RSS settings do is they add a bit of content to your posts, which scrapers cannot remove automatically. This will lead to these other scraper websites linking back to you, even if they republish your content.
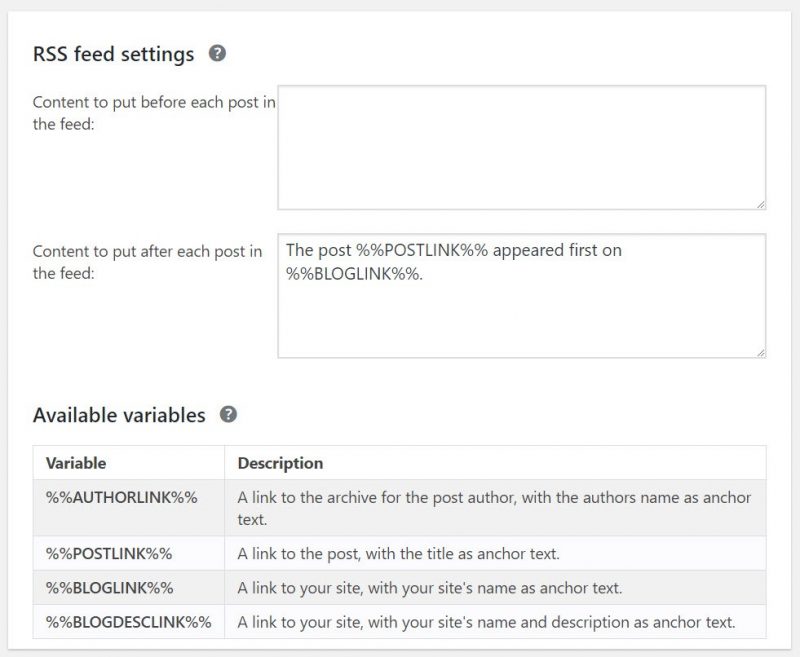
You can leave these settings as default, or if you want even more security, you can add a bit of text both before and after each post in the feed.
Search console configuration
This is another area where you can connect and control your Google Search Console.

If you remember, in the Webmasters Tools you verified GSC with Yoast. And here you need to authenticate it.
Just click on the “get Google authorization code,” then copy and paste it into the box below and click on “authenticate.”
Once you have them connected, Yoast will give you a short overview of crawl errors, taken from the Google Search Console.
Crawl errors happen when Google Bots try to crawl your site to index it, but for some reason, they encounter an error (page not found, server error, soft 404, etc.)

You need to take care of each of these errors and fix them as they may impair the indexation of your site and hurt your rankings.
This is just one of many features available in Google Search Console, you should definitely check out our full guide to learn how to use it for SEO.
Social settings
Social settings allow you to add links to your social media account to help Google understand which profiles are associated with your site.
Now your social media profiles might appear in Google’s Knowledge Graph when someone searches for your brand or related keywords.
Insert URLs for each of your social media profiles and your Twitter handle.

You can also control additional settings for Facebook, Twitter, Pinterest, and Google+.
Facebook settings are probably the most important here.
Enable the Open Graph Metadata because it will display a preview with images and a text excerpt when a link to your site is shared.
This is not only used by Facebook, but other social media use it as well if there’s no Metadata available for their platforms.

You can also add a default image that’s going to appear if you share a post from your site that doesn’t have an image, on Facebook.
Enable Twitter card Metadata to display a preview with images and a text excerpt when a link to your site is shared.

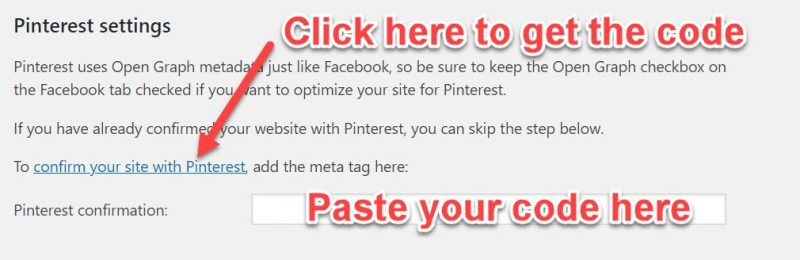
To list your site on Pinterest, follow the link in the settings tab to grab a verification code that you can then paste in the confirmation box.
Ultimately, you can connect your Google+ business page; however, I wouldn’t waste time with it since Google will be shutting down the platform following a huge data breach.
Tools configuration
Yoast also comes with some pretty nifty tools that can make your blogging life easier.
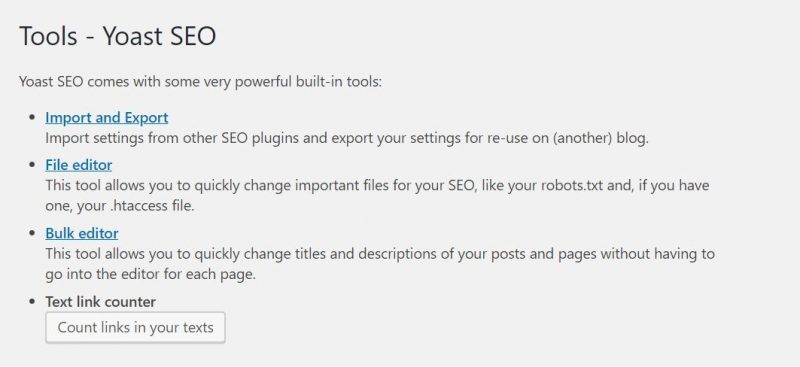
You can use the file editor to create and edit robots.txt and .htaccess files.
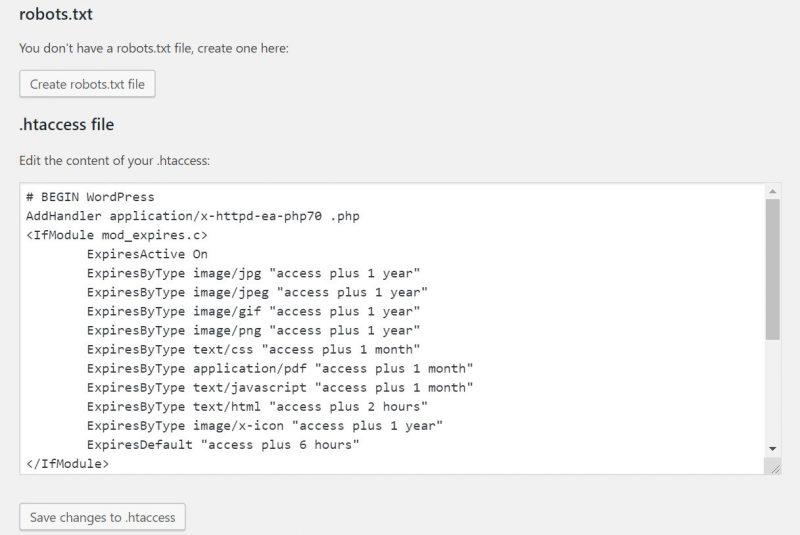
WARNING: Proceed with caution. This part is very technical, so if you’re not familiar with this, please leave it to a professional web development team.
With the bulk editor, you can make changes to several SEO titles and Meta descriptions instead of going one by one.

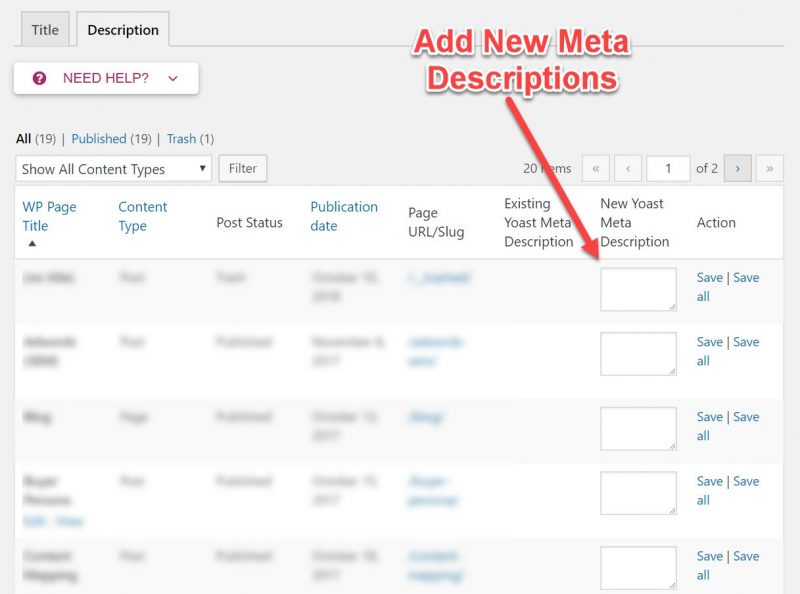
This can significantly reduce your time and effort if you want to make changes to multiple posts.
Last but not least, you can import settings from other users or export your Yoast SEO plugin settings.

While we’re on the subject, you can download our RECOMMENDED SETTINGS and save yourself the hassle of all the setup and configuration.
You can also import settings for other SEO plugins like HeadSpace2, WooThemes SEO framework, etc.
How to do On-page SEO with Yoast
Once you have properly set your Yoast SEO plugin, you can put it to use for your On-page optimization, especially your content SEO.
Most of your day-to-day optimization will be done through the Yoast SEO Meta Box, which you can find at the bottom of each post.
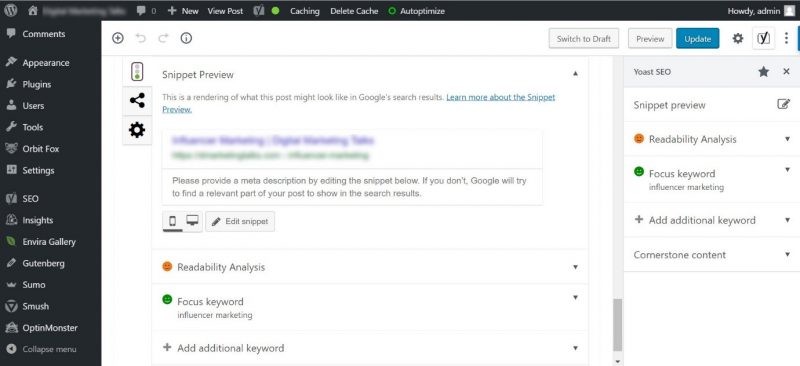
This is where you can find the SEO and Readability analysis, add keywords, mark as cornerstone content, etc.; all the features we mentioned earlier.
Customize your Snippet preview for more click-throughs
You can find the snippet preview on the top of the Yoast Meta Box. Snippets preview allows you to see what your post will look like when displayed in Google search results.
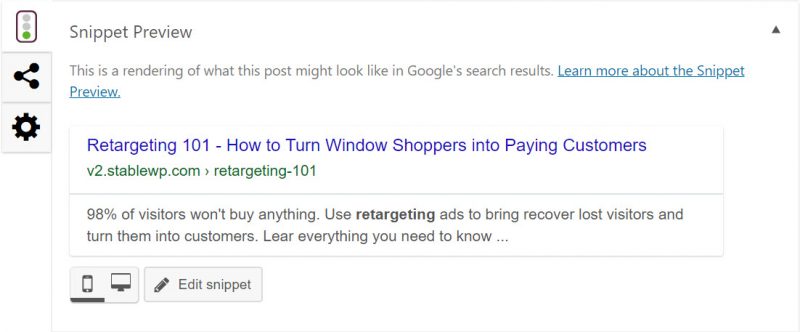
You can see what it would look like on both mobile and desktop devices.
Optimizing your snippets is essential for SEO. They can benefit your SEO twofold.
If you have rich, enticing snippets, more people will click through to your site. So you’ll get all the traffic you can depend on your ranking.
Secondly, if your site is getting more clicks than others on that page, coupled with long enough dwell time, it’ll be a clear signal to Google that you provide high-quality content, and you’ll start climbing up in rankings.
So, let’s optimize your snippets. Click on the “edit snippet” button to open up the editor.

Snippets consist of three elements:
- SEO title – The big text, usually in indigo colour
- Slug – The part of your page URL that identifies your article, appears in green
- Meta description – A short excerpt or a description of your article
You can utilize the defaults that you’ve set in the post settings; however, I would advise you to write custom titles and Meta descriptions for each post.
Good SEO requires keyword research, which you can learn more about in our guide.
Ideally, your title tags should:
- Be around 70 characters long (600 pixels) – more than this and your titles will get truncated
- Include your target keyword – so people immediately see that your post is relevant to their query
- Grab attention – they should stand out, be a click-magnet
- Follow an optimal format (title, separator, site name or brand)
The green bar in Yoast indicates when your title becomes SEO-optimized.

You can use the default slug that Yoast creates, as it’s already in optimal form.
The other crucial part of your snippet is the Meta description. By default, Yoast will grab an excerpt from your post, usually the first paragraph. However, oftentimes this may not be the best solution, which is why I recommend you to write custom descriptions.
Your Meta description should tell users what the article is about and give them a good reason to click through.
- Include keywords – make the description keyword-rich, but be wary of keyword stuffing. Sprinkle in LSI keywords instead
- Use actionable words – learn, find out, get, download, etc.
- They should be up to 155 characters long
- Make it unique
- Meta description should match the content
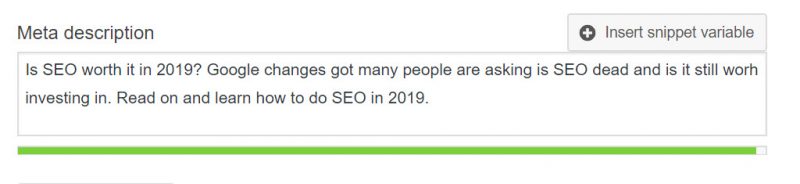
Same as with titles, Yoast will indicate how good your description is when the bar turns green.
Write content users will love with Readability analysis
Content is king! This is why you need to optimize your content not only for search engines but also for humans. After all, they are the ones that will be reading your posts and based on how much time they spend on your site (more is better), Google will perceive your content as high quality and will rank you higher.
The readability analysis in Yoast is supposed to help you write better content for humans. It will monitor your post and grade how readable it is for humans.
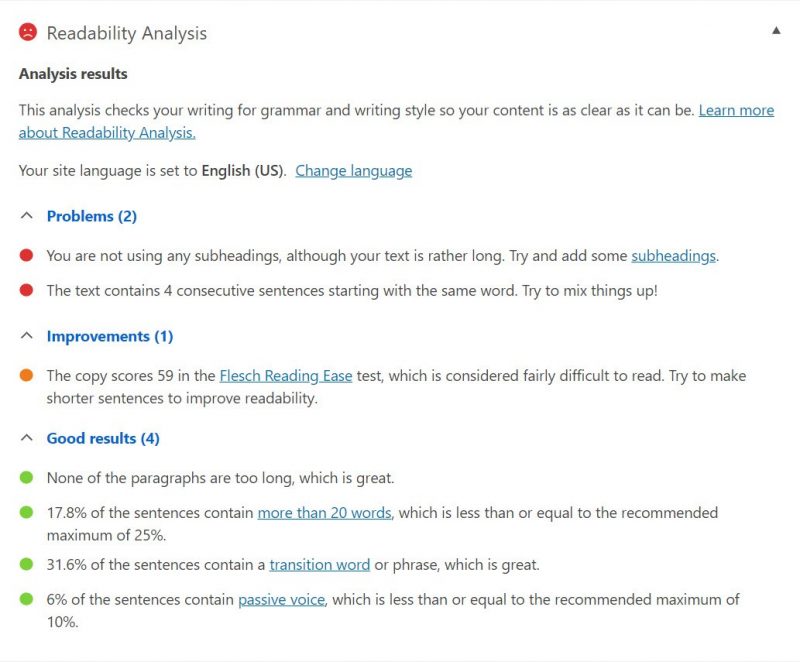
Yoast gives you feedback on the readability of your post. Green dots indicate good results; orange is for the things you could improve to make your content even better. And red dots point out problems with your content that should be addressed immediately.
But don’t be obsessed with getting the perfect score every time. Some of the suggestions will make no sense to you; so don’t dwell on them.
Think of them more as guidelines for writing awesome content your visitors will love.
Optimize for your target keywords with SEO Analysis
This feature is called Focus Keyword in Yoast 8.0 but it does the same thing as before. It analyzes your content based on your target keyword. Yoast checks your keyword density, number of internal and outbound links, image optimization, and many other critical SEO factors.
Similar to the readability analysis, it’ll give you feedback on how optimized your content is around your target keyword, and give you suggestions on what to do to improve it.
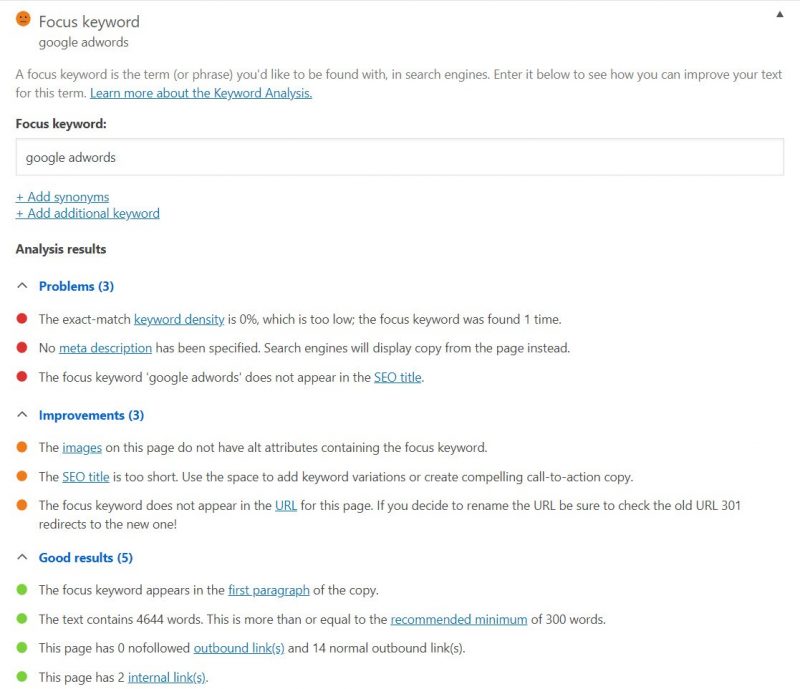
Enter your keyword in the “focus keyword” box and Yoast will grade your article with green, orange, and red dots.

There’s also an option to add keyword synonyms (LSI keywords) and additional keywords to target.
You may want to add these so Yoast can track the use of synonyms instead of just the exact-match keywords. Even so, this is a paid feature only available in the premium version.
A word of caution: Same as with readability analysis, don’t obsess with getting the green dots all the time. The free version only checks for how many times you used your exact-match keyword in the article. If you follow it and try to achieve the recommended keyword density, it may lead to keyword stuffing, which is a bad practice and is penalized by Google.
Highlight key pages with Cornerstone content
Cornerstone content, pillar content, power pages, whatever you may call them; they represent the most important articles on your site. These are usually long, explainer articles you want to rank the highest in SERP.
Yoast allows you to mark any post you want as cornerstone content. This will allow you to easily track these pages or posts and take special care of them.

Pay special attention to internal links that you insert in your cornerstone content. Yoast provides you with a link suggestion tool in their premium version to remind you and recommend whenever there’s a good internal linking opportunity.
Set your post as cornerstone article simply by switching the toggle on the bottom of Yoast SEO Meta Box to ON.

Edit how your posts look on social media
In your Social sharing tab, you can manually set what your content will look like when shared on Facebook or Twitter.
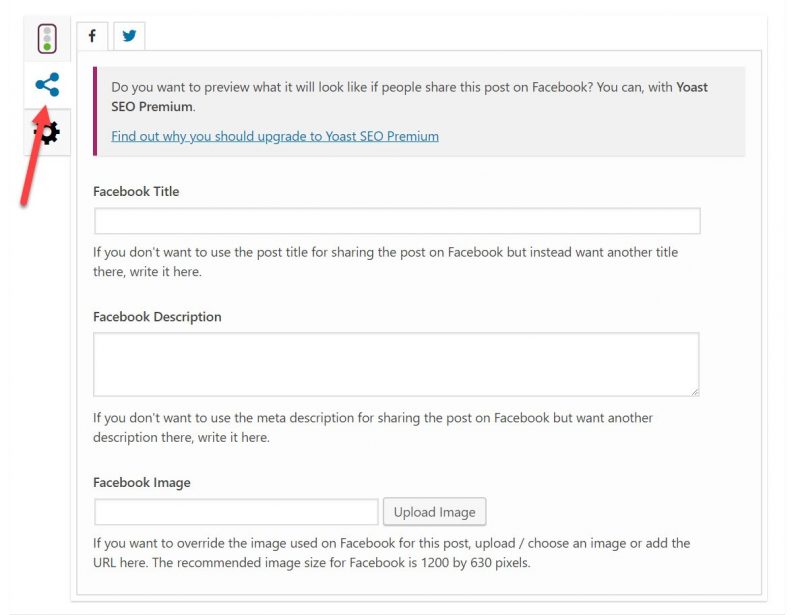
To see a preview of what your post would look like on Facebook and Twitter, you need to sign up for the premium version of Yoast.
If for whatever reason you don’t like the way it looks or you think the audience on these platforms would appreciate something more optimized for them, you can edit your title, description, as well as the image.
Advanced post settings
Finally, there’s the advanced settings tab where you can make some granular adjustments to each of your posts. This is the security feature that you configured in the General > Features settings in Yoast.

You can enable or disable (noindex) posts from appearing in search results, mark links as nofollow, and set Meta Robots settings.
Additionally, you can change your breadcrumbs title and the canonical URL for each post.
This is a bit technical, so unless you have a very good reason, I’d advise you not to tinker with these settings or to ask a developer.
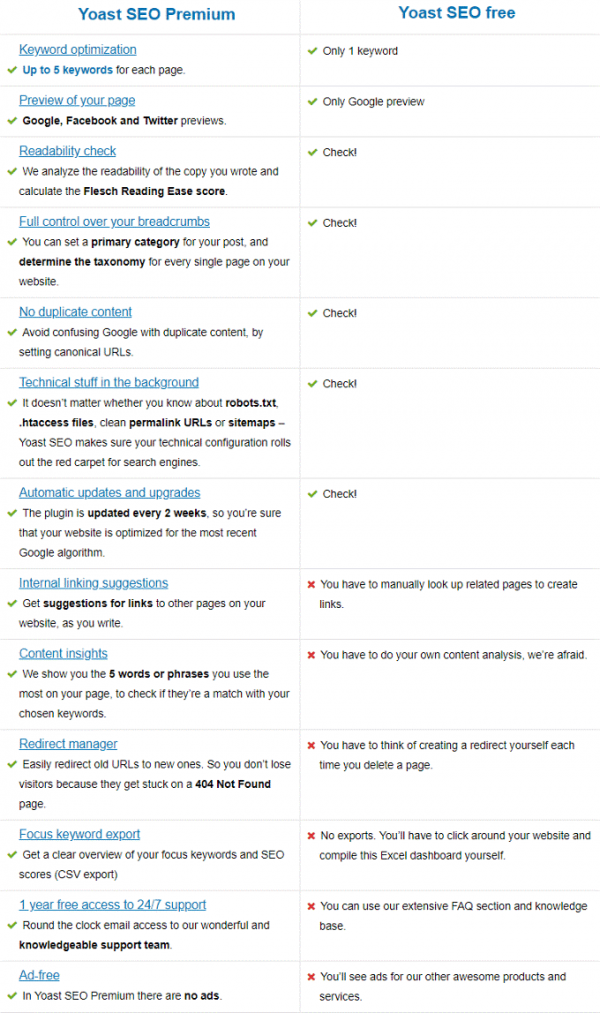
Free Vs Premium
Yoast SEO is one of the most potent SEO plugins, especially considering that you get all of this for absolutely free. But it packs in even more useful features if you opt-in for the premium version.
Avoid 404 errors with Redirects module
When you’re running your site for a while, eventually you’ll delete some pages, move them to another place, modify the URLs, etc. Unfortunately, this can cause crawl errors (which is bad for SEO).
You need to redirect these links manually or have a developer do it for you. But if you get Yoast premium, it can make this job straightforward and simple to do.
For example, if you delete a post, you’ll be asked where you want the existing links to be redirected to.
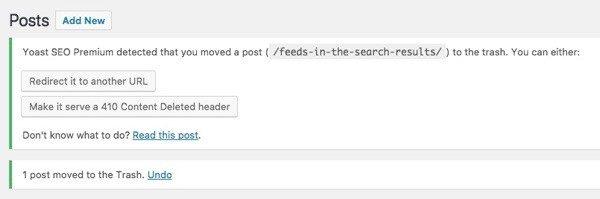
If you change the URL slug, Yoast will automatically redirect to the new URL.
Redirecting can be done with other free plugins as well. Quick Page/Post Redirect is a free plugin you can install for this purpose.
Google Search Console is another free option to can help you with redirects, however, it’s a bit more complicated to use.
Synonyms and secondary keywords
As mentioned in the previous sections, you can add multiple keywords as well as keyword synonyms to better optimize your content.
Google is able to understand the meaning behind words (thanks to the Hummingbird update), so you can sprinkle synonyms and LSI keywords and Google will still understand what the topic and target keyword are.
Unfortunately, the free version of Yoast only tracks the exact match for your target keywords.
Yoast premium, on the other hand, allows you to track up to 5 focus keywords and countless synonyms to better optimize your content for users and Google.
But same as in the free version, don’t insist on getting green dots for everything, rather focus on creating great, valuable content; that’s what gets you ranked on top.
Interlink your content using Internal Linking suggestions
It’s critical that you connect your articles with internal links. This gives structure to your site and signals Google that everything you post is well connected and organized.
Yoast premium will analyze your content and give you suggestions as to which posts on your site you should link to, based on prominent words in your post.
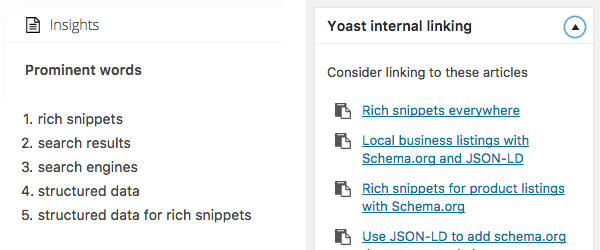
It’s a neat and useful feature, but don’t rely on it completely, use your best judgment and only link to posts that make sense to you. Don’t inject links that may not be useful for your readers.
Social preview
Yoast SEO allows you to edit the way your posts appear when shared on social media. With Social preview you to see what your posts would look like when posted on Facebook and Twitter.
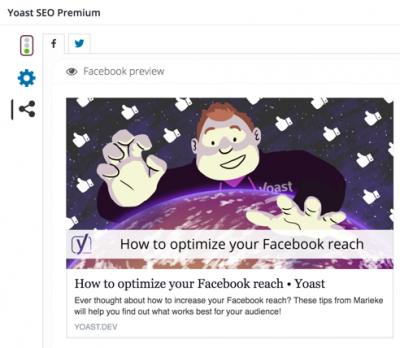
In case you think the default social preview isn’t engaging enough, you can edit and customize for two most popular platforms – Facebook and Twitter.
But don’t get the premium version just because of this. If you upload custom images in the right dimensions (Facebook 1200x630px, Twitter 1024x512px), there’s no need to check, your posts will look great.
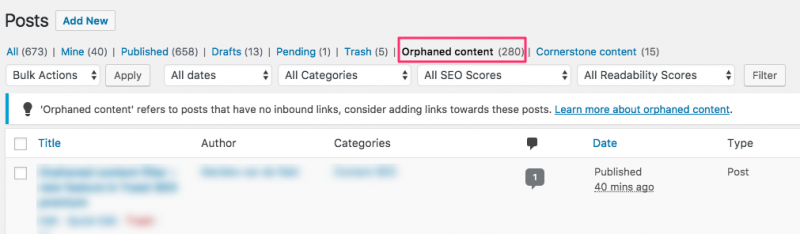
Orphaned content filter
Orphaned content are posts on your site that’s not linked from anywhere else on your site. There are no internal links pointing to this piece of content. And for your articles to rank, they need to be visible to search engines.
However, orphaned content is hard to find for search engine bots, that’s why they might be overlooked, and all the time and effort that went into creating them will go to waste.
Yoast helps you easily find such content and coupled with the internal linking tool, you can optimize this content and make it available for bots to find.
Support
You’ll have access to 24/7 live support for 1 year.
Yoast SEO Premium costs $89. It can make some processes much easier, and you can do most of the work with only one tool. But there are free alternatives available for most of the premium features.
Not even the premium version is going to get your site ranked by itself, you still need to understand the whole process of SEO and what it takes to get to the top, which you can learn about in our blog.
Other premium Yoast products:
- Local SEO –Helps with SEO for local business ($80)
- Video SEO –Allows you to optimize your videos so they appear in search results ($80)
- New SEO for WordPress –Makes it easier to optimize your site for Google News ($80)
- Yoast WooCommerce SEO –Helps you rank your WooCommerce site ($60)
- Local SEO for WooCommerce –Helps you optimize your WooCommerce site for a local area ($150)
Conclusion
Yoast is a must-have tool for anyone running a WordPress site that takes SEO seriously. It’s free, beginner-friendly, yet powerful enough even for professionals.
If you configure Yoast properly, most of its SEO features are set-and-forget. However, if you’re not confident to do it yourself, or don’t want to spend time on it, you can download our optimal Yoast SEO settings and never worry about it again.
But don’t forget to use the Meta Box beneath your posts to optimize your content for something both search engines and real people will enjoy.
If you have any questions, thoughts, or concerns, drop them down in the comments section and we’ll make sure to reply ASAP.
[do_widget id=custom_html-25][/fusion_text][/fusion_builder_column][/fusion_builder_row][/fusion_builder_container]
